Bare spots, voids, fish eyes, divots, pinholes, separations ... no matter what you call them, it's frustrating when your perfect resin pour cures with areas that just didn't take.
I've been there too, so in this article, I'm going over the top 5 most common reasons behind epoxy resin bare spots. I'll show how to fix them and share some pointers to help you prevent them in the future.
Let's get started ...

5 Common Causes of Resin Bare Spots and Separation:
1. Something has repelled the resin
Bare spots often occur when a contaminant on the surface prevents the resin from adhering. Surface contaminants can include:
- Dust, dirt, wax or grease on the surface
- Residue from silicone oil, often from a paint pour
- Sticky film left by tape
- Sap or natural oils in wood
- Wood stain that hasn't dried or that contains oil or wax
- Hand lotion or the natural oils from our hands. This often occurs on the edges from handling the piece.
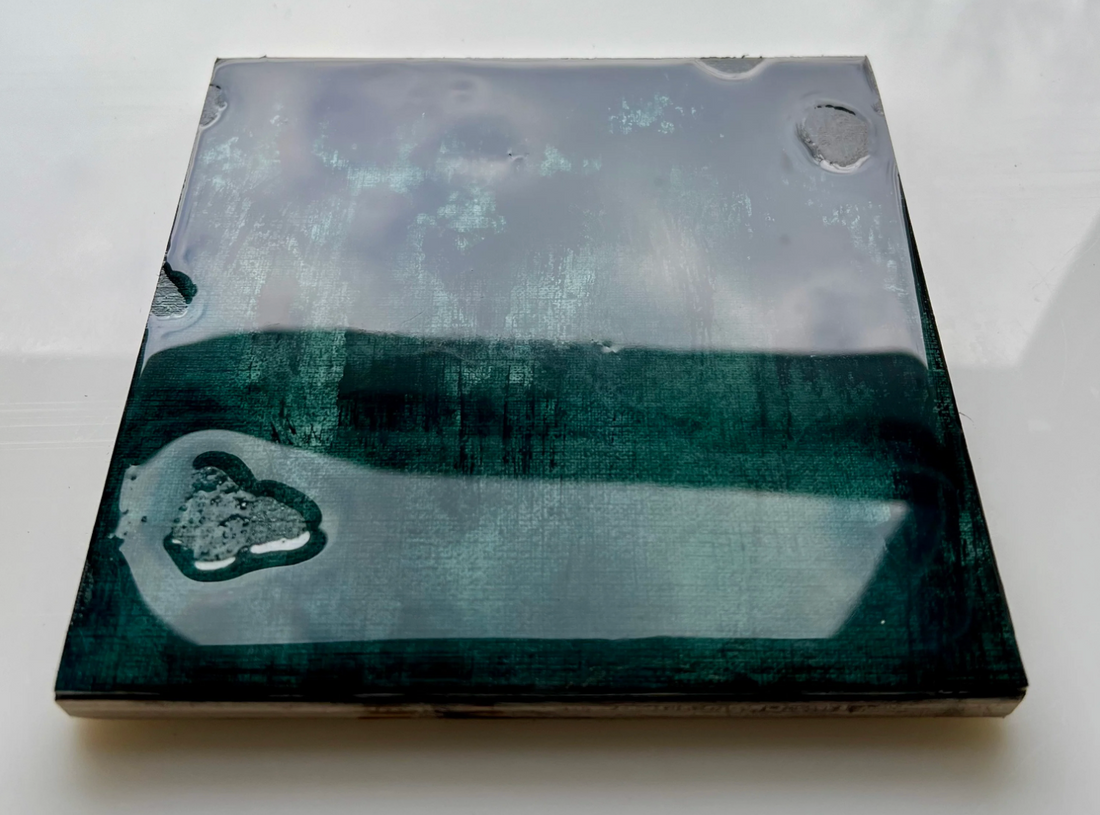
The following piece has bare spots caused by silicone oil.


To fix a resin coat with bare spots, you'll need to clean and sand down the initial layer, and then pour a fresh coat of resin over top.
- First, clean the resin surface thoroughly by wiping it with a soft cloth dampened with a solution of water and grease-fighting soap like Dawn. This will help remove traces of whatever repelled the resin in the first place so it doesn't happen a second time.
- Ensure you wipe it down a second time with a soft cloth and plain water to remove any soap residue.
-
Let the surface air dry completely.
💡 IMPORTANT: Be mindful of the artwork when you're wiping down the resin. For example, acrylic paint can handle getting wet, but something delicate like a paper collage or watercolor painting may not.

Alternatively, you can use isopropyl alcohol for cleaning. Let the surface air dry completely. Same rules apply here - exercise caution using alcohol on certain types of artwork. For example, alcohol can reactivate alcohol inks.

Next, wearing a mask to avoid inhaling resin dust, sand down the cured resin layer with coarse sandpaper. You're not trying to remove the resin; all you want to do is rough up the surface to create tooth for the fresh layer to adhere to.
💡 TIP: Be very careful sanding around bare spots to avoid damaging artwork.

Wipe away the sanding dust with a damp cloth and allow to air dry.
💡 TIP: Remove all traces of sanding residue that may remain on the surface before applying the fresh coat of resin. I find a soft paintbrush comes in handy for this.

Finally, pour a fresh layer of resin over the sanded surface. The scratch marks will be filled in by the resin and the piece will look clear once again.


Cover and cure for 24 hours and reveal - no more bare spots!

2. Not using enough resin to cover the surface
Epoxy resin spreads and self-levels to about 1/8" (3 mm) once poured. However, if you don't mix up enough resin to cover your surface, you'll likely end up with thin or bare spots.
The following piece did not have enough resin poured to cover it.

Luckily, ArtResin has two different calculators to determine exactly how much resin you'll need for your artwork:
i) The Resin Calculator can be used for square or rectangular pieces.
Simply enter the length and width of your surface, in inches or centimetres, and the calculator will indicate how much resin and hardener you'll need and even which kit to buy!
💡 TIP: Keep in mind that the recommended amounts on ArtResin's Calculators are based on a 1/8" or 3 mm layer. If you want to do multiple layers, you'll need more ArtResin to cover the same surface area.

ii) The Circle Calculator works in the same way, but instead of length and width, you'll enter the diameter.

To fix bare spots from not enough resin, you'll need to sand down the cured layer, being careful not to damage the exposed artwork.

Next, consult the resin calculator to ensure you measure and mix enough resin to coat the entire surface.
💡 TIP: If a significant area of your piece is bare, you may need to prepare a little bit more than the calculator suggests. This will help ensure that the bare spots from the first pour are adequately covered.


Cover and cure for 24 hours and your piece will look good as new!

3. Pouring onto a surface that isn't level
Before you mix and pour the resin, make sure the surface is level to ensure even coverage. Epoxy resin will self-level as it cures, but if the surface isn't perfectly flat, gravity will pull it towards the lowest spot, resulting in an uneven cure.
The following piece has an uneven resin cure because it was not sitting level.

I deliberately positioned this piece to sit unevenly so I could show the resulting effect.


To fix a resin cure that isn't level, you'll need to sand down the first layer of cured resin, being careful not to damage the artwork along the bare spots. Then wipe away the sanding dust.

Ensure your piece is perfectly level before you pour. You don't want the same thing to happen twice.

Apply another layer of carefully measured and mixed ArtResin overtop. Again, if there are large areas with no resin, you may need to prepare slightly more than the Resin Calculator calls for.


Once cured, your piece will be level - you'll never know there was an issue the first time.


4. Pouring onto a stretched canvas
Epoxy resin is heavy. When poured onto a stretched canvas, the weight can cause the material to sag, with the resin pooling in the center. This is especially true when pouring a large quantity of resin over a big canvas, or pouring onto a lower quality, less taut stretched canvas.
I poured an even layer of tinted black ArtResin on this canvas to demonstrate. Sure enough, the canvas sagged and the resin sank to the lowest point as it cured, resulting in bare spots and a thick, opaque center.


To fix bare spots on a stretched canvas, you'll need to sand down the resin surface, taking care not to damage the bare canvas along the edges. Remember, the idea is rough up the surface, not to remove the resin. I used an 80 grit sandpaper in the center where the resin was deep and, to be on the safe side, I used a 180 grit where the resin was thin.

Measure and mix a fresh batch of ArtResin. You may want to prepare slightly more than the Resin Calculator calls for if there are a lot of bare spots. Apply the resin, taking care to cover the bare edges.

Depending on how badly the canvas sagged, you may have to repeat this step if the resin is still thin around the edges, as it is below.

Cover and cure. You have to do a couple of repours, but you'll eventually end up with a level, even resin layer like this:

To prevent bare spots from happening next time, try brushing on a very thin coat of resin to the back of the canvas and let it cure. This will stiffen up the canvas to help prevent it from sagging. Next day, once the resin has hardened, apply the resin to the front of the piece as usual.

You can also support the canvas by inserting a piece of cardboard cut to size and fit into the back opening of the piece.

Of course, your best bet is to work on wood panels. Resin artists love cradled wood panels for their crisp edges and modern look. They're available in a number of sizes, depths, shapes, and price points. Most importantly, wood panels are sturdy, strong, and will not sag under the weight of the resin.

5. The resin soaked into the substrate
If you're pouring resin over a porous surface, like wood or terracotta clay, you may notice that instead of sitting on top, the resin soaks in and creates bare spots. This is particularly common when pouring over wood: you may have areas where the resin cures perfectly and bare spots over areas with knots or cracks.
The following piece ended up with bare spots where it soaked into the cracks and dark knotty areas.
To prevent resin absorption, it's a good idea to seal wood prior to resining. This creates a barrier to ensure the resin sits on top instead of soaking in.
To fix bare spots due to resin absorption, you'll first need to sand down the cured resin. 
Next, clean off the sanding residue. If there are holes or cracks in the wood, I like using a brush or a can of compressed air to remove sanding dust trapped in the nooks and crannies.
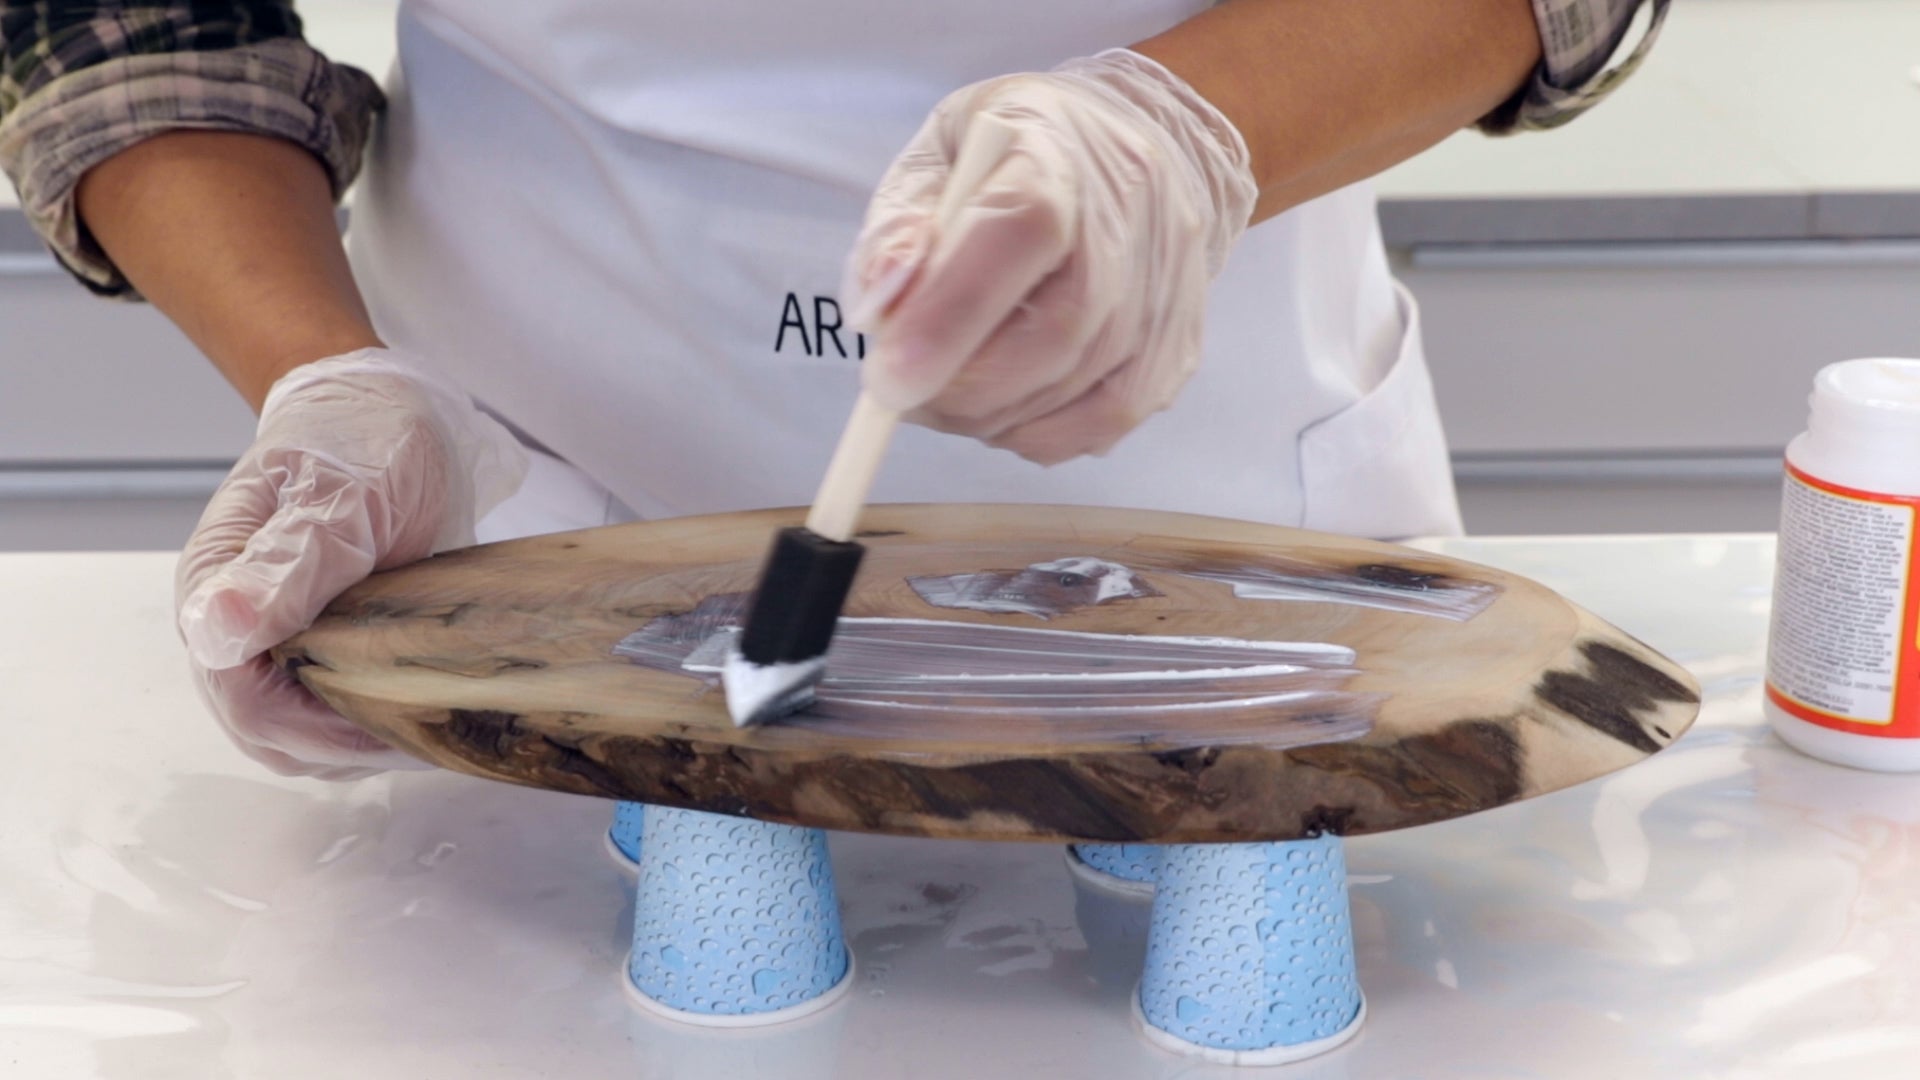
Next, apply a very thin coat of resin with gloved hands over the entire surface, taking care to cover the bare spots. If the resin continues to absorb into the wood, you may need to sand and repeat this step until the wood is saturated and allows the resin to sit on top.
Once cured, sand the resin down again and apply a final top coat.
Cover, allow to fully cure and your board is ready for serving.
💡 TIP: ArtResin is food safe once fully cured: this means it has to cure for 72 hours before you put your project into use.

Top 5 tips to prevent epoxy bare spots, fish eyes, pinholes, and separations:
- Ensure your artwork is clean before you resin. Wear gloves when handling your work to avoid surface contamination. If you've used silicone oil, wipe the dried painting with warm soapy water or isopropyl alcohol and a soft cloth to remove oil residue. Let the piece dry completely before applying resin.
- Use ArtResin's Resin Calculators to ensure you're preparing enough resin to coat your artwork.
- Use a level to check that your work is sitting perfectly horizontal for an even cure.
- Opt for wood panels when possible. If you resin over a stretched canvas, stiffen the canvas with a thin coat of resin on the back and add a piece of cardboard to the back opening for extra strength and support.
- Seal porous surfaces that may absorb the resin.
We hope that helps explain why bare spots occur, how to fix them, and how to prevent them from happening in the future. Feel free to ask any questions in the comments below.
Do you want to learn more about troubleshooting epoxy resin? Read our guides:
ArtResin’s Troubleshooting Guide
Tips To Prevent Bubbles
Can I Fix Small Imperfections In My Resin?
Is It Possible To Over Stir My ArtResin?
How Do I Remove Epoxy Resin Drips?
Is It Possible To Over Torch My ArtResin?
Epoxy Resin Not Hardening
How To Prevent Bendy Resin
How To Fix Soft, Sticky Spots In My Resin
How Can I Avoid Getting Dimples In My Epoxy Resin?
How To Reduce Dust Before Your Resin
How Can I Get Rid Of Bubbles In My Cured Resin?
How Can I Prevent Dust In My Epoxy Resin?
How Can I Deal With Epoxy Resin Drips After They've Dried?
What Happens If I Overtorch Resin?
Why Is My Resin Cloudy?
Why Is My Epoxy Resin Still Sticky?
What Does Silicone Do To Resin?
ArtResin: The Original Epoxy For Resin Art.
