Coating a large photo print in thick, glossy epoxy resin gives it a sleek, modern look you just can't get from traditional framing. Epoxy resin takes photos from good to gorgeous, saturating the colour and adding depth and shine for a gallery worthy aesthetic.
Though the idea of coating a large format print may seem daunting, the process of applying ArtResin epoxy is the exactly same whether your piece is large or small. Photographer Silviu Agotici recently finished off a large photo print with a coat of ArtResin.
Let's take a look ...

Step 1: Mount Print With Spray Adhesive
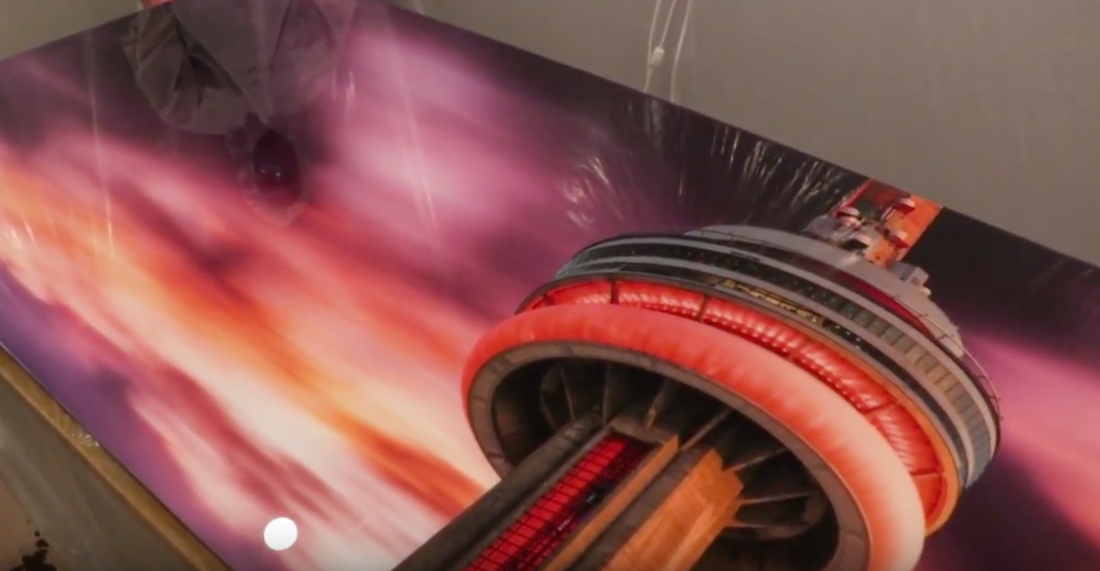
Silviu Agotici captures urban life through landscapes and city scenes snapped all over the world, including this stunning shot of Toronto's CN Tower taken from the roof of a downtown apartment building. Silviu had the image made into a digital chromogenic dye print which he then mounted onto aluminum composite using 3M spray adhesive.

Step 2: Ensure Print Is Free Of Dust And Debris
Propping the print up and off of his work surface, Silviu removed any surface dust using a can of compressed air and wiped the print down with a lint free cloth to remove any smudges or fingerprints.


Step 3: Prepare ArtResin According To Label Instructions
Next, Silviu mixed up enough resin and hardener to cover his 70x31 print, in two separate containers for ease of use, scraping the sides and bottom of his mixing vessels as he stirred.
ArtResin is an easy to use 1:1 epoxy resin, meaning it requires equal parts of resin and hardener measured by volume. Stirred for 3 minutes, it allows you approximately 40 minutes working time before it gets too thick to spread.
💡 TIP: Not sure how much ArtResin you need for your project? Simply visit our Resin Calculator and enter in the dimensions of your artwork to find out exactly how much resin and hardener you need for an approximate 1/8" layer.

Step 4: Pour And Spread The Epoxy Resin Over The Print
After he had thoroughly mixed for at least 3 minutes, Silviu poured and spread the resin directly on top of his photo print, allowing it to run off the edges. He did not use a sealant. Glossy photo paper does not generally require a sealant as its shiny surface allows the resin to sit on top without absorbing. However, for matte photos (which may absorb the resin) or if you simply want to err on the side of caution, you can certainly seal your photo using a spray sealant marked safe for photos.
💡 TIP: We always recommend testing your particular materials out with ArtResin on a test piece so you know exactly what to expect before you resin your final project.


Step 5 - Torch Out Bubbles


Step 6: Allow Resin To Cure For 24 Hours
⚠️ PLEASE NOTE: ArtResin is recognized by the American Society for Testing and Materials (ASTM) as meeting safety standard D-4236: Safe for Home Use when used in a well ventilated area.
The enclosed dust tent that Silviu created is a good example of an area that would NOT be considered well ventilated (you can see this in parts of his photos.) As such, he took the necessary precaution of using a respirator. Please ensure you wear a respirator in a non-ventilated area. Of course, feel free to wear a respirator in a well-ventilated space if you wish.
The end result is a vibrant, glossy, professional looking piece of artwork that would look equally good at home or hanging on a gallery wall. Whether it's a painting or a photograph, ArtResin epoxy resin provides that gorgeous, shiny clear coat that takes artwork next level.

Special thanks to Silviu Agotici for sharing his work with us!
To see more of Silviu's gorgeous photography:
Visit his website: www.silviuagotici.com
Follow him on Instagram: @sagotici
Looking for more resin art tutorials? Check out our blogs below:
- Introduction To Resin Art
- How To Create A Resin & Glass Mosaic
- How To Create A Resin Mixed Media Painting
- How To Make a Resin Window Painting
- How To Resin Your Home Wall Decor
- How To Resin A Glossy Photo
- How To Make Resin Geode Art
ArtResin: Made For Artists, by Artists.
