Serving trays come in many different shapes and sizes but the best ones are ones that you make by hand! And it's so rewarding to customize them to suit your style and flare. Whether you’re working with metal, wood or another substrate, ArtResin provides endless possibilities when designing your very own serving tray.
Serve up a conversation piece!
Mixed media artist and YouTube influencer Dan Rodo has been working with resin, creating anything from resin apples to vintage cameras. Recently he stopped by the ArtResin HQ to experiment and guide us step-by-step in creating 2 customized metal trays.
Take a look on our step-by-step instructions on how to create a resin tray.
Here's what you'll need:
- ArtResin epoxy resin
- metal trays
- ResinTint liquid colorants
- sprinkles
- silicone star tray
- glue gun and glue sticks
- Sheathing tape, such as Tuck Tape or Tyvek Tape
- foam core
- a marker
- scissors and/or X-acto knife
- A pair of nitrile gloves, a stir stick and spreader
- plastic mixing bucket
- small plastic cups and craft sticks, enough for each color of tint
- a plastic drop sheet to line your work surface
- an Artist's Torch
- a dust cover large enough to cover your piece
Browse our resin art accessories & tools!
Assemble Your Materials Before You Start
Gather your tools so that everything is at hand before you start, including your dust cover.

Keep your background in mind when composing your design and choosing your color palette: for example, if your background is white, you can get away with translucent colors whereas a dark or metallic background will get best coverage from opaque colors.
Making A Sprinkle Tray

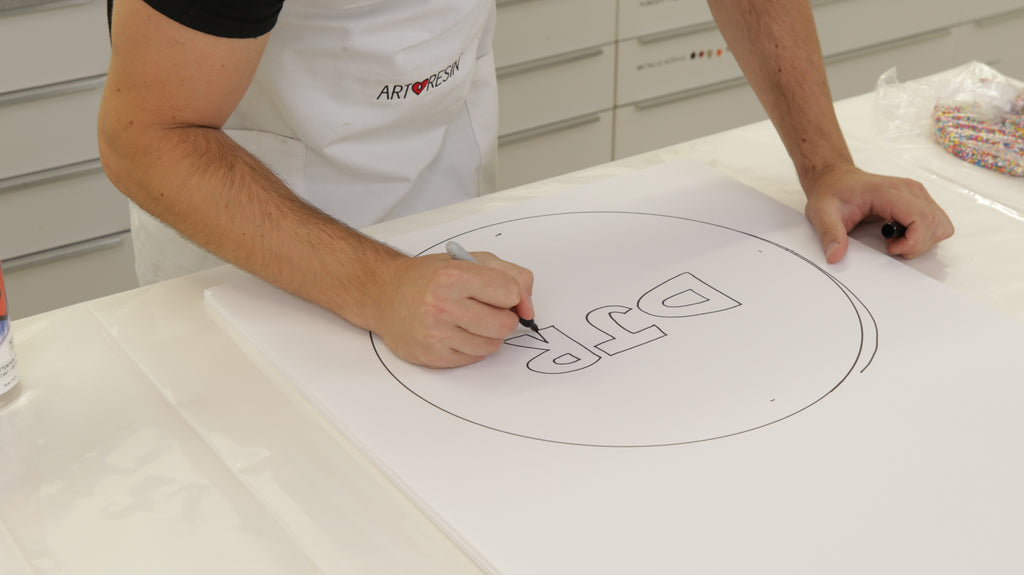
1. Make a Mold
Grab a piece of foam core and, using the marker, trace the circumference of the tray. Knowing the size that you’ll be working within, outline your initials in big block letters.
Using the X-acto knife, cut out the letters from the foam core and trim them nice and smooth with the scissors.

Using those letters, trace and cut them out once again. Try to clean them up as much as possible but don’t worry if they don’t perfectly match—you just need the extra pieces for height.
Grab your glue gun and glue the same letters together in order to provide more height when pouring your resin. Place the best looking letter on top as the resin pour will follow that pattern and we want it to look good!

Next up, take the Tuck Tape and cover the foam core letters as the ArtResin won’t stick to the tape. Try to make it as smooth as possible so that the shape of your mold will be clean and impressive. Be sure to cut out any small holes within each letter such as in the ‘D’ and ‘R’.

Now take your letter that will be in the middle and center it to the tray. Glue it down and place the remaining letters accordingly. Once complete, you have essentially created a mold to help you shape the resin.

2. Measure and Mix Your ArtResin And Tints
Now it’s time to grab your ArtResin and start mixing. First you’ll want to determine how much resin you will need. ArtResin has made it easy for you to calculate with our new Circle Calculator. Simply measure the diameter of your circle art piece, go to artresin.com/circle, punch in that number and select the units.
Once you’ve determined the amount required, measure equal amounts (by volume) of resin and hardener and mix thoroughly for at least 3 minutes. Scrape the bottom and sides of the mixing container as you go.

Next, grab your ResinTint bottle and shake well. Use a few drops to tint the resin, mixing well to achieve the color you wish to use.
Dan used black for his tray and filled the holes with sprinkles after 24 hours.
ResinTint is a highly saturated pigment based colorant, so it's always best to start with less than you need, adding more as necessary. Check the transparency by using the mixing stick to pull some of the tinted resin up the side of your cup: if the tint is too translucent, add a little more until you're happy with what you see.
💡TIP: No matter which colorant you choose to use, don't add more than 6% of the total combined volume of resin and hardener. Adding more than 6% will throw off the delicate balance required for the resin and hardener to cure, and you may end up with resin that doesn't harden.
3. Pour The Resin
Finally it is time to pour the tinted ArtResin into the tray. Be sure to pour all around the letters and into any small holes. The top of the letters should still rise above the resin to help remove them the following day.

4. Torch, Cover And Wait
Lightly run a torch over your design to remove any bubbles. Cover your piece with a dust cover and allow your piece to cure for 24 hours until it's dry to the touch.
Learn more about how to torch resin!
5. Remove The Letters
Now that the resin is hard to the touch, you can safely remove the tape covered letters from the tray. Use any tools you have available but once you get under the tape you should find it quite easy to lift and remove.

6. Measure, Mix and Pour
Once again, determine how much resin you will need and measure equal amounts (by volume) of resin and hardener and mix thoroughly for at least 3 minutes.
Now it is time to introduce the sprinkles. Sprinkles tend to sink to the bottom of the mixture so be sure to add more than you think you need and mix them up.

Pour the rainbow colored resin into the open letters.

Learn more about how to pour and spread resin.
7. Torch, Cover And Wait
Run the torch over your letters, cover your piece with a dust cover and allow your piece to cure for 24 hours.

8. Top Coat
After 24 hours you should have a near perfect tray. We highly recommend one more small step to ensure a perfectly level, perfectly clean resin tray—a top coat of ArtResin.

You may find that some of your shapes or letters are not perfectly even. The best way to take care of this is to sand down the top of the tray. It will get all scratchy and dusty but that’s ok. Wipe off the dust and pour one more thin coat of ArtResin. The scratches will disappear and the tray will be universally level.

Wait just one more day and you will then have your brand new custom serving tray.

Making A Silicone Star Tray
Silicone is fantastic to work with when using ArtResin. Nothing sticks to silicone so you can use all sorts of shapes and letters to create patterns in your tray.

1. Prep Your Pattern
Grab your silicone mold and cut out your shapes individually. Place them all around the tray in the pattern you find most appealing.

💡TIP: When working with silicone sometimes you have to think outside the box as nothing tends to stick to it. This makes keeping your shapes in one place difficult. Dan tried gluing, taping and other tricks to try and lock the molds into place but nothing was working. In the end, he weighted the silicone cut outs with stones and that seemed to do the job.
2. Measure and Mix Your ArtResin And Tints
Once you’ve determined how much ArtResin you need by using our new Circle Calculator, measure equal amounts, by volume, of resin and hardener and mix thoroughly for at least 3 minutes. Scrape the bottom and sides of the mixing container as you go.

Grab your ResinTint bottle and shake well. Use a few drops to tint the resin, mixing well to achieve the colour you wish to use.
Dan used Metallic White for this tray.
3. Pour The Resin
Pour the tinted ArtResin into the tray. Do not submerge the shapes in resin.

4. Torch, Cover And Wait
Lightly run a torch over your design to remove any bubbles. Cover your piece with a dust cover and allow it to cure for 24 hours.

5. Remove Shapes
Now that the resin is hard to the touch, you can safely remove the silicone shapes. The silicone will pop right out of the resin - very satisfying!

6. More Resin Mixing and Pouring
You should be a resin measuring, mixing and pouring expert by now. Repeat the same process to get your proper mixture and divide into smaller cups if you plan to use multiple colors.
In this case, Dan put a little bit of resin in a cup to mix some red for a single star. He mixed the rest with Metallic Gold and poured that into a squeeze bottle to avoid unnecessary drips.

Pour the tinted resin into your shapes, filling as close to the top as you can.

7. Torch, Cover And Wait
Torch your resin if necessary, cover your piece with a dust cover and allow your piece to cure for 24 hours until it's dry to the touch.
8. Final Top Coat
After everything has cured, you may find that some of your shapes are uneven. The best way to take care of this is to sand down the top of the tray. It will get all scratchy and dusty but that’s ok. Wipe off the dust and pour one more thin coat of ArtResin. The scratches will disappear and the tray will be universally level.

Wait 24 hours to see your brand new custom serving tray.

Have you created your own resin serving tray?
We'd love to hear - let us know in the comments below!
To see more of Dan's work:
Visit his YouTube page:
TheDanocracy
Follow him on Instagram:
@danocracy
ArtResin: Made For Artists, By Artists.
Do you want to learn more resin art projects? See below our how-to tutorials.
- Introduction to Resin Art
- How to Make an Epoxy Resin Tumbler
- How to Resin a Coaster
- How to Make a Pen Blank
- How to Create Resin Petri Dish Art
- How to Make a Charcuterie Board
- How to Make a Tiered Resin Tray
- How to Make Resin Flower Coasters
- How to Resin a Puzzle
- How to Resin a Board Game Table
- How To Make Resin Flower Coasters
- 20 Resin Art Ideas
