
Learn how to create your own copper cuff bracelet, hand painted with alcohol ink and sealed with a thin coat of epoxy resin. Artist Sue Board prefers working with copper blanks because they're malleable to bend into a cuff shape. A base coat of white, glossy primer provides the same effect as yupo paper, allowing the alcohol ink to maintain its bright color. ArtResin's crystal clear finish brings the jewelry to life, providing a shiny, protective coating. The result is a one-of-a-kind piece of wearable art with an intense depth of color and a look reminiscent of stained glass.
In 4 steps, Sue walks us through the supplies you'll need, with step-by-step video instructions on how to create your own hand painted, copper cuff resin bracelet.
Let's get started!
Materials
4 steps
30 mins (plus cure time)
- copper cuff blanks (available online or at craft stores)
- white, glossy spray primer for metal
- alcohol ink in 2-3 colors that blend well together
- a fine tip paintbrush
- paint pots with caps for holding the ink (available online or at craft stores)
- canvas board
- painter's tape
- ink cleaner in a small plastic cup
- ArtResin (each bracelet requires 1/4 fl oz. mixed resin)
- disposable gloves
- plastic cups for measuring and mixing
- stir stick
- torch
- plastic container to use as a dust cover
- bracelet bender

Step 1 - Assemble Your Materials
Prime the copper blanks using a white spray primer that will adhere to metal. Use a smooth, glossy primer that replicates the smooth, glossy surface of yupo paper. Allow to dry thoroughly, for at least 3 hours, to prevent any chance of the alcohol ink from absorbing into the primer.


Place a piece of painter's tape, sticky side up, onto the canvas board. Tape down both ends with painter's tape.
Mount the cuff onto the sticky painter's tape to hold it in place while you paint.


Pour a little of each of your alcohol ink colors into small, lidded paint pots. These make an ideal place to store your alcohol ink while you work. Not only can you create your own custom blends right in the pot, but they are air tight and will prevent the alcohol ink from drying out - if it does evaporate, you can simply add a little more ink to re-animate it.
💡TIP: When making custom color blends, take note of how many drops of each color you add so it’s easy to reproduce.
Keep a small cup of ink cleaner close by while you work. Clean your brush often, not only between ink colors but every time you load your brush up with ink. Since the alcohol evaporates so quickly, the ink can get thick and pasty in the brush. Keeping the brush clean will ensure your alcohol ink stays fluid. 
Step 2 - Paint Your Design
We're ready to paint! You can paint one or two bracelets at a time, painting each one in a pattern as simple or as detailed as you like. Repeating geometric shapes, such as circles, squares, or rectangles, is an easy and interesting pattern.
Sue's advice: Start with an idea in mind and let it unfold. Work with how you feel and how the colors are working together. Remember, it doesn’t need to be perfect.
Starting with the darkest color you've chosen, apply a few circles or squares as your base layer.
💡TIP: avoid black ink as it has a tendency to overpower the other colors.

Repeat the pattern with successively lighter colors, following the shape of the circles and squares. As you paint, the colors will blend and if you choose your colors well, the results are beautiful.


Repeat the pattern until you've filled the space. If you have any white showing, you can either blend and drag the colors beside the white area to fill it in or you can add a lighter color ink to cover it up. 
Let the ink dry for 6-8 hours before you apply the resin.

________________________________________________________________________
What if you're not happy with your design? You can wipe it away and start again, but try to wipe it off in just one swipe or you may end up removing the primer. Keep in mind you may still see the ink colors you've been using, so you may find you'll have to re-prime and start from scratch. Most often, it's easier to work with your mistakes. Sometimes it's best to leave the piece to dry, come back another time and re-work it: add more colors, take color away, or blend so that the lines aren’t as defined.
_________________________________________________________________________
Step 3 - Apply The Resin
Wearing gloves, measure equal amounts of resin and hardener in a plastic cup.
Mix for 3 minutes, scraping the sides and bottom of the mixing cup as your stir.
Pour a strip of resin down the middle of the cuff, using an old paintbrush to push the resin right out to the edges without going over the sides. Instantly, you'll see that the colors become brighter and more intense as soon as the resin is applied.
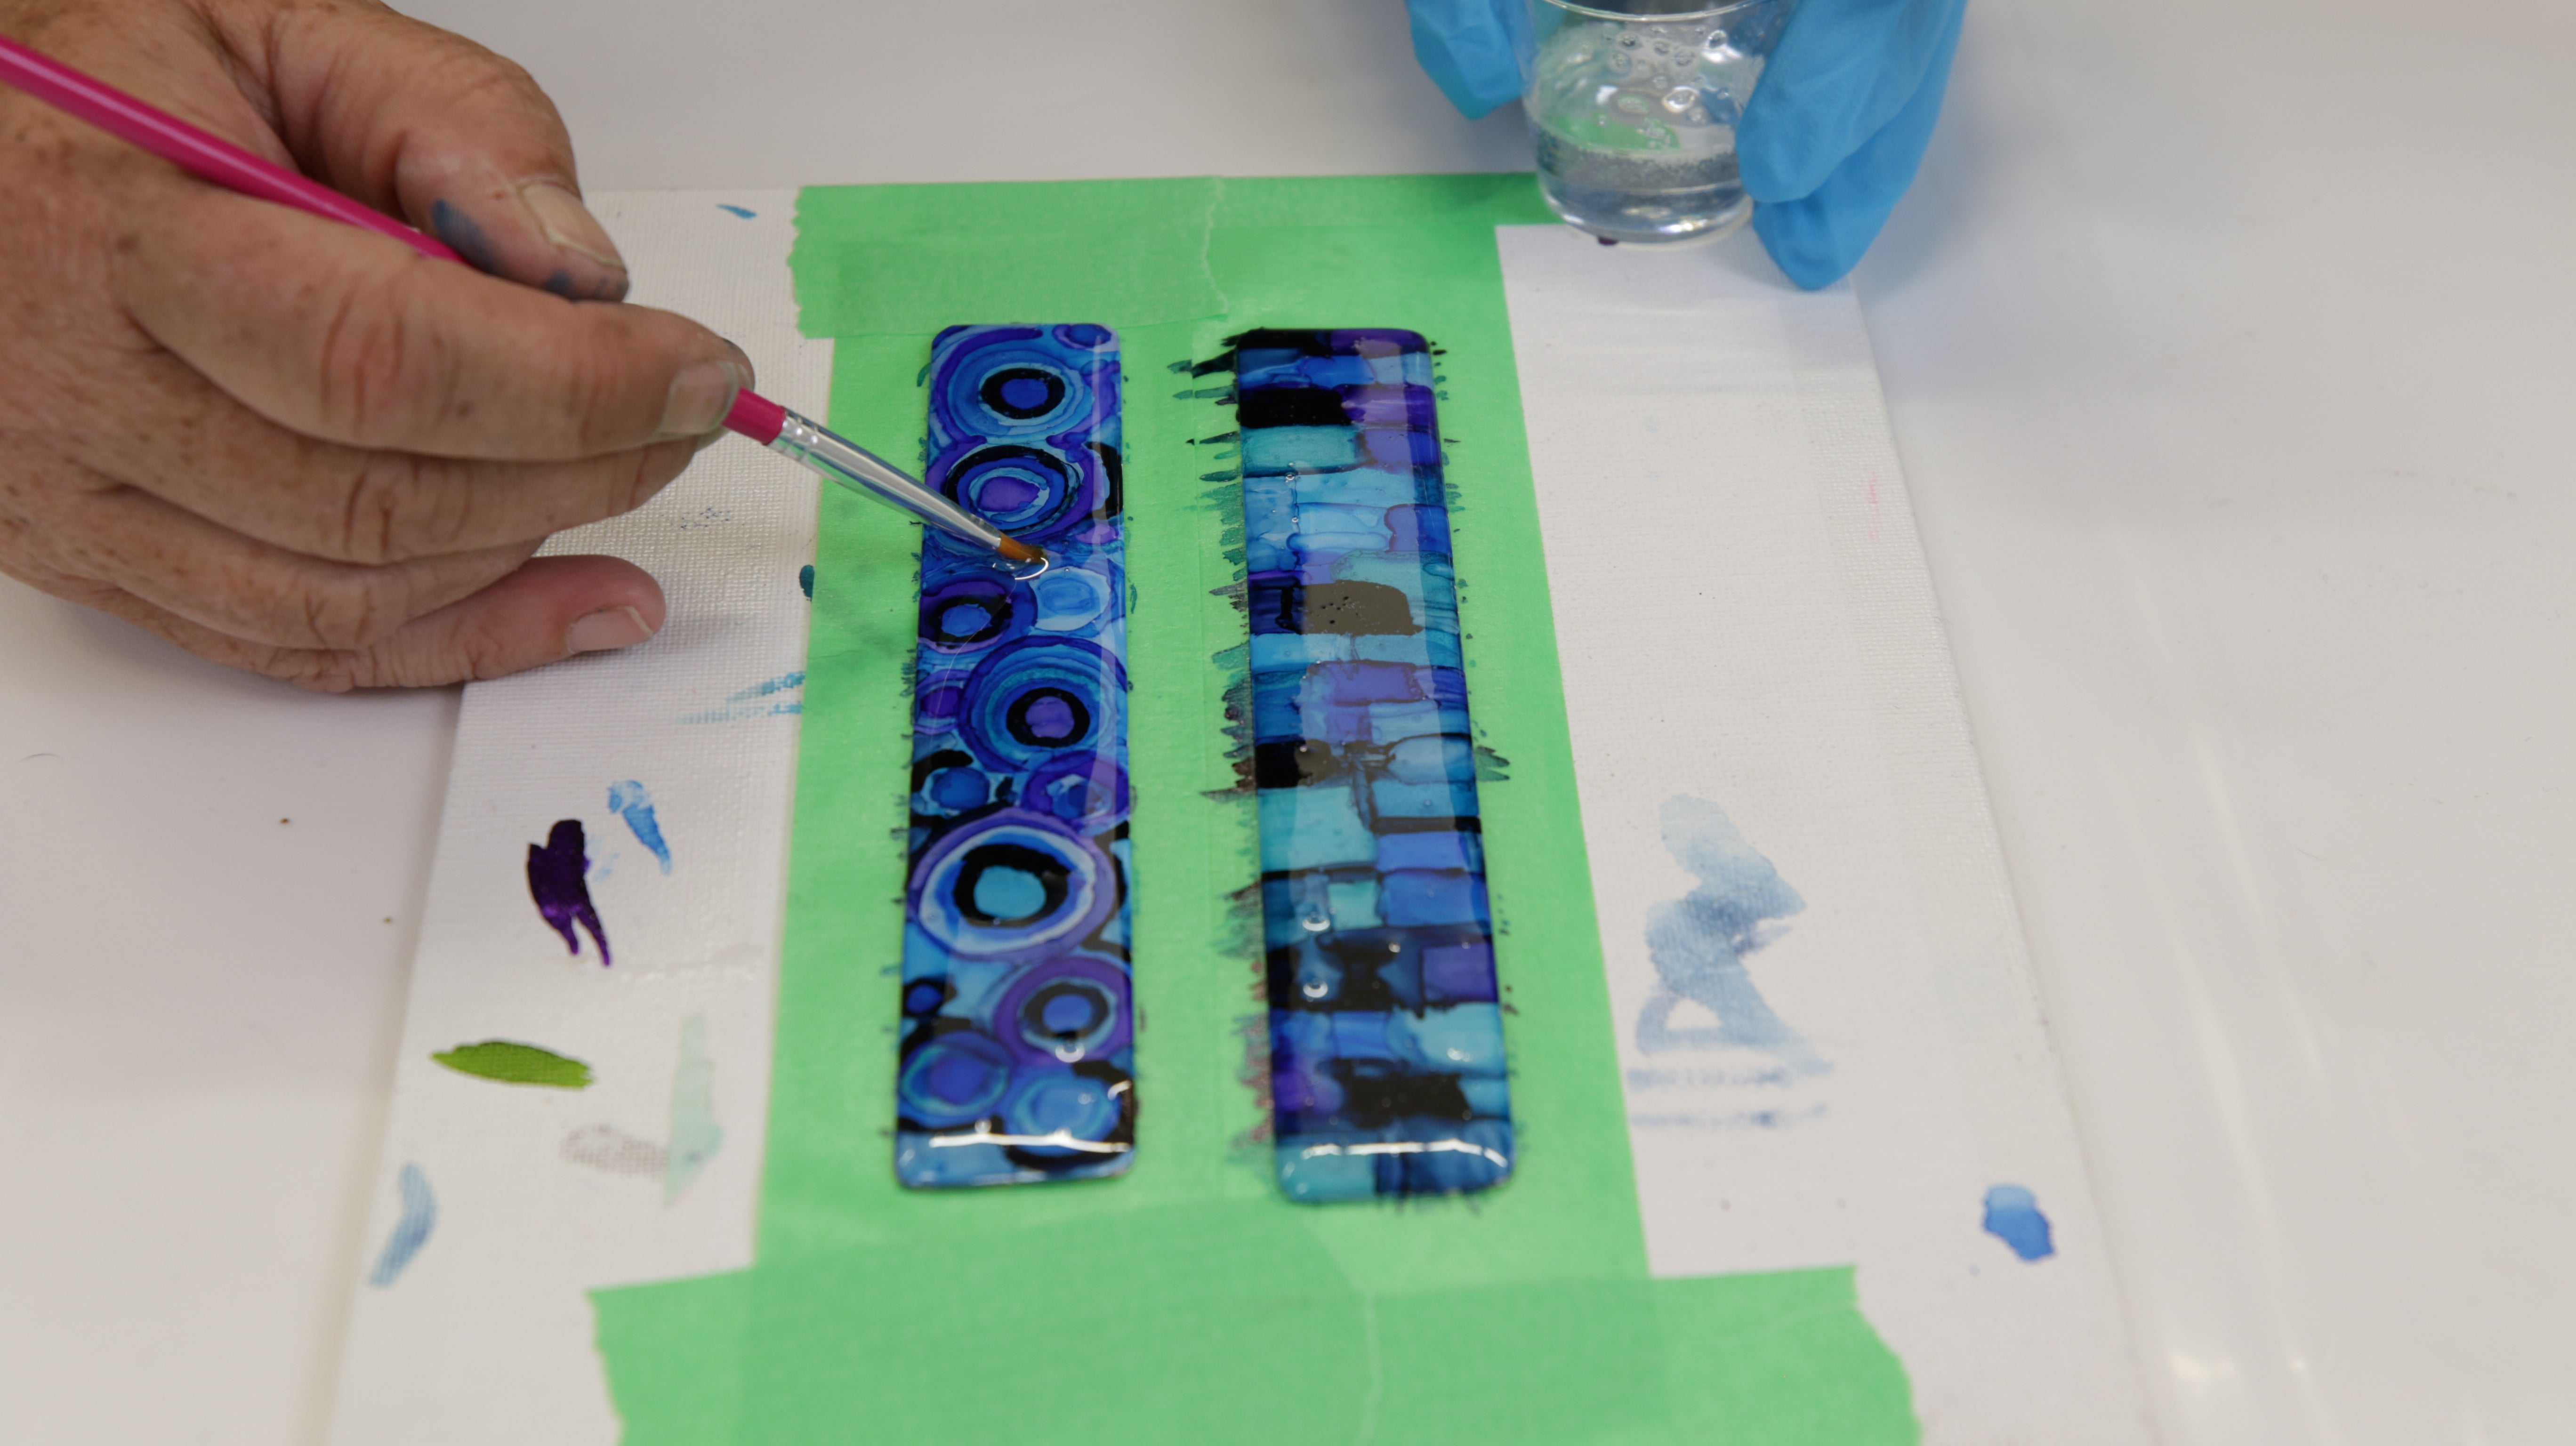
Torch to remove any bubbles.
Cover the with a dust cover and allow to cure for 12 hours, until the resin is dry to the touch but still has enough flexibility to bend the bracelet.
💡TIP: Leave the cup of leftover resin beside your project to test the resin cure rather than disturbing your work.
Step 4 - Bend Your Bracelet
Once the resin is dry to the touch, pop the semi cured bracelet off of the canvas board, inserting one end into the bracelet bender and carefully curving one side. 

Turn the bracelet around and bend the other side. Handle the bracelet carefully as the resin is still soft and vulnerable to indenting.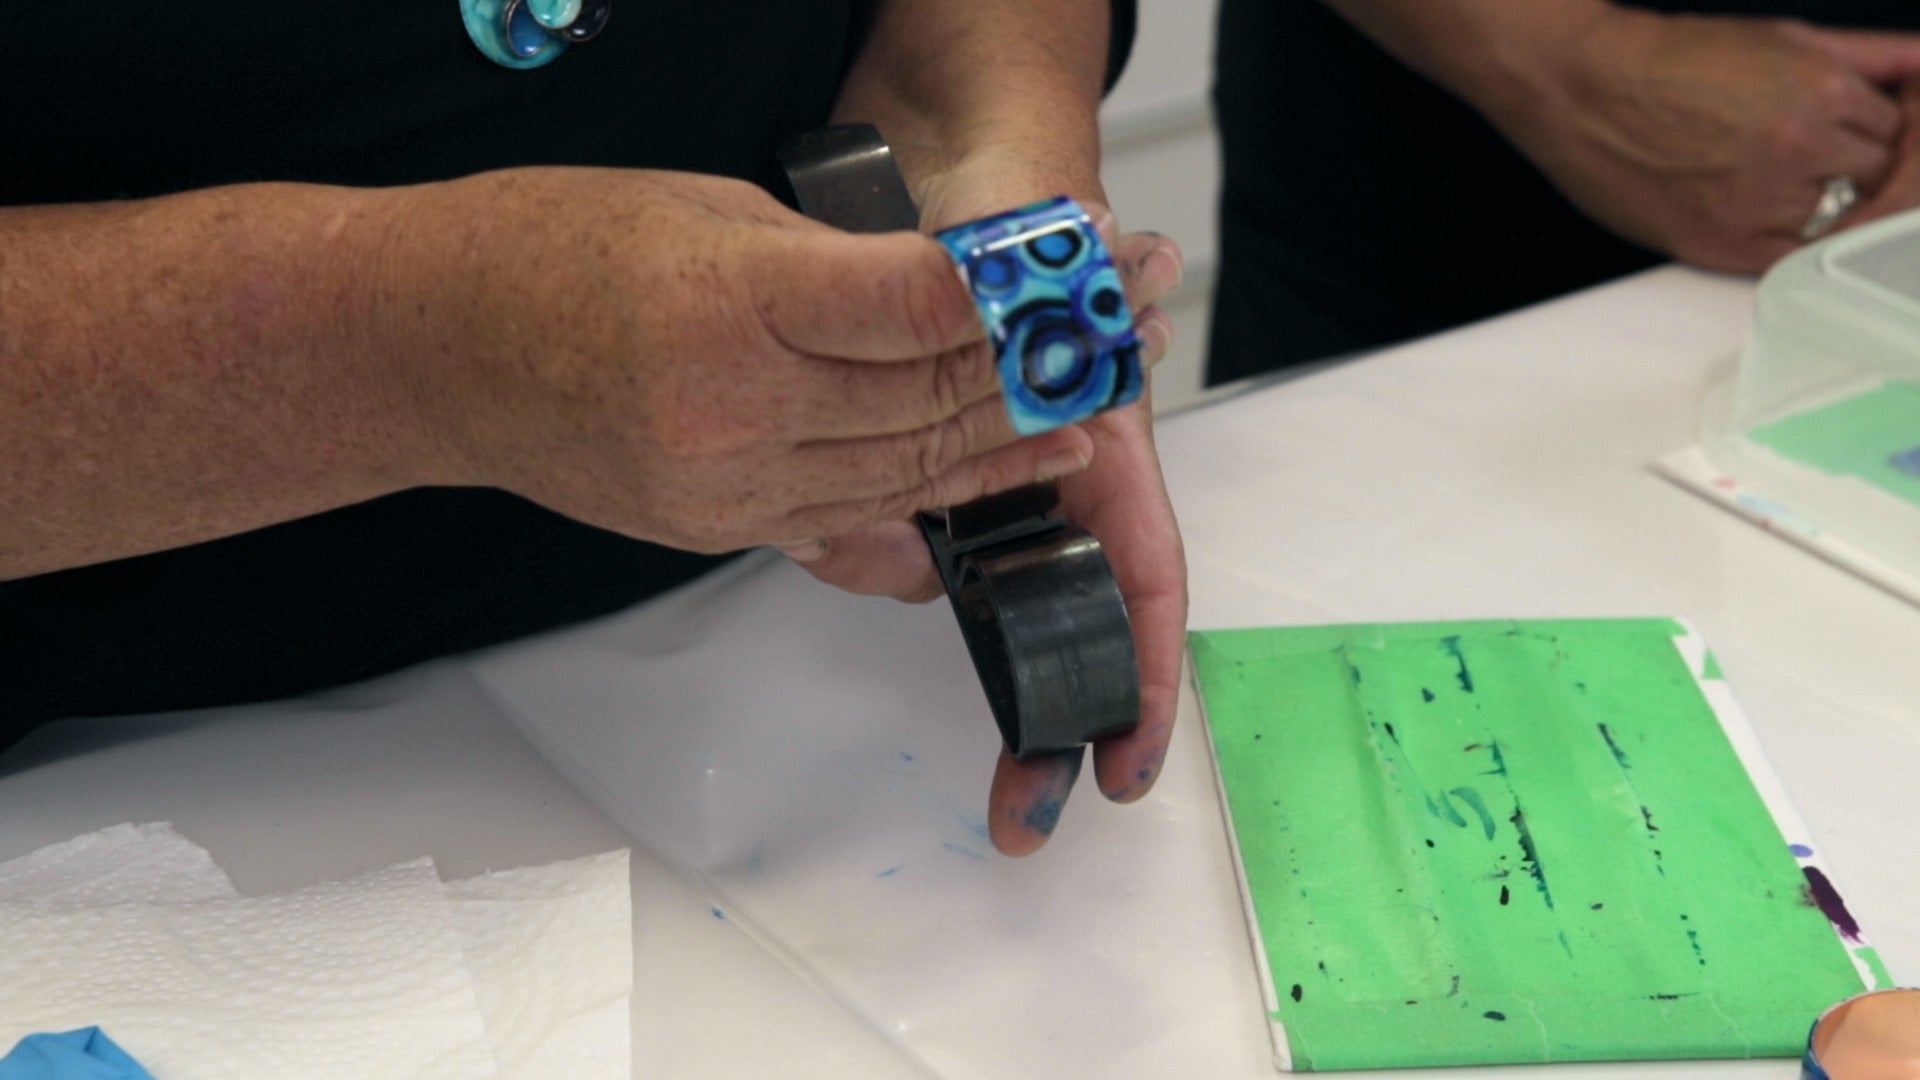

Allow to cure for another 12 hours. Once the bracelet has fully cured, clean up the edges with wire wool that may still have bits of ink or resin on them.
Adjust the size of the cuff to fit your wrist - a 1" gap is standard. ArtResin has been formulated with a bit of flexibility so you can adjust without fear of cracking the resin finish or causing any damage to the bracelet.
We hope you feel inspired to create a piece of hand painted resin jewelry of your own! Please leave any questions or comments below.
For more resin project ideas, check out these blogs:
- How To Make Resin Jewelry
- How To Make Resin Keychains
- How To Make A Resin Geode Phone Grip
- How To Make Resin Pens
To see more of Sue's work:
Follow her on Instagram: @suebdesigns_
ArtResin: The Original Epoxy For Resin Art.
