
It's important that the products you use to make homemade silicone molds are safe. That's why we made sure our silicone Mold Making Material is non-toxic, has no VOCs, no BPA and is food safe once cured. This means you can safely use Mold Making Material to create fun, personalized silicone molds for chocolate, ice, candy, fondant, butter, gummy bears, and more!
What Is Mold Making Material?
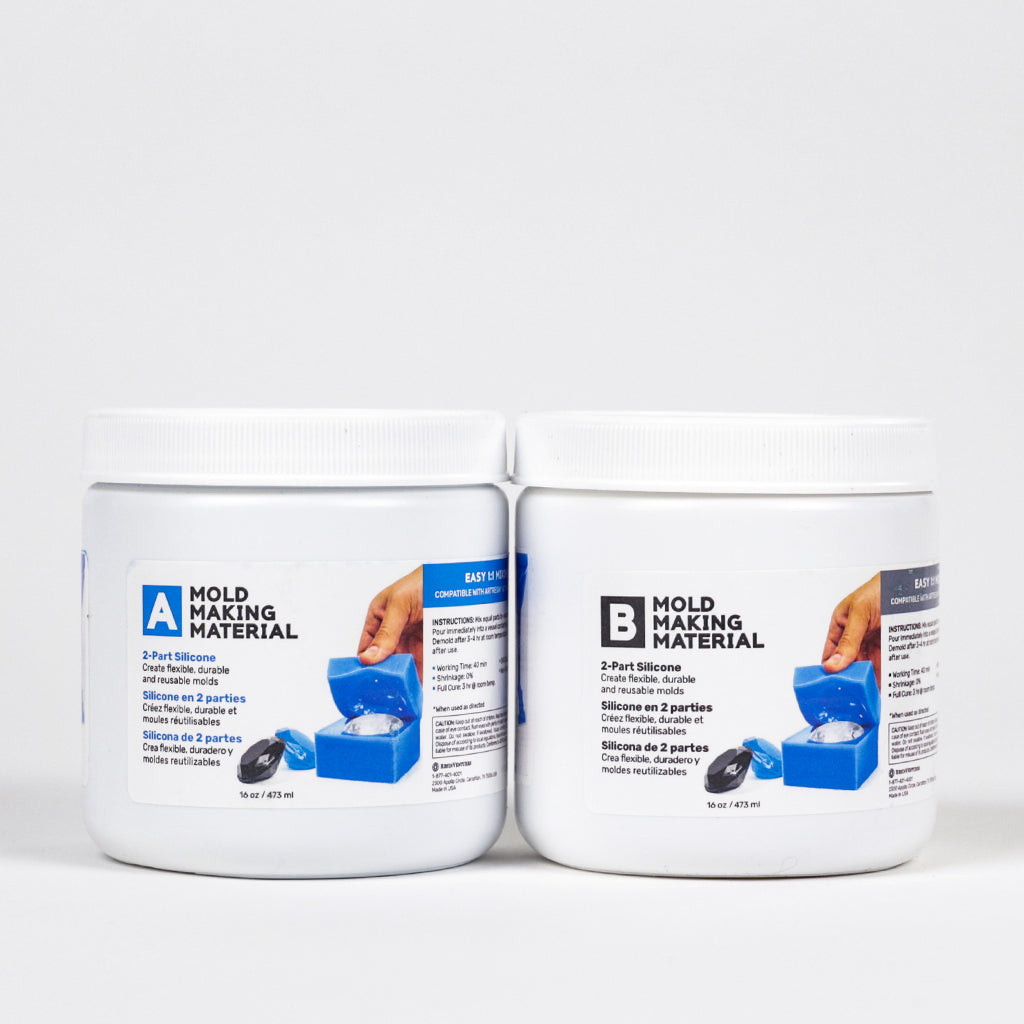
Mold Making Material is a two-part platinum silicone kit for making custom molds. It is safe for use with food or non-food materials.
- Odorless. Non-toxic. Food safe once cured.
- Creates a strong, smooth mold that stretches without tearing.
- Easy to use. Fast curing.
- A thin viscosity to reproduce objects with even the finest surface details.
- Excellent release properties.
-
Reusable. Properly cured molds will create hundreds of castings without deteriorating.
What is Mold Making Material made of?
Mold Making Material is made of high quality, US made, platinum silicone, a pure, food grade material that contains no fillers or by-products. Platinum silicone is odorless, non-toxic, and has no VOCs or BPA. Once cured, it’s 100% safe to use for molds as it will not contaminate food that comes into contact with it. 
How do I know these silicone molds are food safe?
A 3rd party lab conducted extraction tests on Mold Making Material and found that it passed the requirements of FDA 21 CFR 177.2600: this is part of the FDA’s Code Of Federal Regulations that defines requirements for rubber articles intended for repeated contact with food items.
Mold Making Material meets the FDA’s criteria for food contact substances when accurately measured, thoroughly mixed, and fully cured. It may be used in repeat contact with food items, both water and fat based.

How do you make a homemade mold out of silicone?
Mold Making Material allows you to create custom silicone molds for shaping food items. The product comes in two parts that, when mixed together, cure from a liquid silicone to a flexible, high strength rubber, perfect for DIY molds.
Simply mix equal amounts (by volume) of Part A and Part B until the color is one, consistent, blue hue. 


Mold Making Material has a working time of 45 minutes. Pour the mixed product into a plastic or plastic lined container containing the 3D object(s) you’d like to reproduce. Pour slowly and cover the object. Let the silicone cure for 3 hours at room temperature until it’s no longer sticky to the touch.
💡 TIP: Tack down objects with a bit of glue to help them stand straight or prevent them from shifting once you pour in the Mold Making Material.

Carefully remove the cured silicone from the box mold. Using a utility knife, cut an opening at the bottom of the mold and carefully wiggle the object(s) out. Wash the silicone mold cavity in warm, soapy water using a mild dish soap and a soft sponge. Rinse and allow to dry.


Congratulations! You’re now ready to make replicas of your object!

DIY Silicone Mold Ideas
You can use Mold Making Material to create molds for food including:
- Butter
- Candy
- Cake Decorations
- Cheese
- Chocolate
- Fondant
- Frozen Liquids
- Gelatin
- Gummy Bears
- Ice
- Ice Cream
- Marzipan
- Pâté
- Rice
- Royal Icing
How To Make Silicone Mold Hard Candy:
Step 1: Prepare the candy syrup
Using the recipe of your choice, prepare a hard candy syrup. Once the syrup has reached the hard ball stage on a candy thermometer and you've added the flavoring and color of your choice, pour the contents into a silicone beaker.
Step 2: Pour into the mold
Ensure the silicone molds have been cleaned and allowed to air dry. Working quickly, pour the liquid candy into each of the mold's cavities until full. Allow the candy to harden; depending on how thick you pour, this can take anywhere from 15 minutes to an hour.
💡 TIP: A silicone beaker not only allows you to safely handle hot liquids, but its flexibility allows for better control when pouring.


Step 3: Remove the hardened candy
Carefully wiggle out the hardened candy from the silicone mold. Once all the the candies have been removed, wash the molds in warm, soapy water with a soft cloth. Allow to air dry and store flat until next use.


How To Make Silicone Mold Chocolate:
Step 1: Melt chocolate
In a double boiler or in the microwave, melt chocolate or meltable candy making chocolate. Pour into a silicone beaker.
Step 2: Pour melted chocolate into the silicone mold
Pour into each cavity of the mold, being careful not to overfill. If desired, use a plastic knife to smooth out the back. Allow to harden in a cool place.


Step 3: Remove hardened chocolate from silicone mold
Carefully wiggle the hardened chocolate shapes from the silicone mold. Once removed, wash the molds in warm, soapy water with a soft cloth. Allow to air dry and store flat until next use.
💡 TIP: If you prefer the chocolates with a glossy finish, the object you're casting needs to have a glossy finish. If the item you want to copy has a matte finish, spray it with a gloss clear coat prior to pouring the silicone. 
How To Make Silicone Mold Fondant:
Step 1: Prepare the fondant
Wearing disposable gloves, knead a small amount of store bought fondant until it is soft and pliable. 
Step 2: Place fondant into the mold.
Rip off small pieces of fondant and place into the mold, smoothing each piece down as you go. Once the mold is filled, gently press on the back of the fondant to ensure
to ensure it fills every part of the mold cavity. Chill in the fridge or freezer for easy release.
Step 3: Release the fondant
Once the fondant has chilled, carefully remove it from the mold. Use a small blade to trim away the excess. Wash the molds in warm, soapy water with a soft cloth. Air dry thoroughly and store flat until next use.
How To Silicone Mold Gummies:
Step 1: Prepare the gummy mixture
Using the recipe of your choice, prepare the gummy mixture and pour the contents into a silicone beaker.
Step 2: Pour into the mold
Ensure the silicone molds have been cleaned and allowed to air dry. Working quickly, pour the gummy mixture into each of the mold's cavities until full. Place the mold into the fridge and chill until the gummies have set.
💡 TIP: A silicone beaker not only allows you to safely handle hot liquids, but its flexibility allows for better control when pouring.
Step 3: Release the gummies from the mold
Once the gummies have set up, carefully wiggle them, pulling gently until they release from the mold.
Once the gummies have been removed, wash the molds in warm, soapy water with a soft cloth. Allow to air dry and store flat until next use. 
How To Make Silicone Mold Ice:
Step 1: Fill the mold
Ensure the silicone molds have been cleaned and allowed to air dry. Fill each cavity with water.
Step 2: Freeze & remove
Place in the freezer until the water has turned to ice. Working quickly, carefully wiggle each ice cube out of the mold.
💡TIP: Create fun ice cubes that won't dilute your drinks by using juice, ice tea, lemonade, cold coffee, Kool-Aid, Gatorade or other colorful beverages.

What is the temperature range of your silicone molds?
The silicone molds are best used at room temperature, but also be used to shape both hot and cold food items. The molds can be placed in the fridge or freezer to create personalized cold and frozen items and can withstand temperatures of up to 400F to create gummies and hard candies. Do not expose the silicone mold to temperatures or food casting materials over 400F/200C.
⚠️ PLEASE NOTE: Mold Making Material is intended for molding only. We do not recommend using Mold Making Material for cooking or baking.

How do you clean food safe silicone molds?
Molds made from Mold Making Material are easy to clean and maintain. Once you’ve demolded your food shapes, simply wash your silicone mold in warm, soapy water, using a mild dish soap and a soft sponge to remove any traces of food. Do not place your silicone mold in the dishwasher. Allow the mold to air dry.
⚠️ PLEASE NOTE: Avoid harsh cleaners or scrubbing with a scouring pad/dish brush to avoid damaging the interior of the mold. Use a soft cloth or sponge and a mild dish soap in warm water.
How should I store my silicone molds?
Properly cared for molds should last for years, depending on maintenance and frequency of use. Before storing, always clean your molds to remove any traces of food or non-food material you’ve cast with and allow the mold to air dry. Store your molds flat, in a single layer and ideally in a container to help maintain their shape and integrity.
⚠️ PLEASE NOTE: Do not stack objects on top of your molds to avoid warping.
What other materials can you use in silicone molds?
In addition to food, Mold Making Material is ideal for casting other moldable materials such as epoxy resin, cement, plaster, polyurethane, wax, soap, potters clay, polymer clay, play dough and paper mâché to make prototypes, art projects, architectural details, statues, figurines, candles and more!
⚠️ PLEASE NOTE: We cannot guarantee the food safety of molds that have been used with non-food materials. Once you’ve used non-food materials in a mold, do not use that same mold for food. Molds designated for use with food should ONLY be used for food.

Learn more about the mold making material and read our guides about mold making:
- How to make a resin box mold?
- One part vs two part molds
- How to use a mold?
- Shiny vs matte silicone molds
ArtResin: Made For Artists, By Artists.
