Whether you're a beginner resin artist looking for a fun project or you're a resin pro who wants a new challenge, you're going to love making textured resin art with drywall compound, resin and a wood panel. Textured resin art can be made as simple or as detailed as you'd like, but either way, the results are colorful and eye-catching.
Join Rebecca from ArtResin as she demonstrates two different textured resin art techniques: the first uses acrylic paint and second uses tinted ArtResin. Each method has a totally different, but equally beautiful look. Once you learn how it's done, you're going to want to try it yourself!
Join Rebecca from ArtResin as she demonstrates two different textured resin art techniques: the first uses acrylic paint and second uses tinted ArtResin. Each method has a totally different, but equally beautiful look. Once you learn how it's done, you're going to want to try it yourself!
Let's get started!
Option 1 - Make Textured Resin Art with Acrylic Paint
With this method, you're going to use acrylic paint for a colorful, opaque look, made even more vibrant under a coat of ArtResin.
What You'll Need:
- A wood art panel
- Drywall compound
- Spatula or small trowel
- Acrylic Paint
- Paintbrushes
- ArtResin epoxy resin
- Disposable gloves
- Stir Stick
- Mixing cup with easy to read measurement lines
- Foam brush
- A handheld butane torch like our Artist's Torch
- A clean box or plastic tote to protect your resin art while it dries
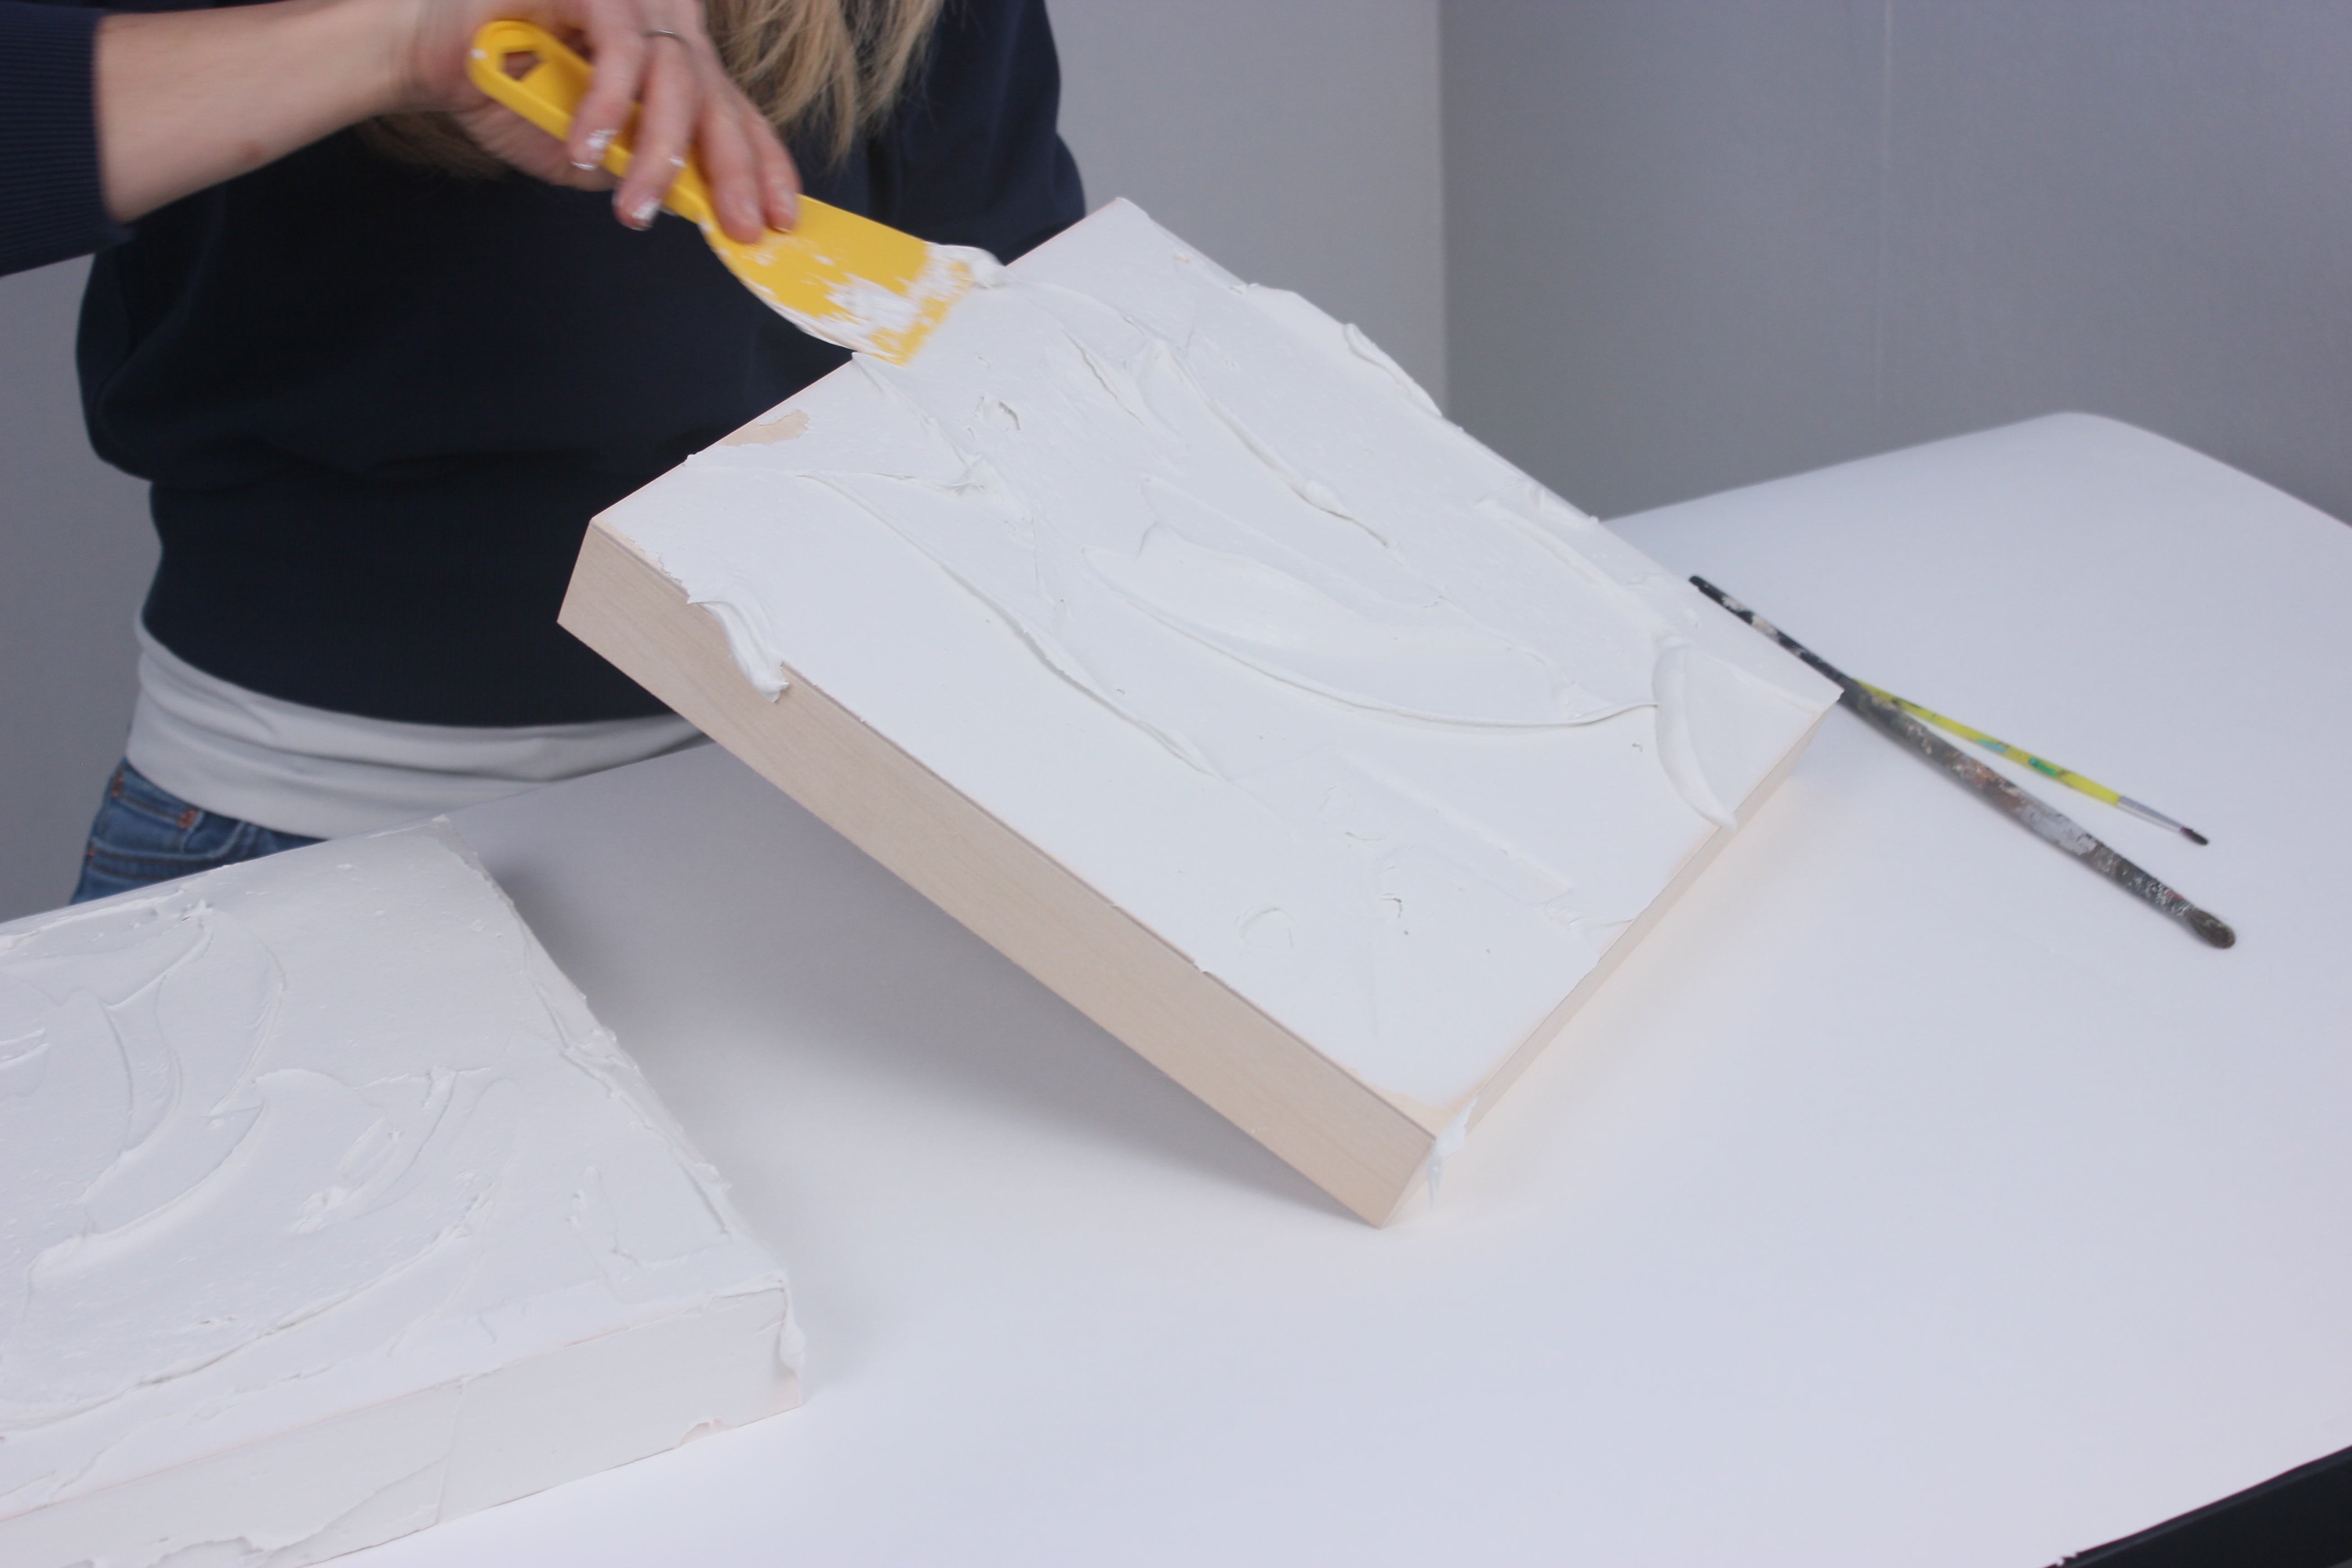
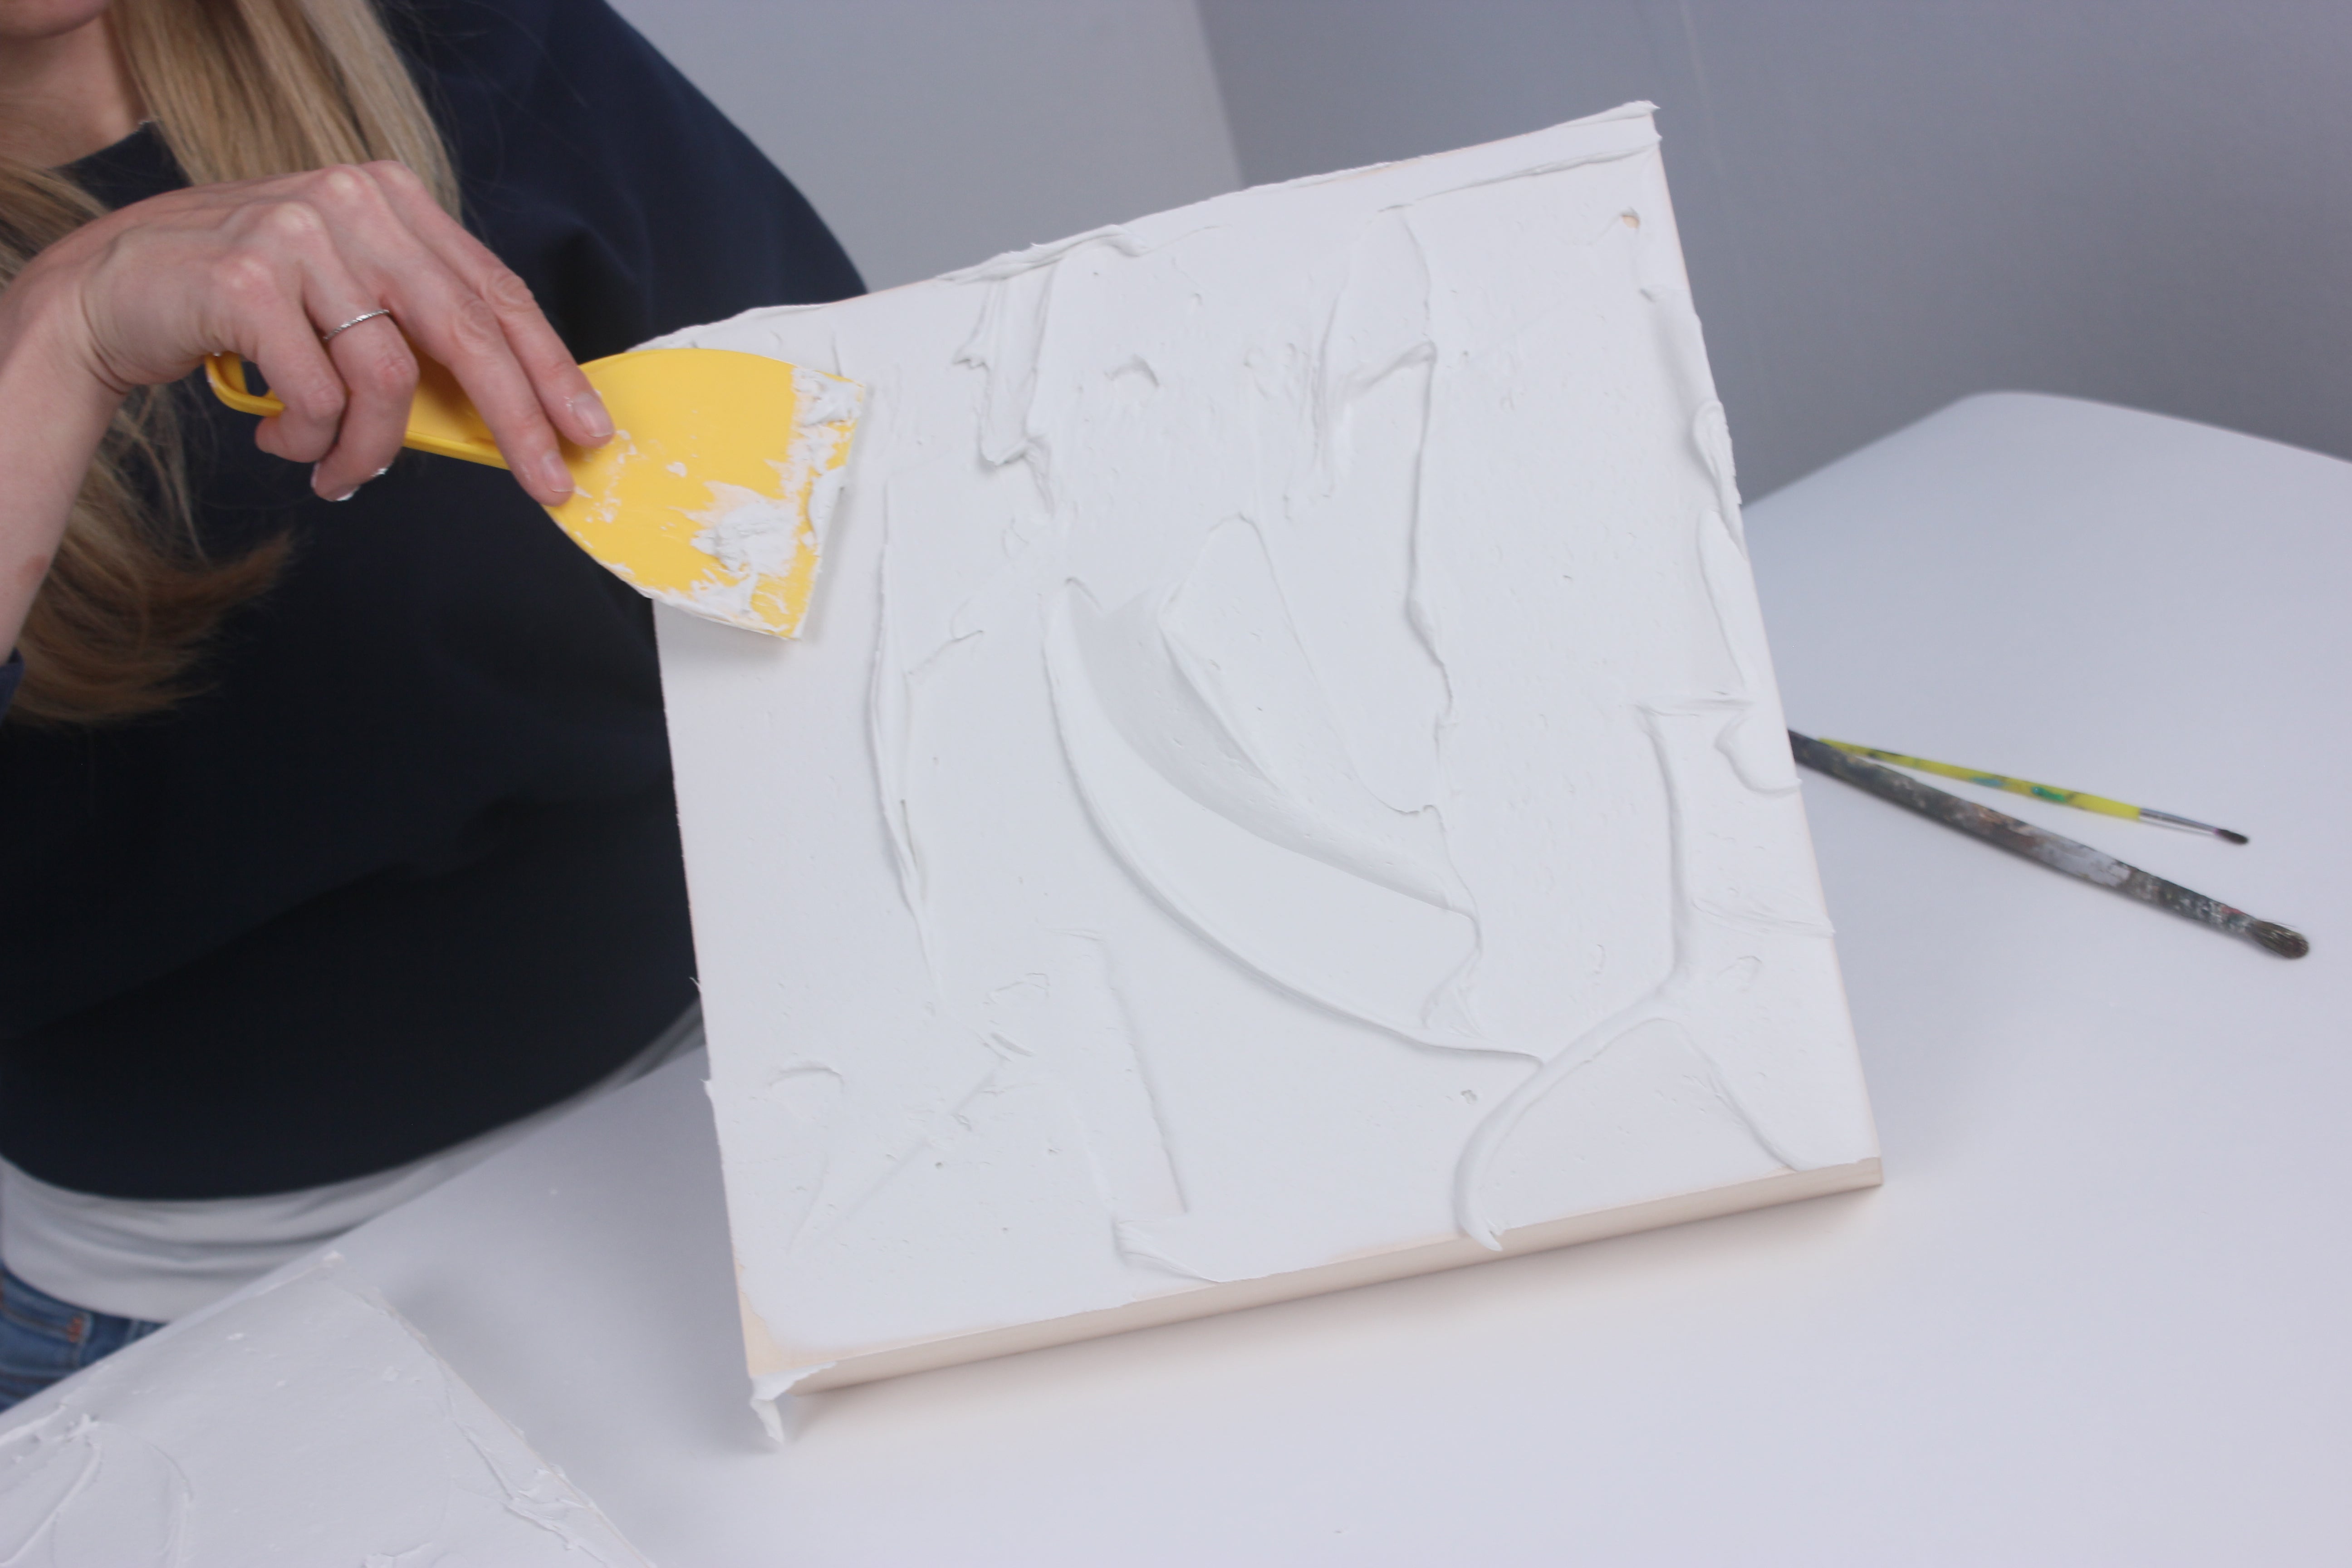
1. Using a spatula or trowel, apply a thick coat of drywall compound
Using a spatula or trowel, apply a thick coat of drywall compound to the front and sides of the wood panel. Shape it with the spatula until you're happy with how it looks. Ensure that the coat on the face of the panel is thick enough to draw your design into.
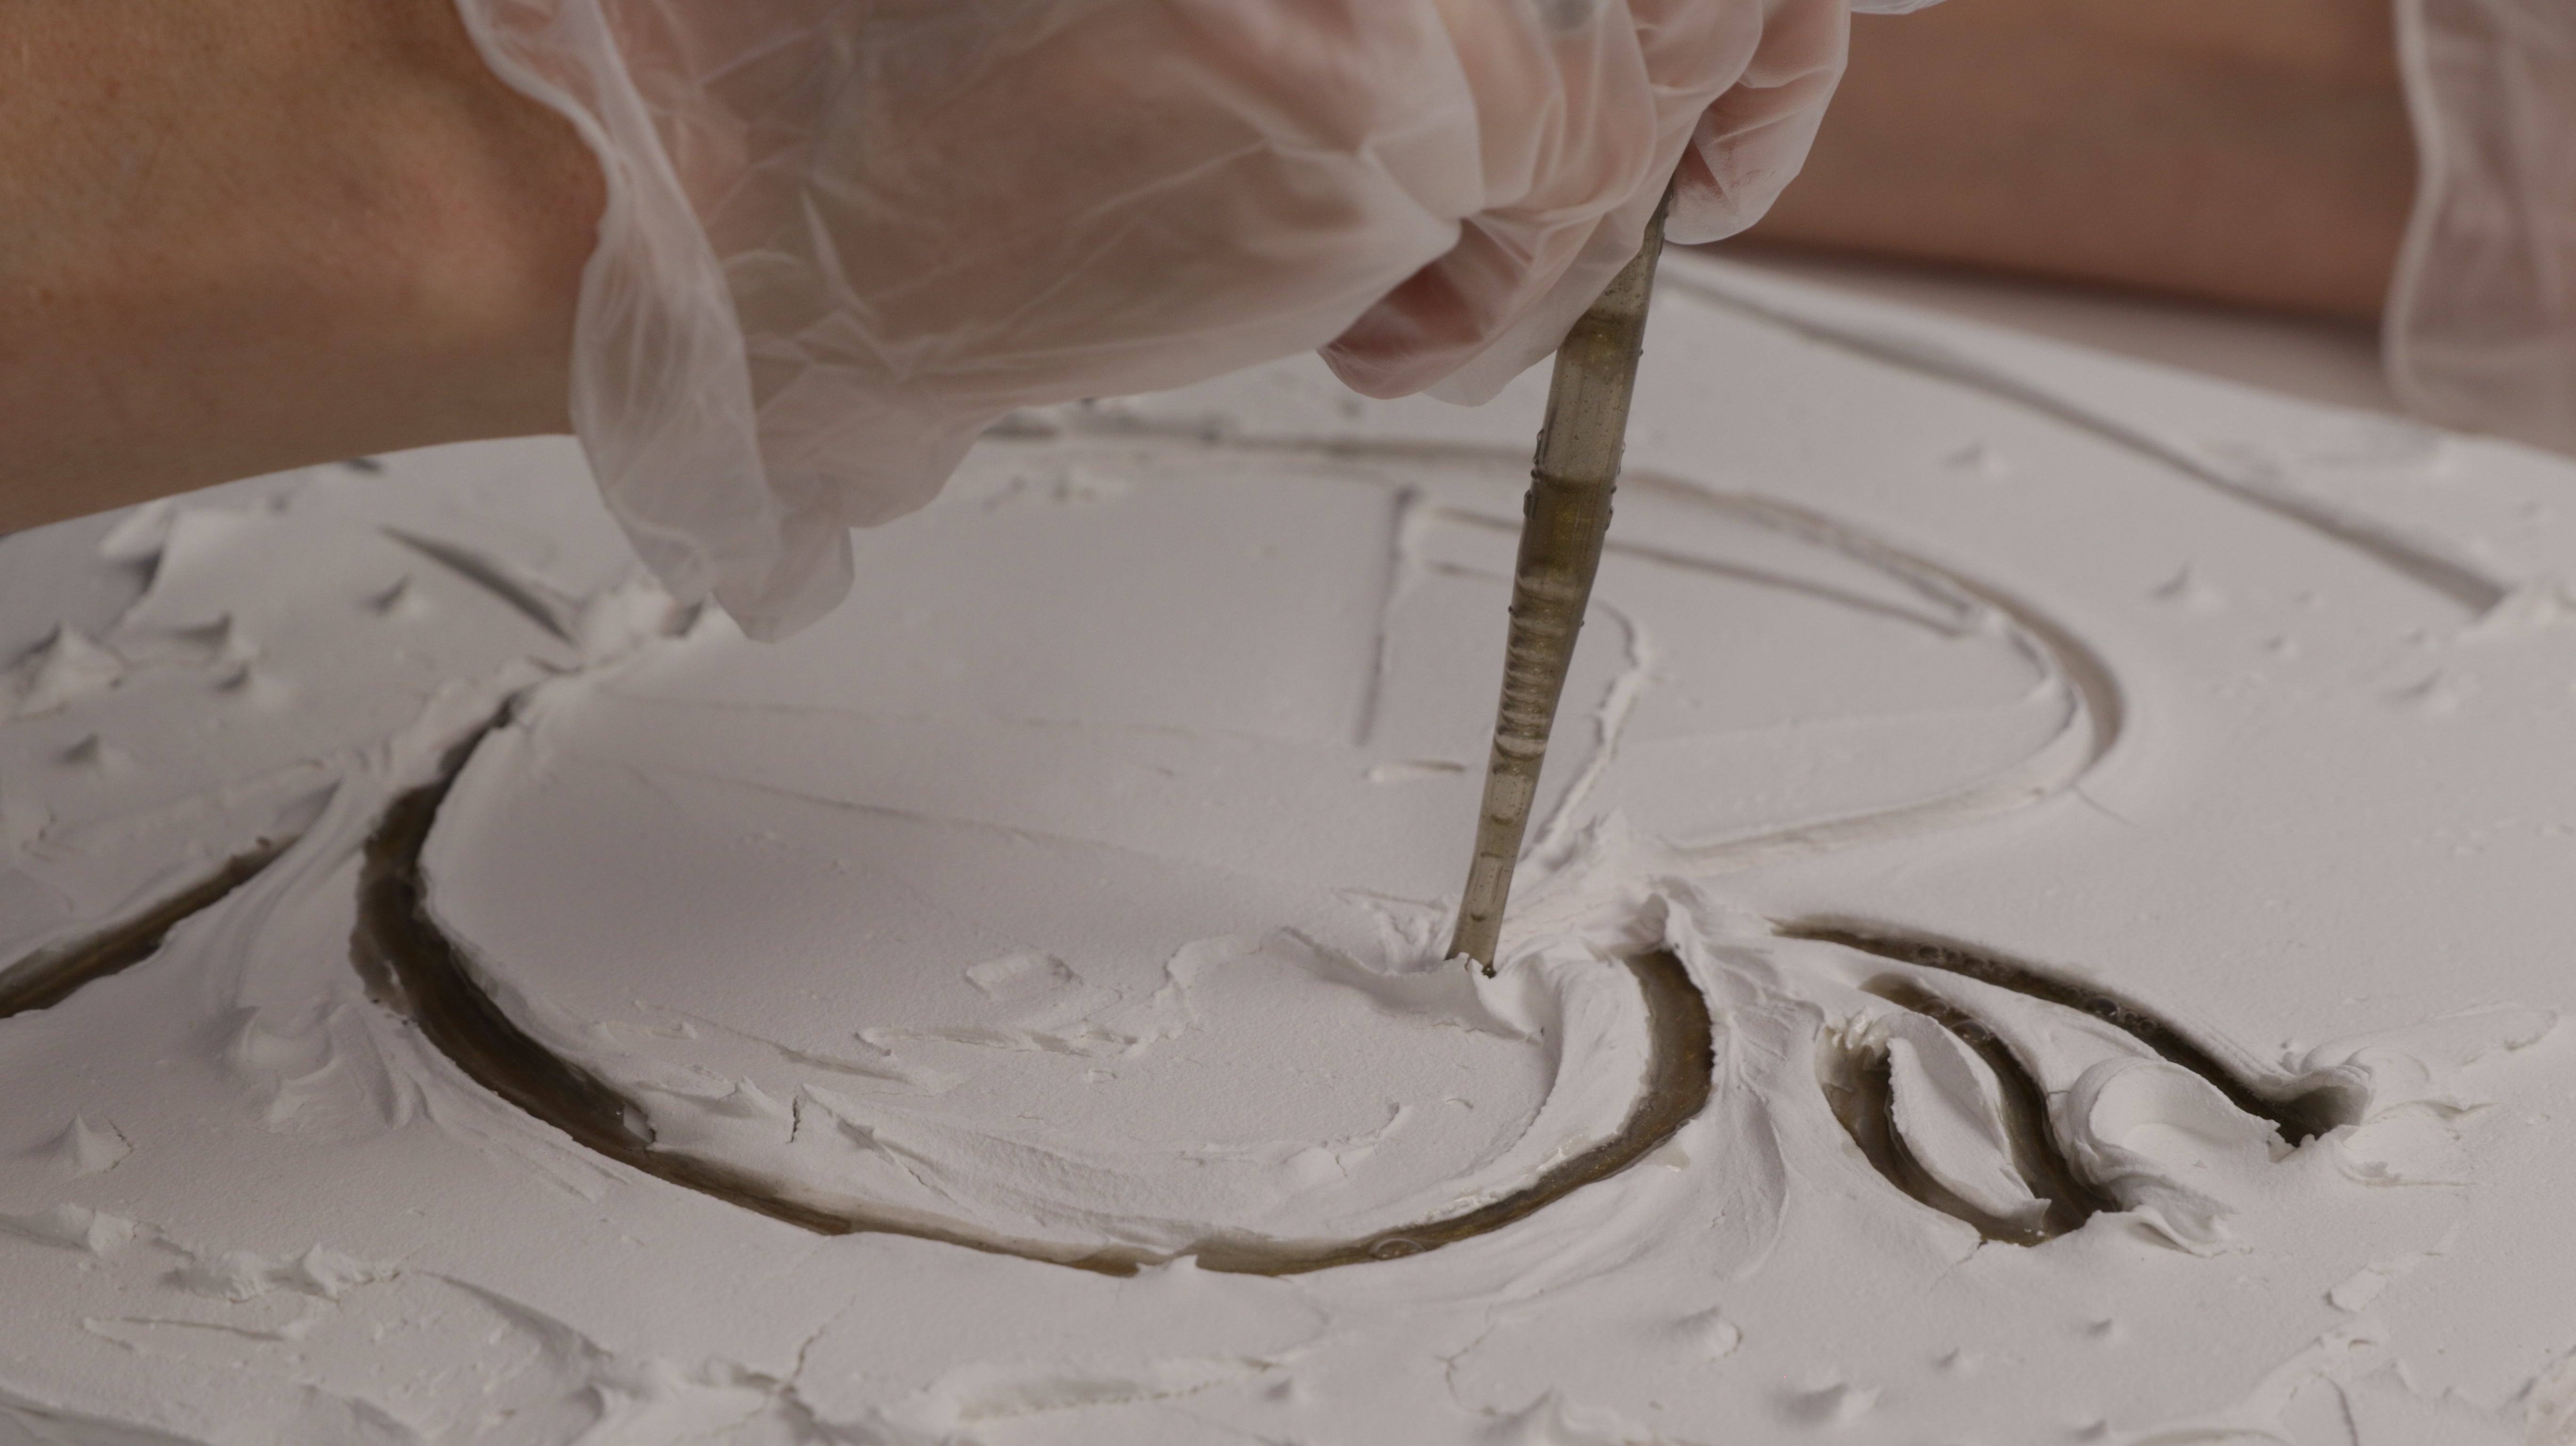
2. Draw your design into the drywall compound
Draw your design into the drywall compound while it's still soft using the handle end of a paintbrush. Here's where you can get really creative using a variety of tools to create different textures in the compound.
Here are a few ideas:
💡TIP: Practice first with a variety of tools and compound on a scrap piece of wood to get an idea of what sort of textures you can achieve.
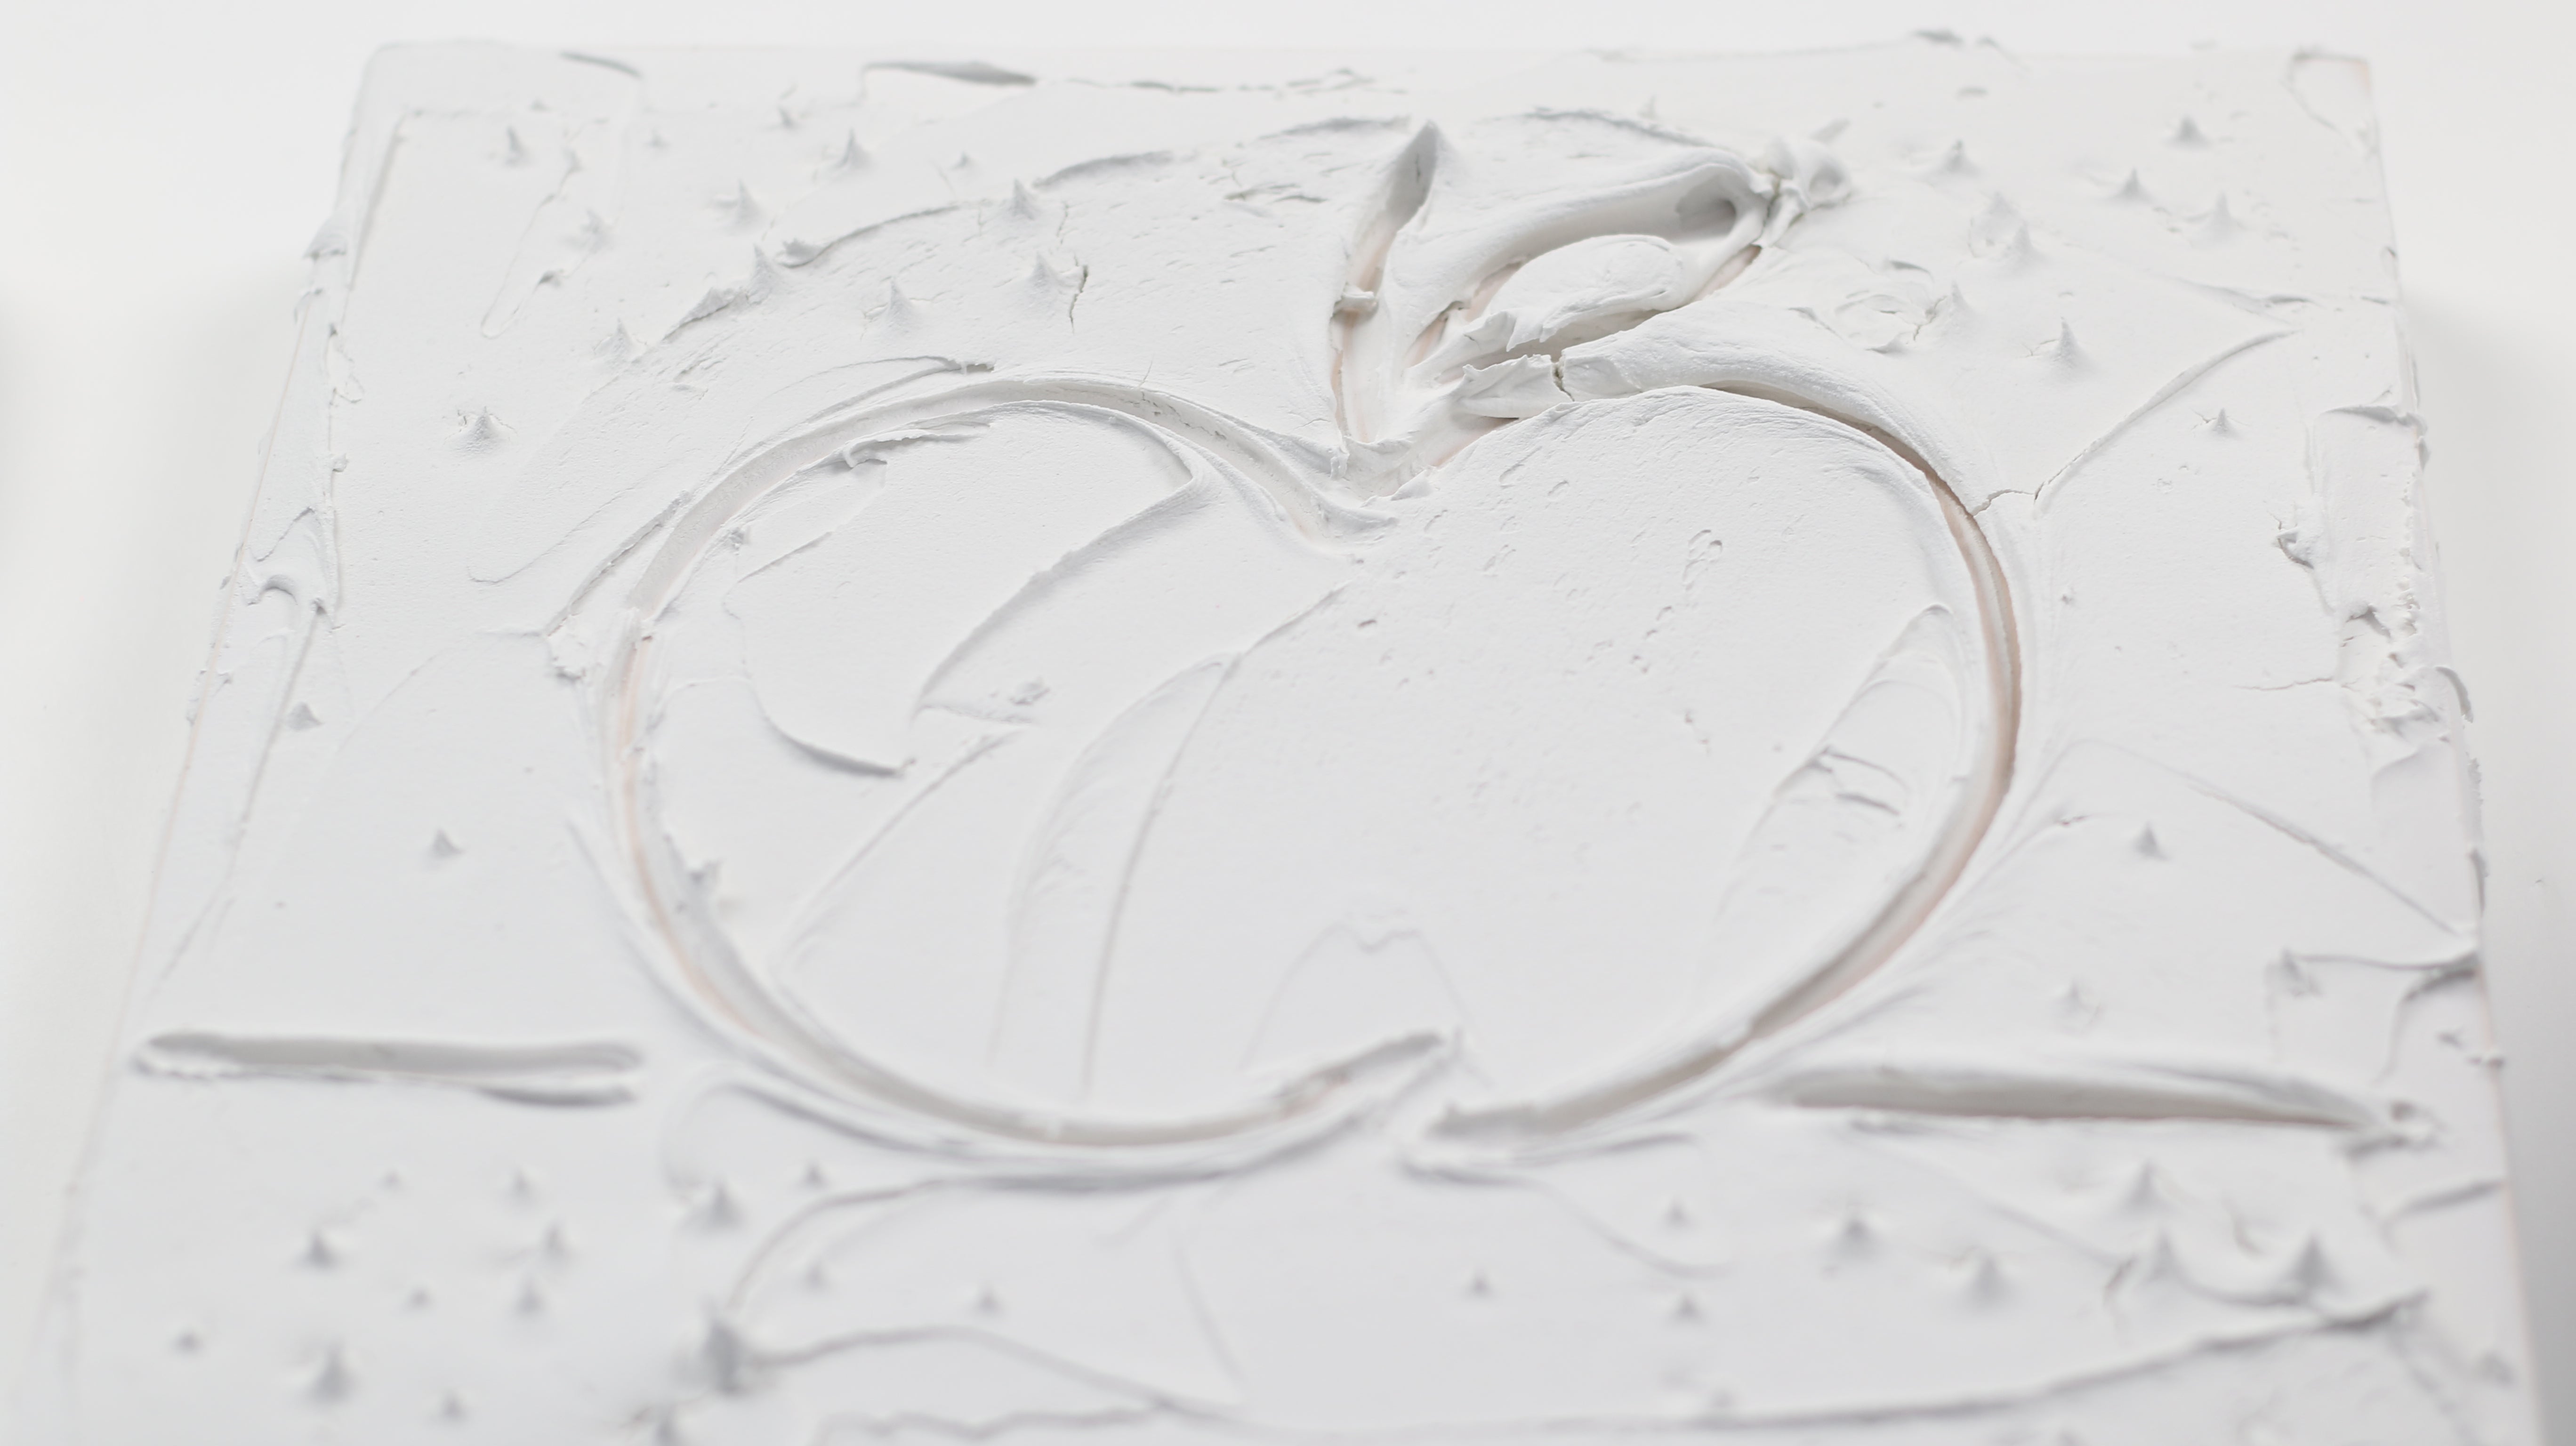
Here are a few ideas:
- use your spatula or trowel to create swirls
- press bubble wrap into the compound to make indents
- use a paint brush for brush strokes
- use a toothpick for fine details
- use a comb to create lines
- use crumpled aluminum foil to create a rough texture
💡TIP: Practice first with a variety of tools and compound on a scrap piece of wood to get an idea of what sort of textures you can achieve.
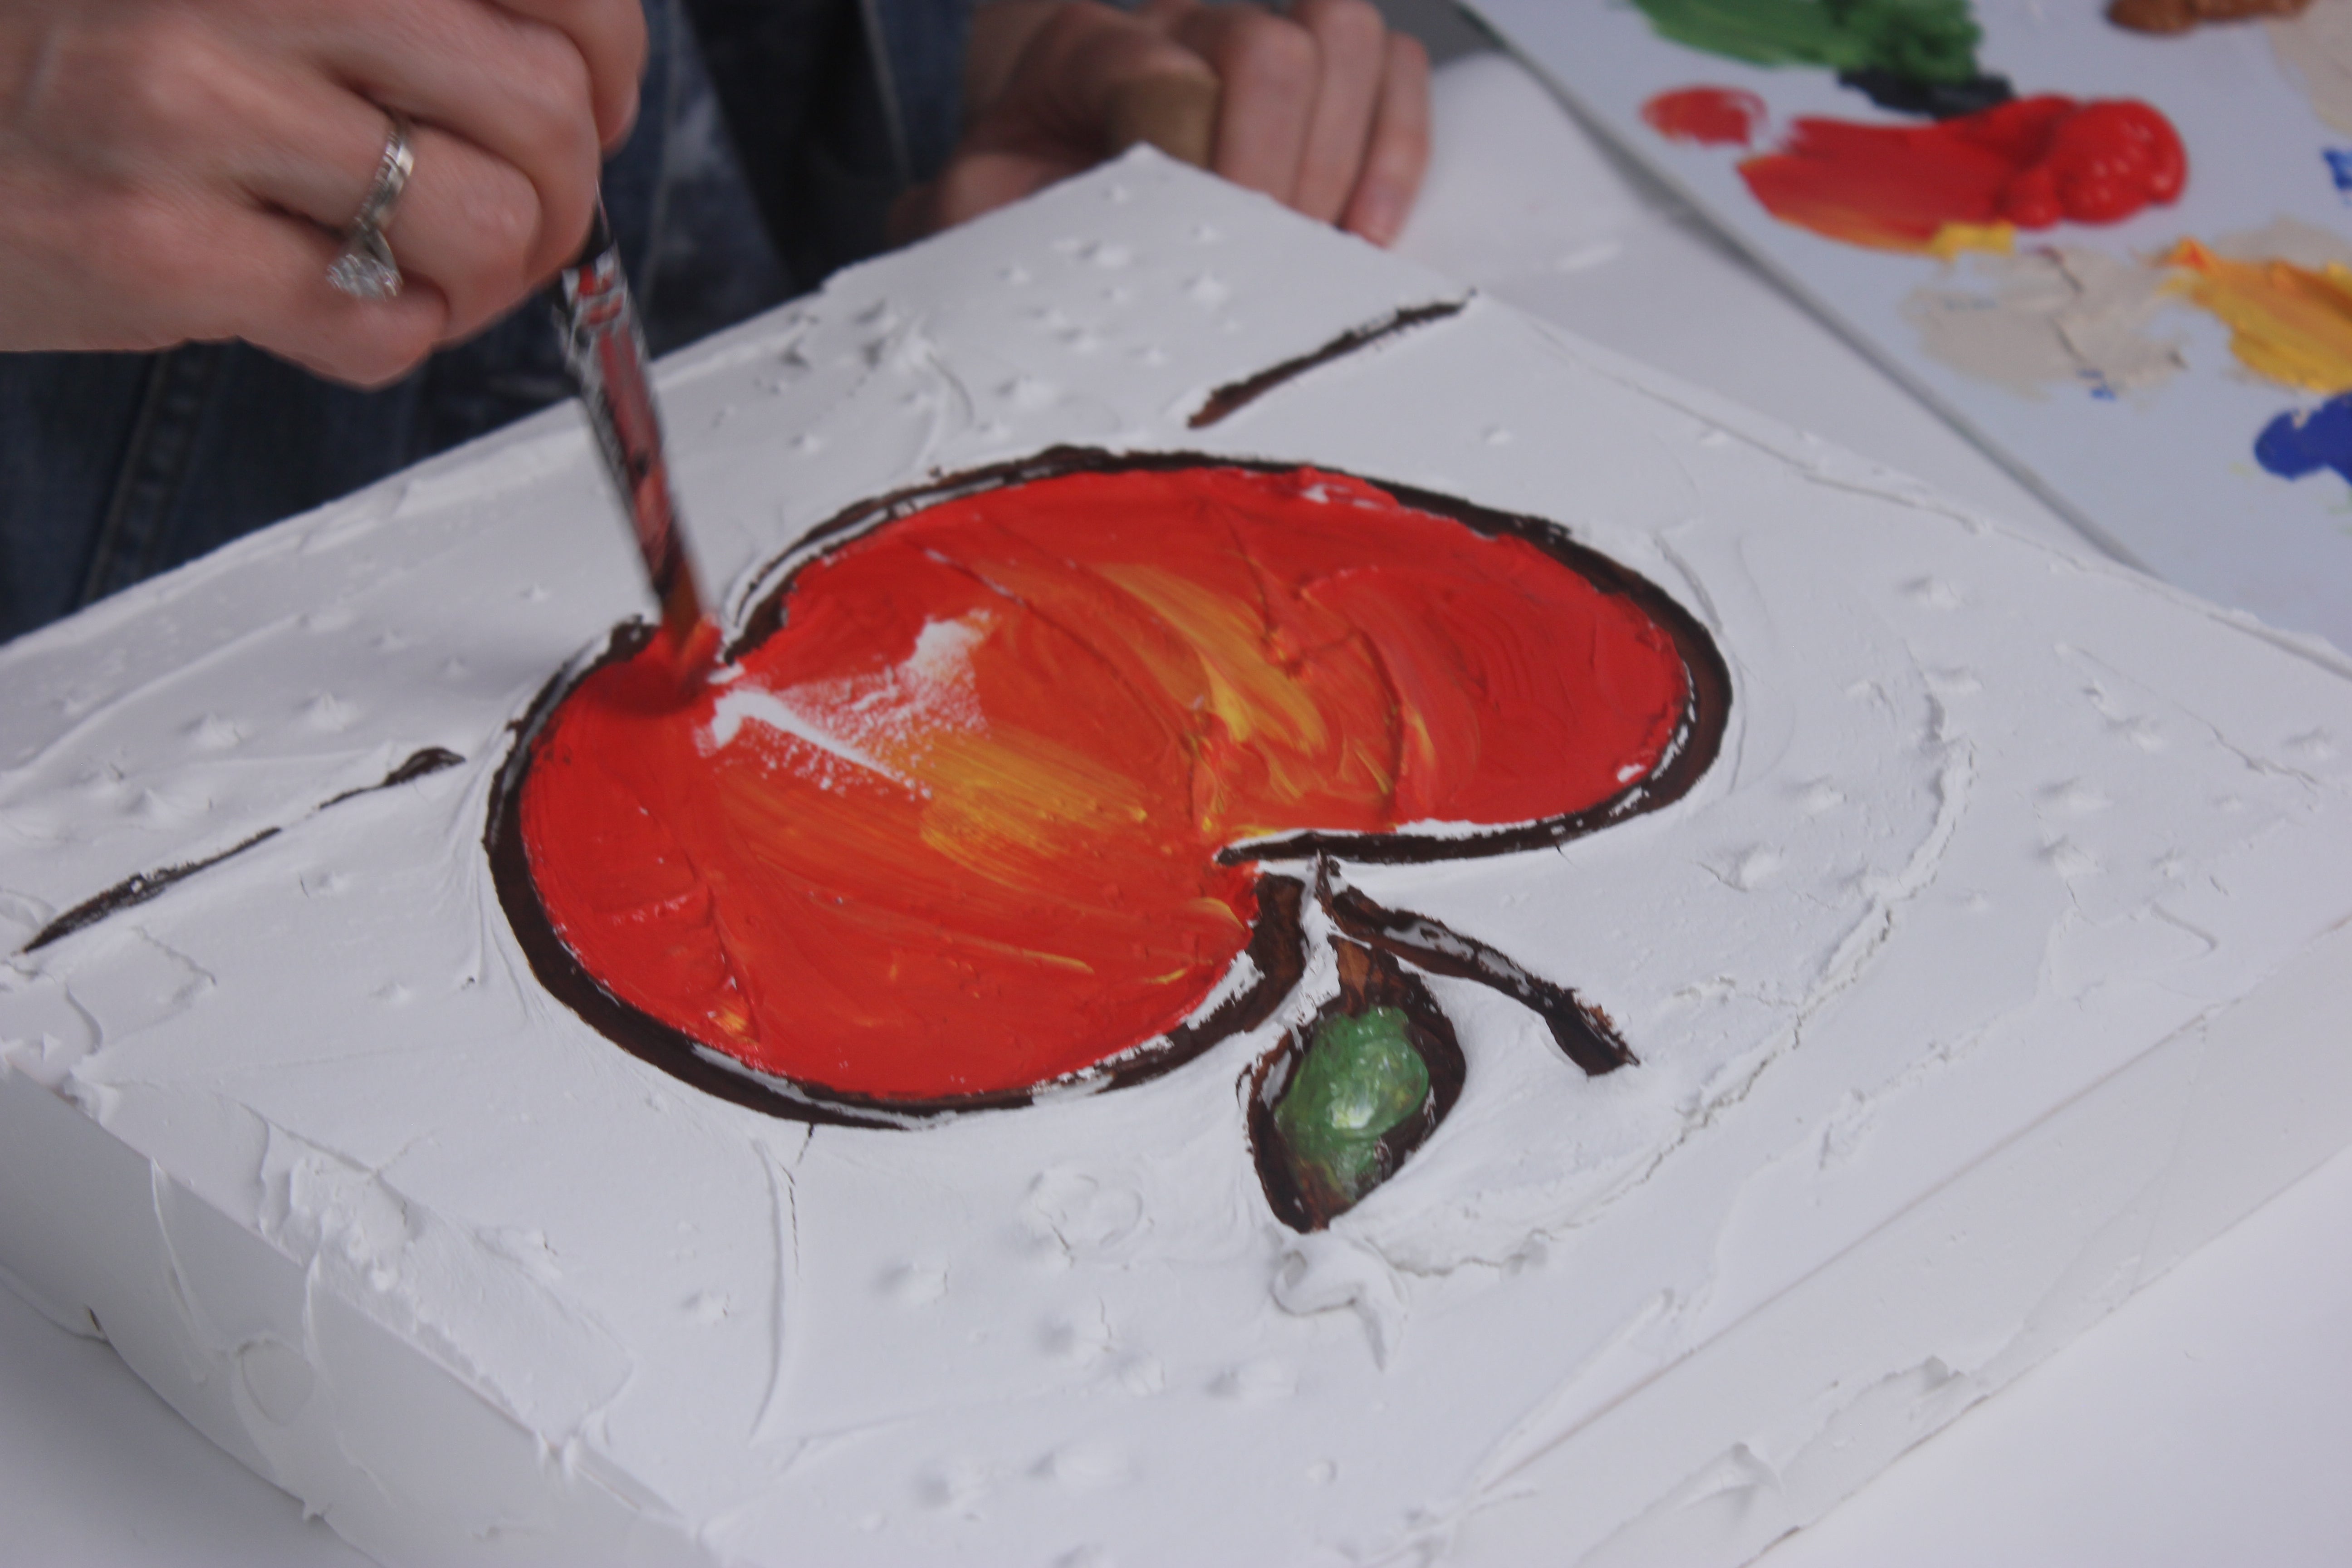
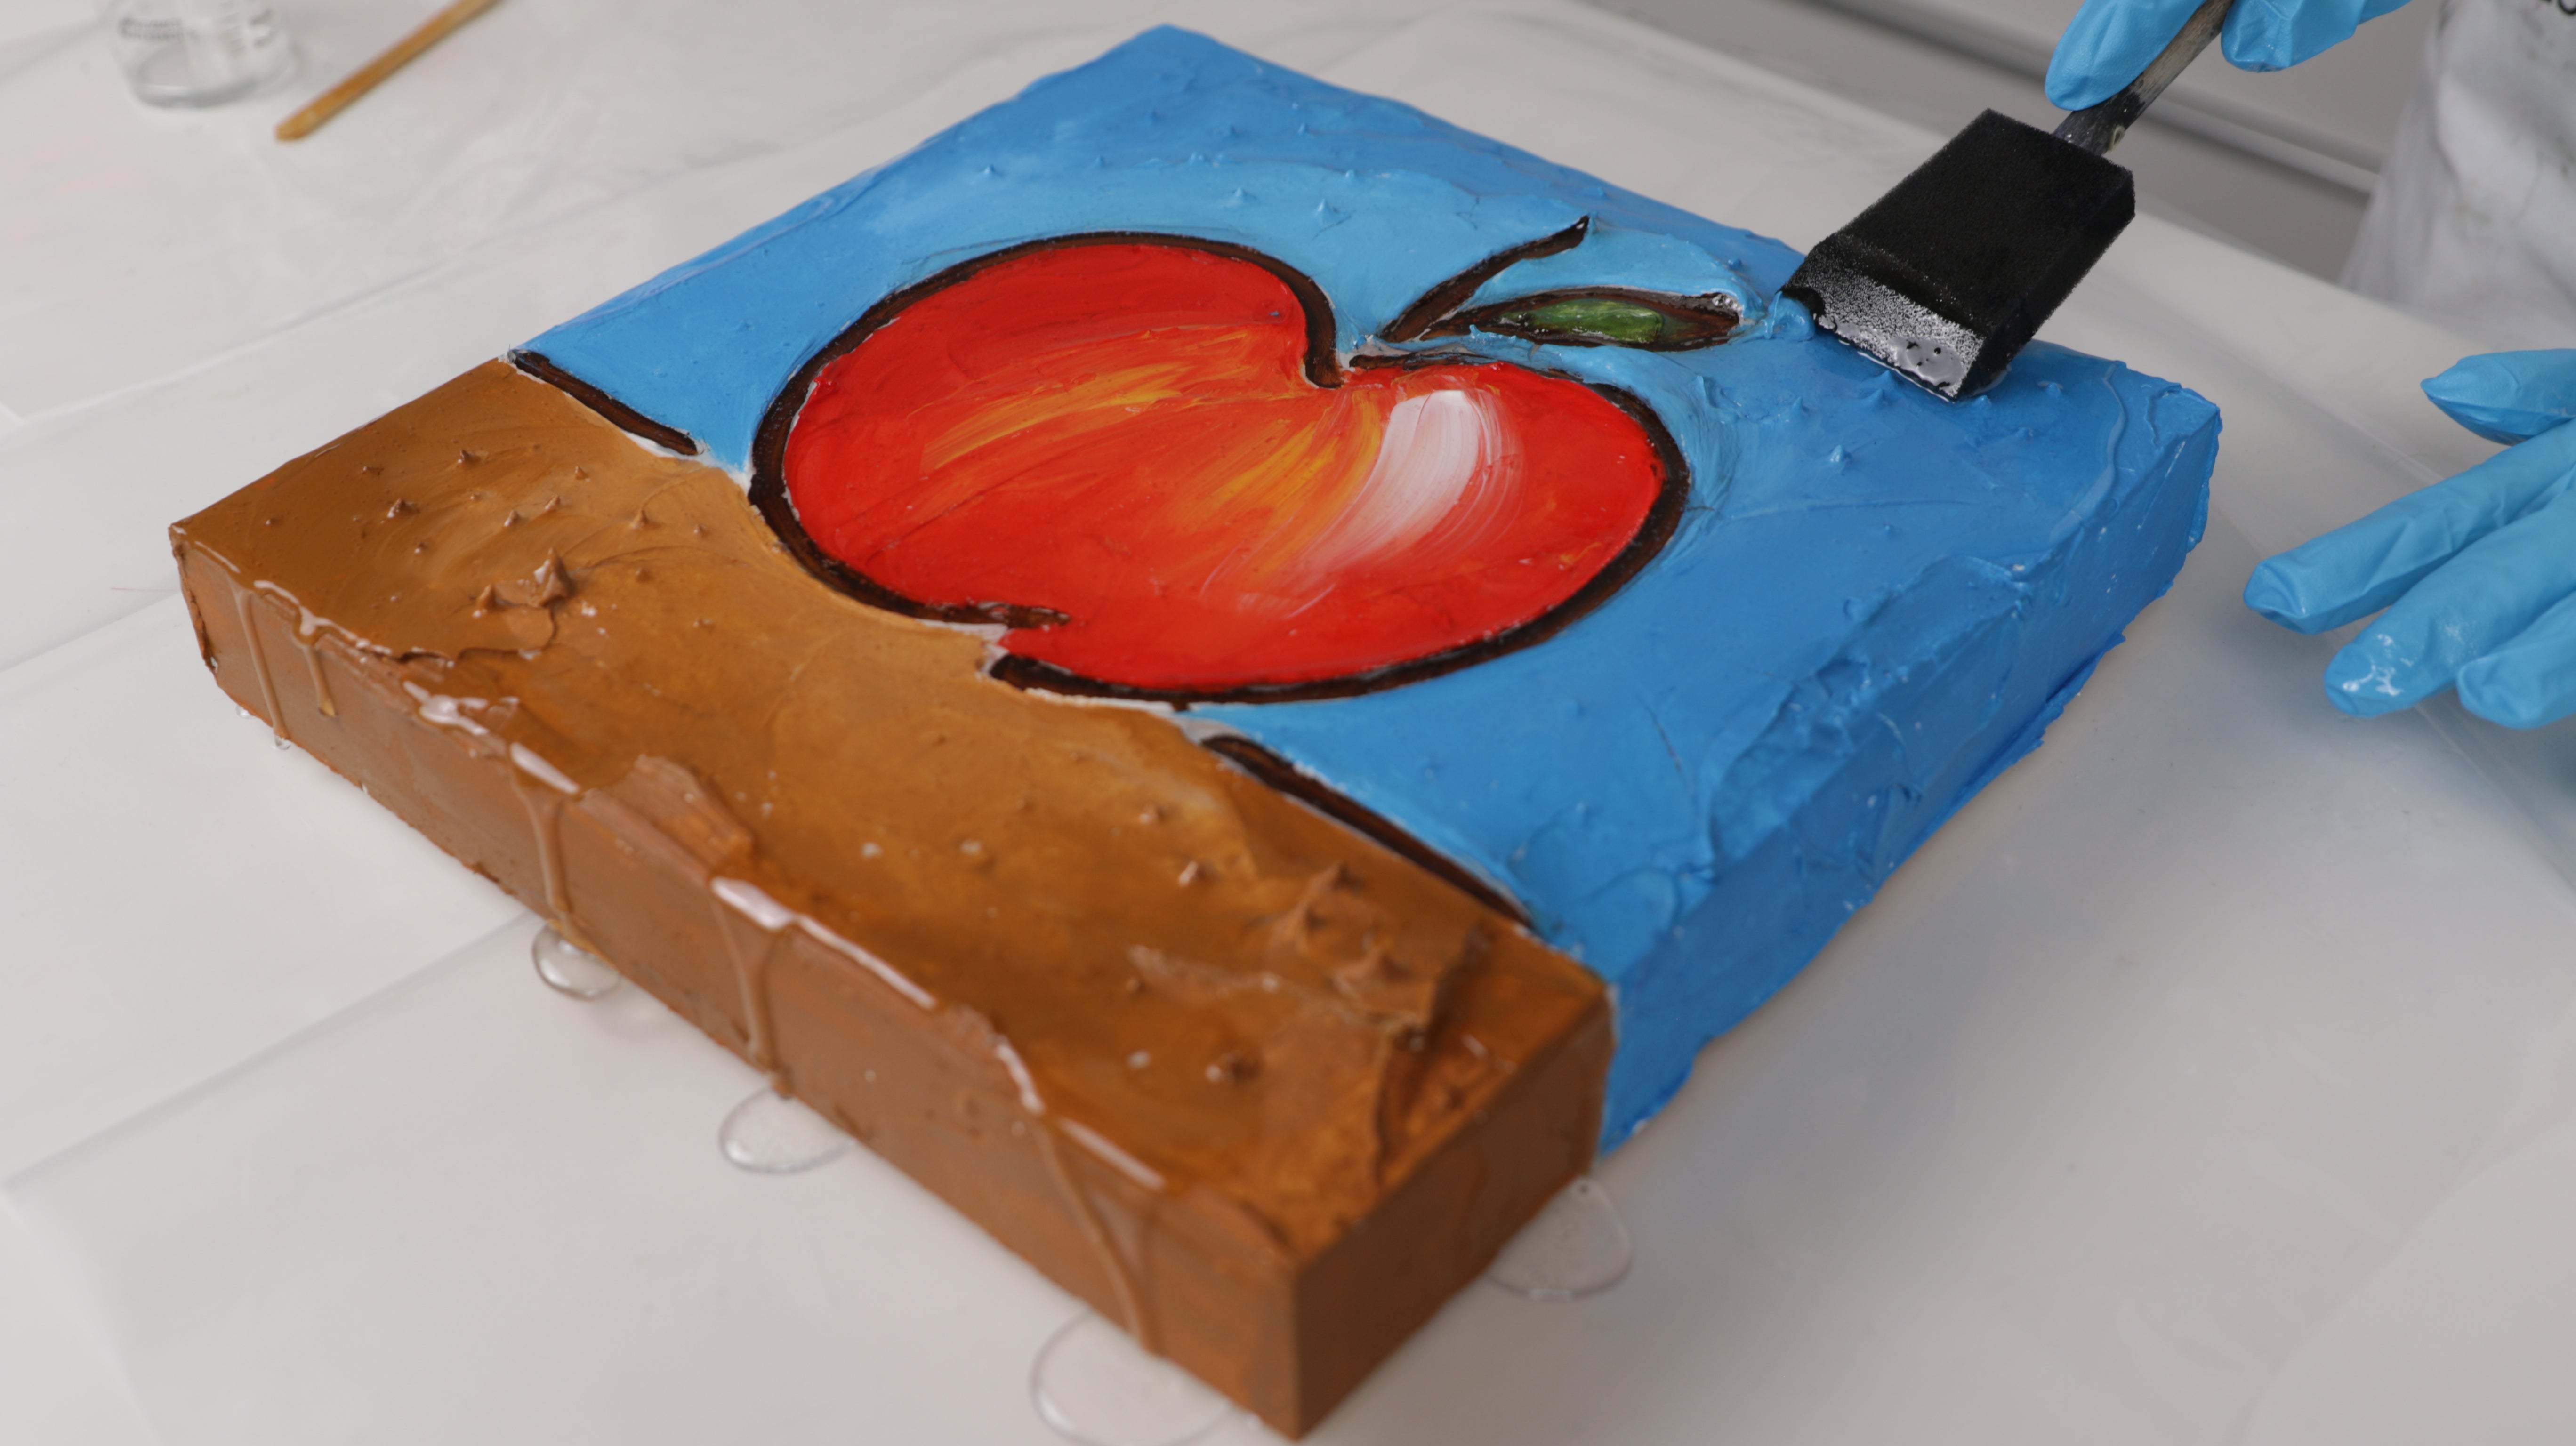
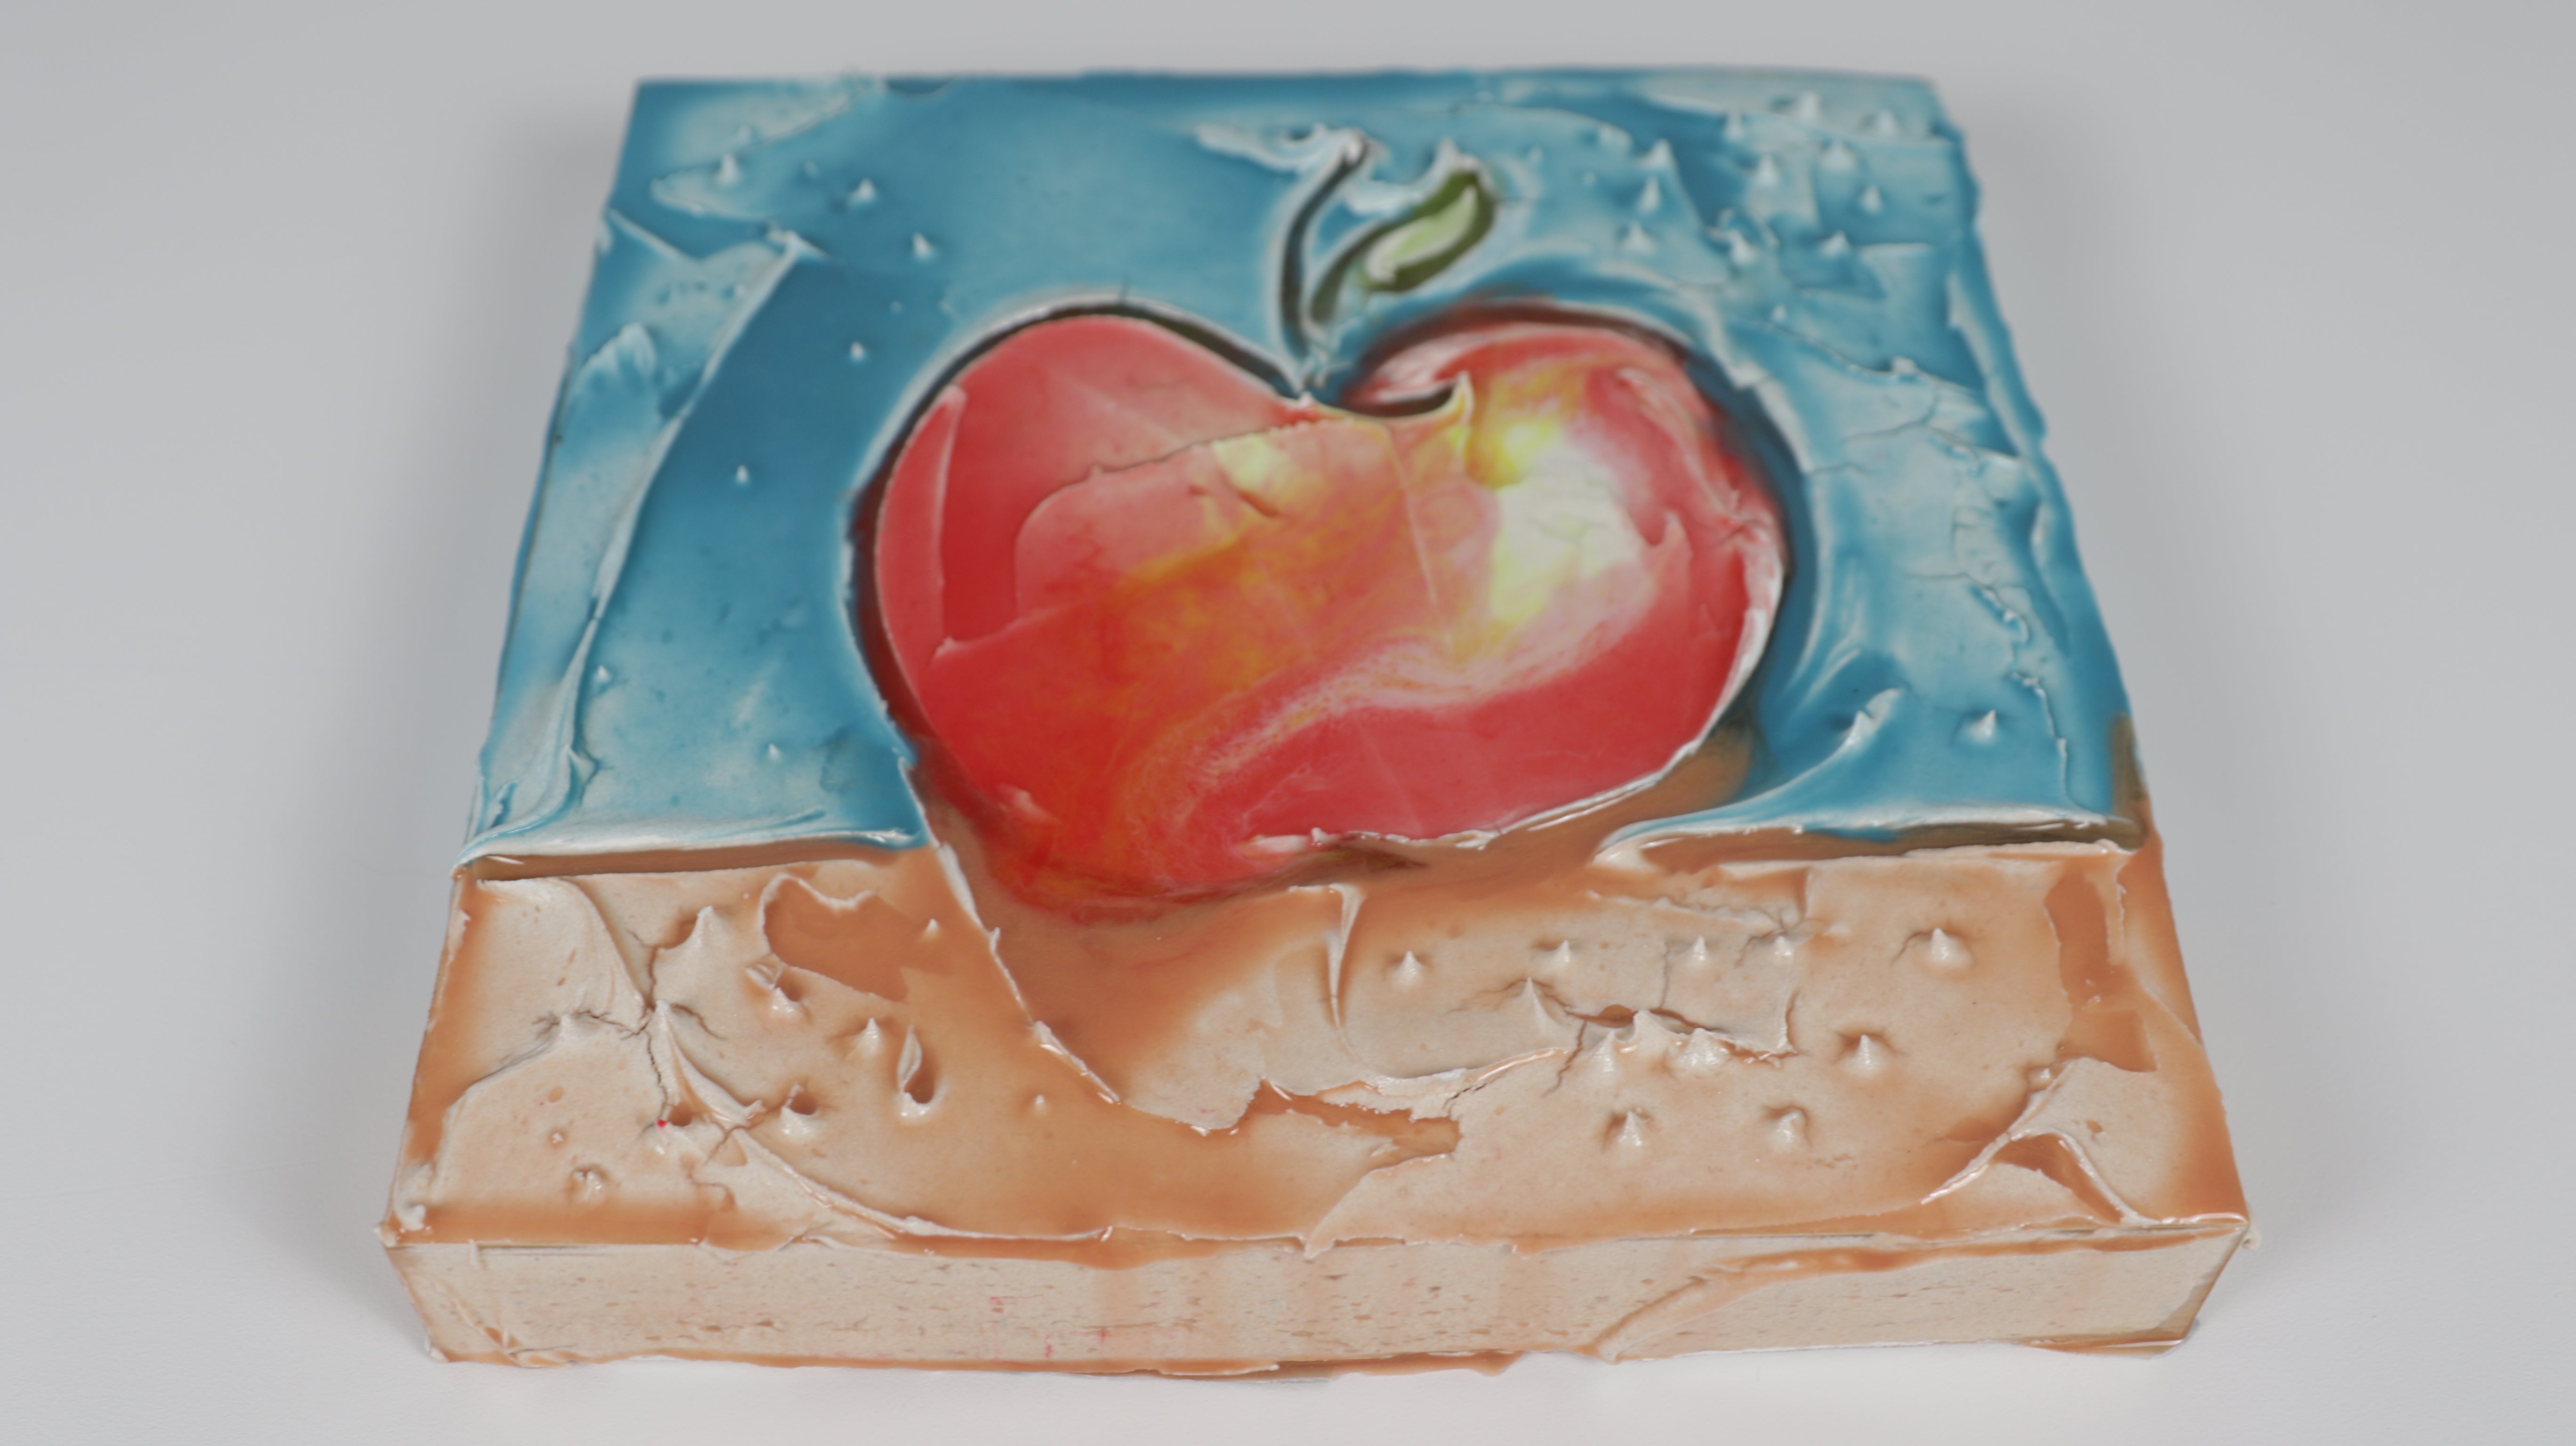
3. Using acrylics, paint your color pattern
Using acrylics, paint your color pattern onto the dried plaster design. Allow the paint to dry thoroughly before applying ArtResin.

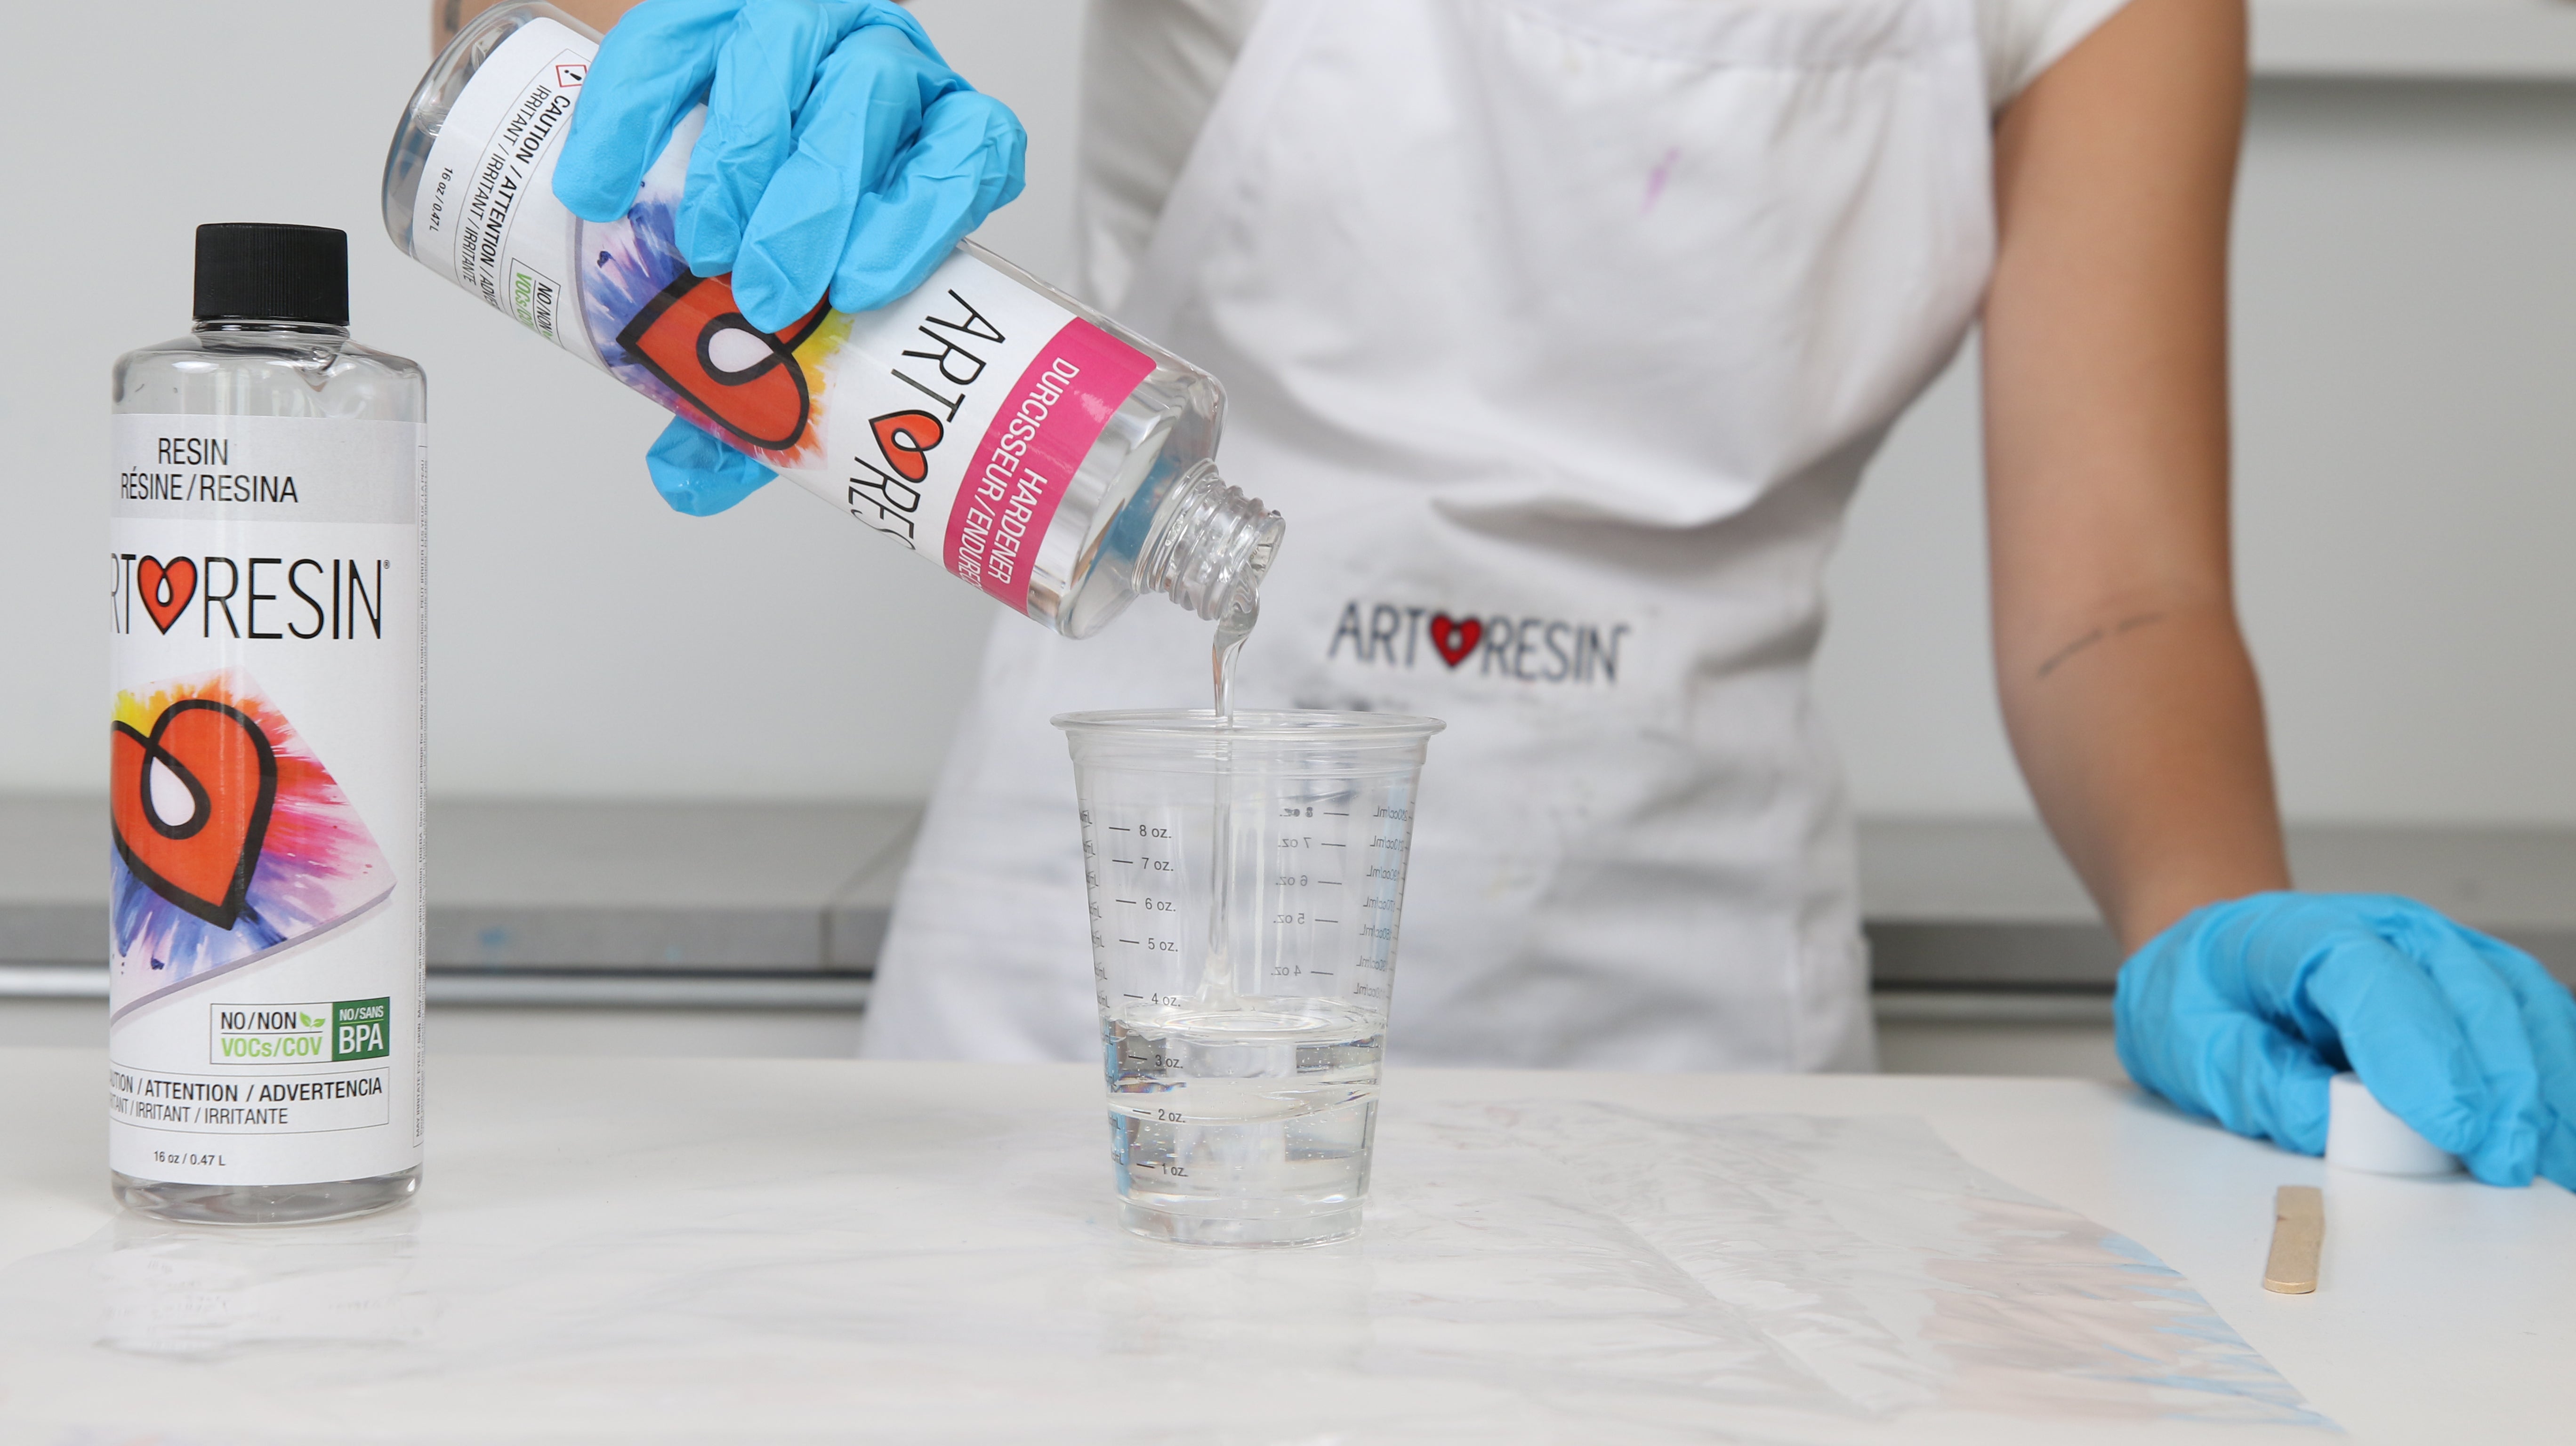
4. Wearing gloves, measure and mix the resin and hardener
Wearing gloves, measure and mix the resin and hardener in equal amounts by volume. Mix for at least 3 minutes, scraping the sides and bottom of the mixing container as you stir.
💡TIP: Not sure how much ArtResin you need? Simply enter the dimensions of your wood panel into our Resin Calculator and it will tell you exactly how much resin you need and which kit to buy.
💡TIP: Not sure how much ArtResin you need? Simply enter the dimensions of your wood panel into our Resin Calculator and it will tell you exactly how much resin you need and which kit to buy.
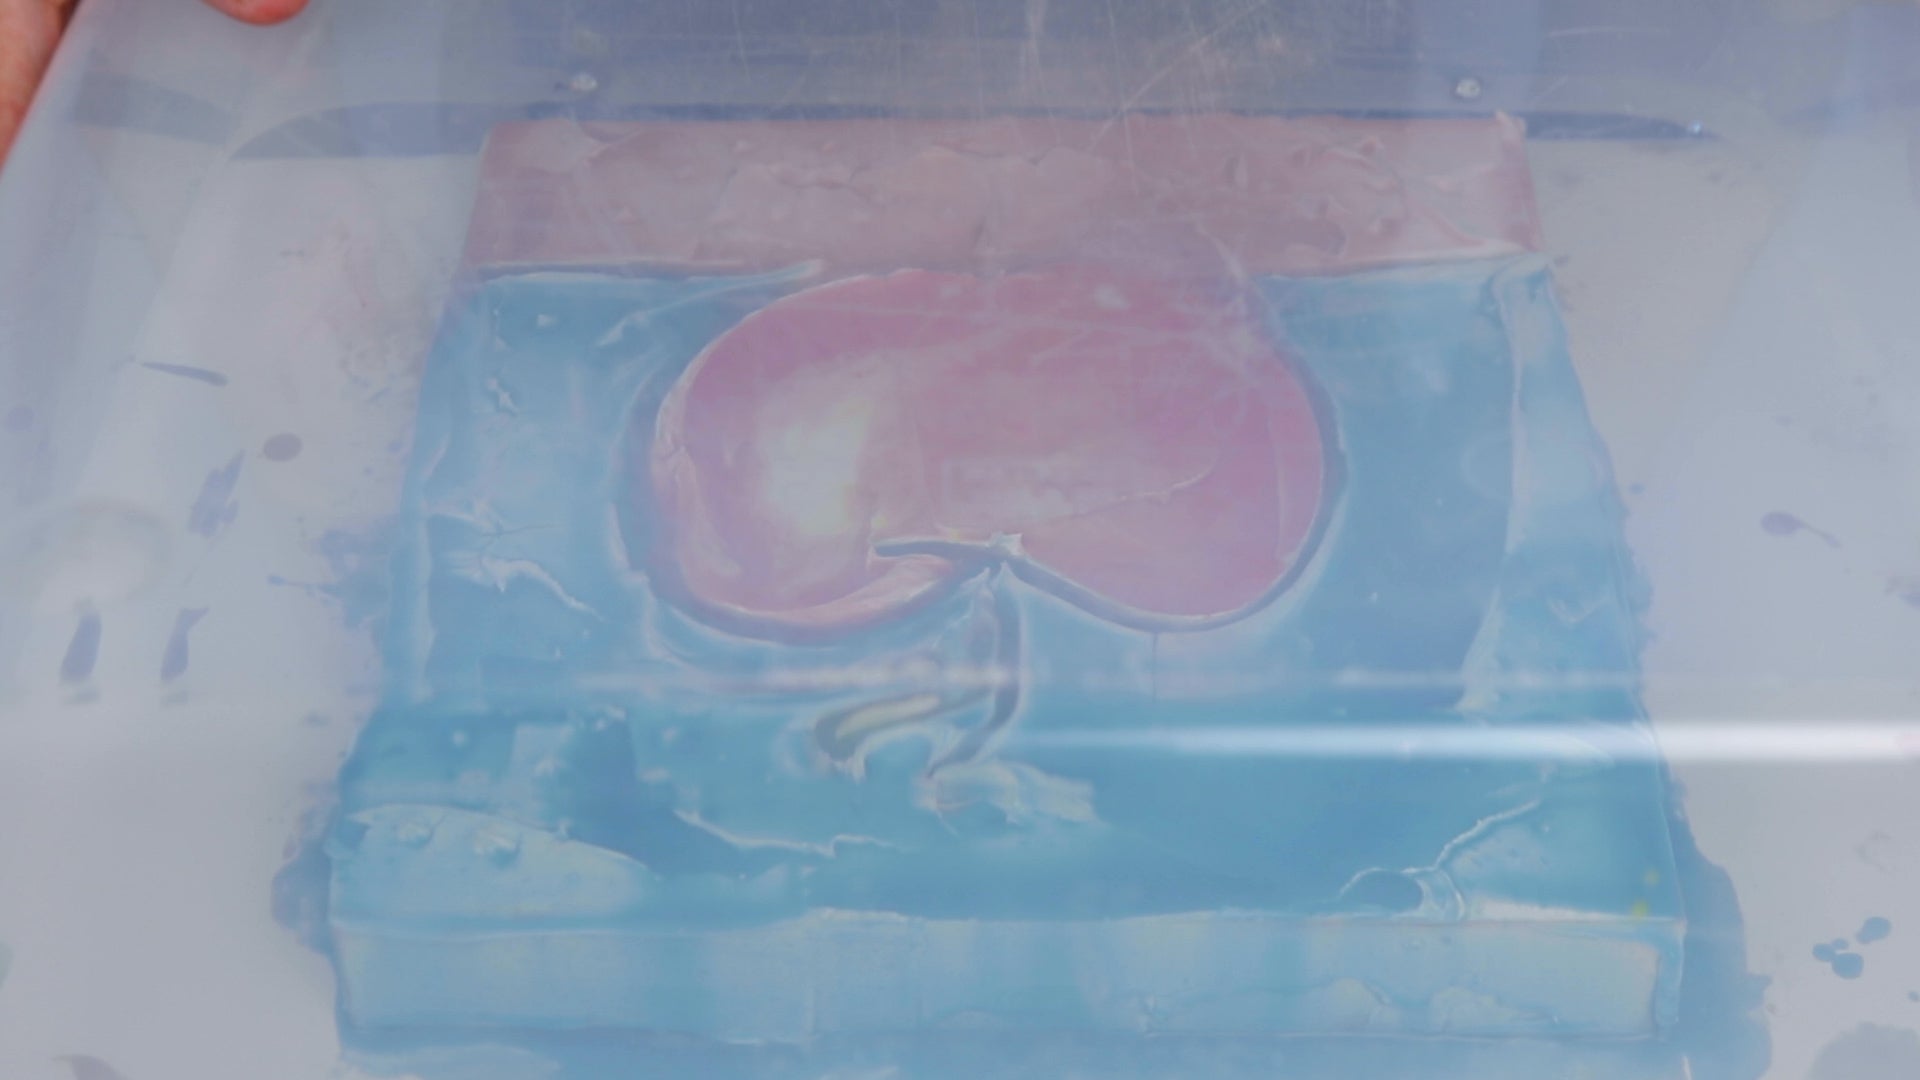
5. Apply ArtResin
Apply ArtResin evenly to the front and sides of the panel using a foam brush or gloved hands.
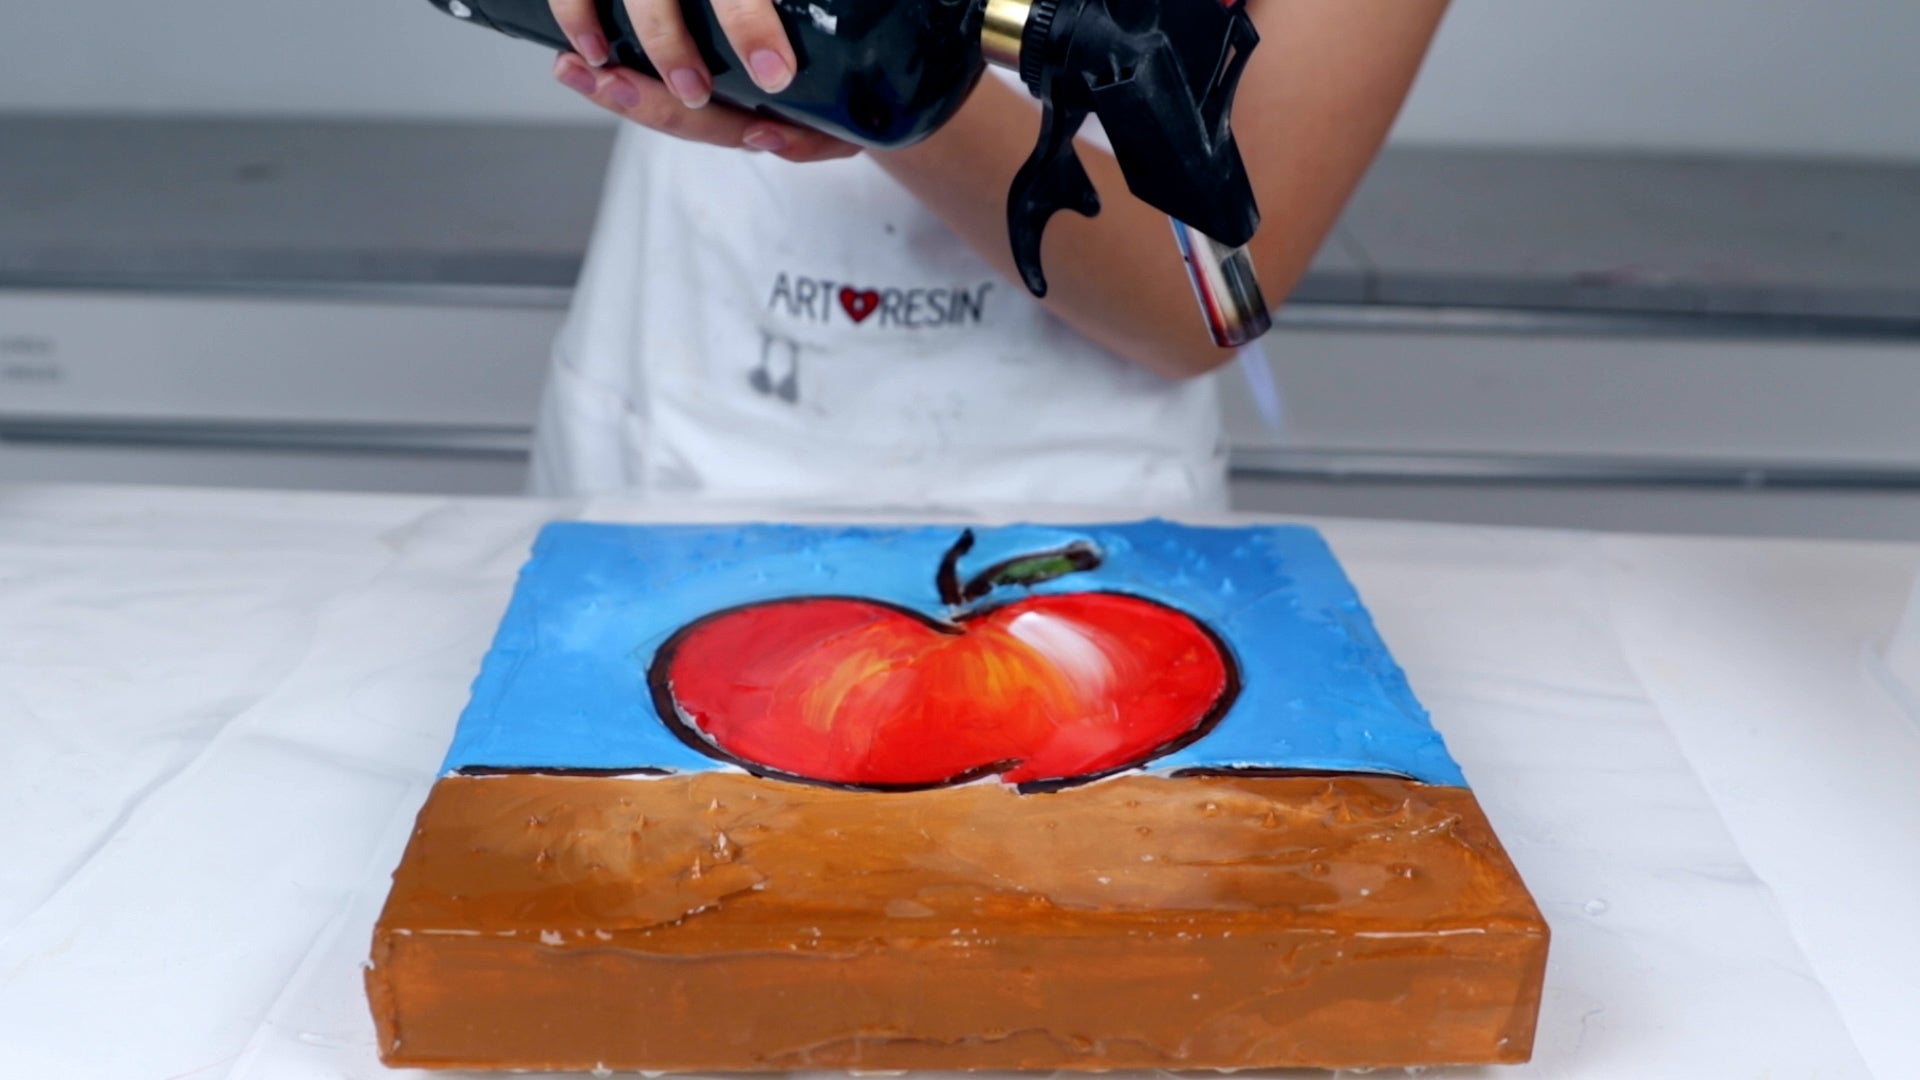
6. Pass a butane torch over the top of the resined surface
Pass a butane torch over the top of the resined surface quickly to remove any bubbles. Looking under a light source, use a toothpick to remove dust or pop stray bubbles.
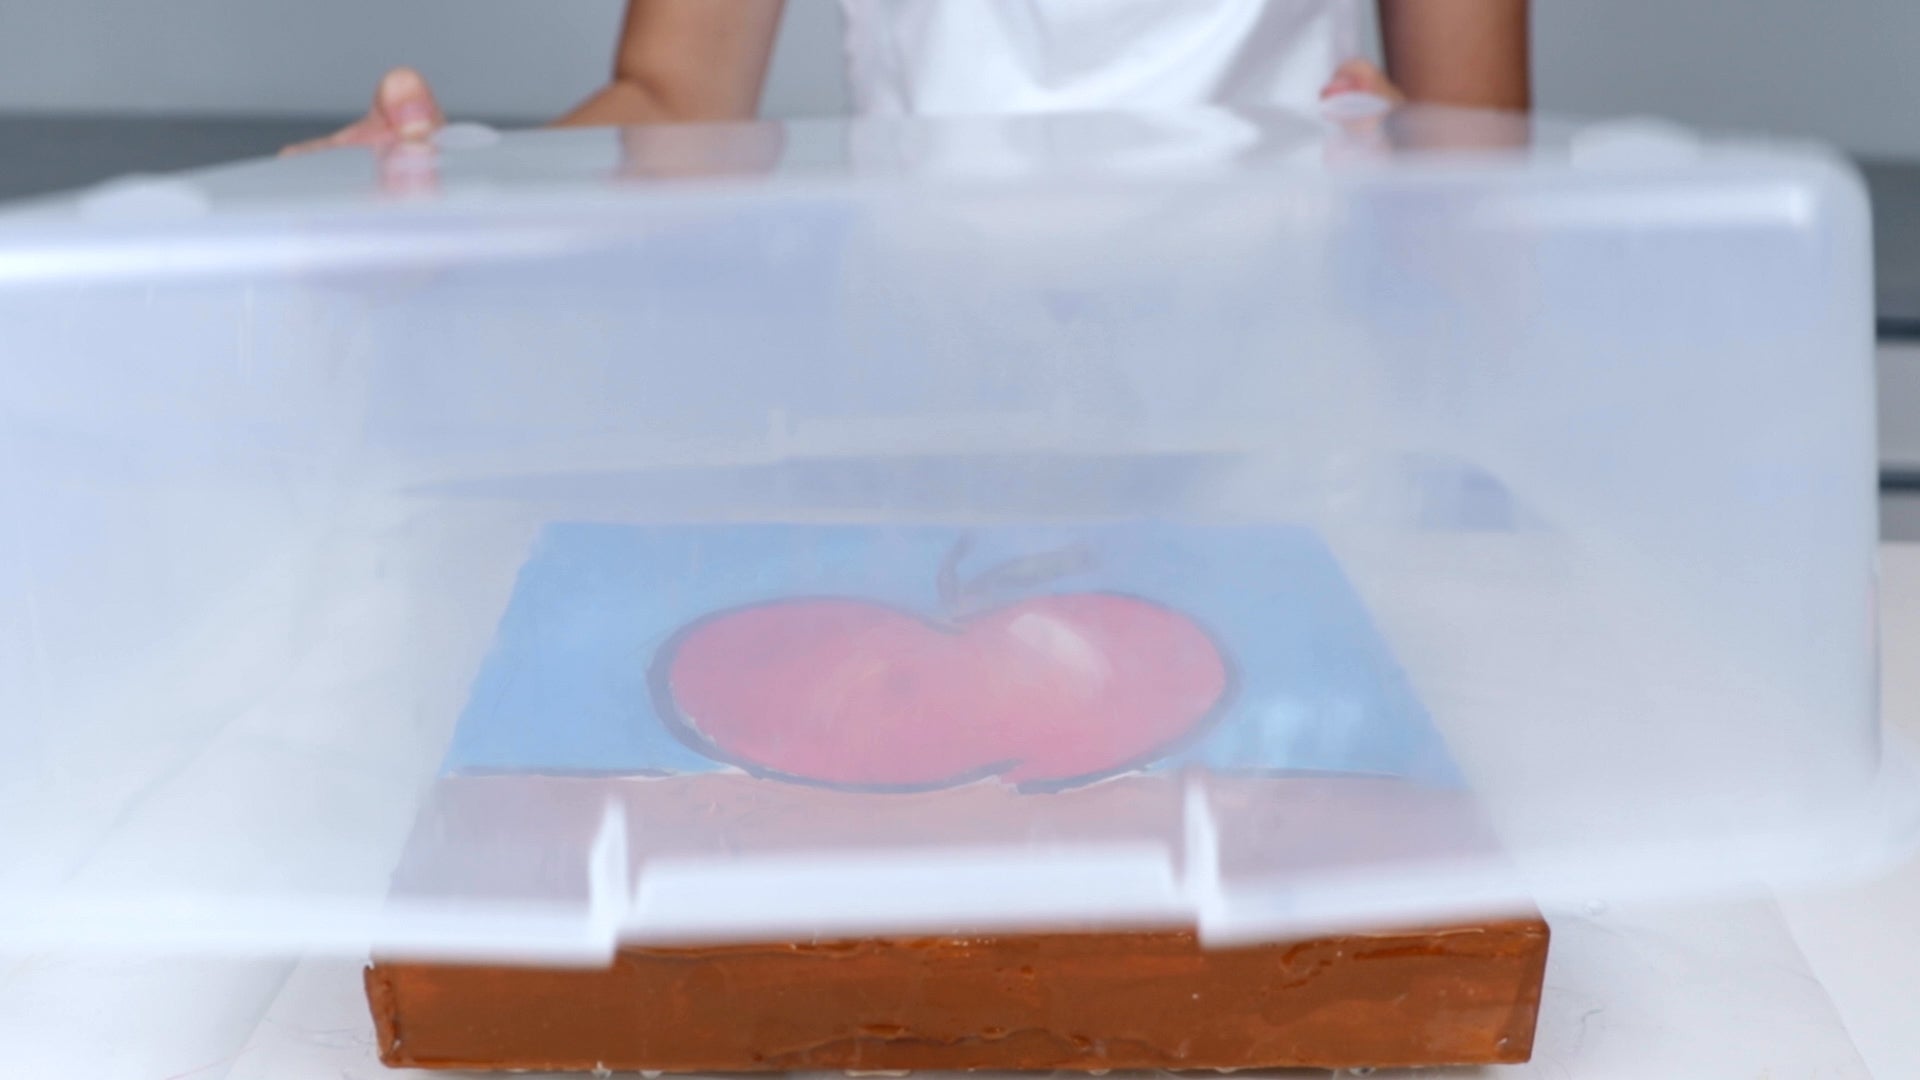
7. Cover your Textured Resin Art
Cover your resin art with a clean dust cover and allow to dry for 24 hours.
The second method is similar to the first except you'll be painting the plaster design with tinted ArtResin for a more transparent, watercolor effect.
What You'll Need:


Option 2 - ResinTint
The second method is similar to the first except you'll be painting the plaster design with tinted ArtResin for a more transparent, watercolor effect.What You'll Need:
- A wood art panel
- Drywall compound
- Spatula or small trowel
- ArtResin epoxy resin
- Disposable gloves
- Stir Stick
- Mixing cup with easy to read measurement lines
- Plastic cups & stir sticks (one for each color)
- ResinTint liquid colorant
- Eyedropper
- A handheld butane torch like our Artist's Torch
- Toothpicks
- A clean box or plastic tote to protect your resin art while it dries
1. Using a spatula or trowel, apply a thick coat of drywall compound
Using a spatula or trowel, apply a thick coat of drywall compound to the front and sides of the wood panel. Shape it with the spatula until you're happy with how it looks. Ensure that the coat on the face of the panel is thick enough to draw your design into.
2. Draw your design into the drywall compound while it's still soft
Draw your design into the drywall compound while it's still soft using the handle end of a paintbrush. Carve your design deep enough into the compound to create well defined cavities - this will help contain the resin and prevent the colors from bleeding into one another. Here's where you can get really creative using different tools to create different textures in the compound. Here are a few ideas:
💡TIP: Practice first with a variety of tools and compound on a scrap piece of wood to get an idea of what sort of textures you can achieve.

- use your spatula or trowel to create swirls
- press bubble wrap into the compound to make indents
- use a paint brush for brush strokes
- use a toothpick for fine details
- use a comb to create lines
- use crumpled aluminum foil to create a rough texture
💡TIP: Practice first with a variety of tools and compound on a scrap piece of wood to get an idea of what sort of textures you can achieve.
3. Wearing gloves, measure and mix the resin and hardener
Wearing gloves, measure and mix the resin and hardener in equal amounts by volume. Mix for at least 3 minutes, scraping the sides and bottom of the mixing container as you stir.
💡TIP: Not sure how much ArtResin you need? Simply enter the dimensions of your wood panel into our Resin Calculator and it will tell you exactly how much resin you need and which kit to buy.

💡TIP: Not sure how much ArtResin you need? Simply enter the dimensions of your wood panel into our Resin Calculator and it will tell you exactly how much resin you need and which kit to buy.
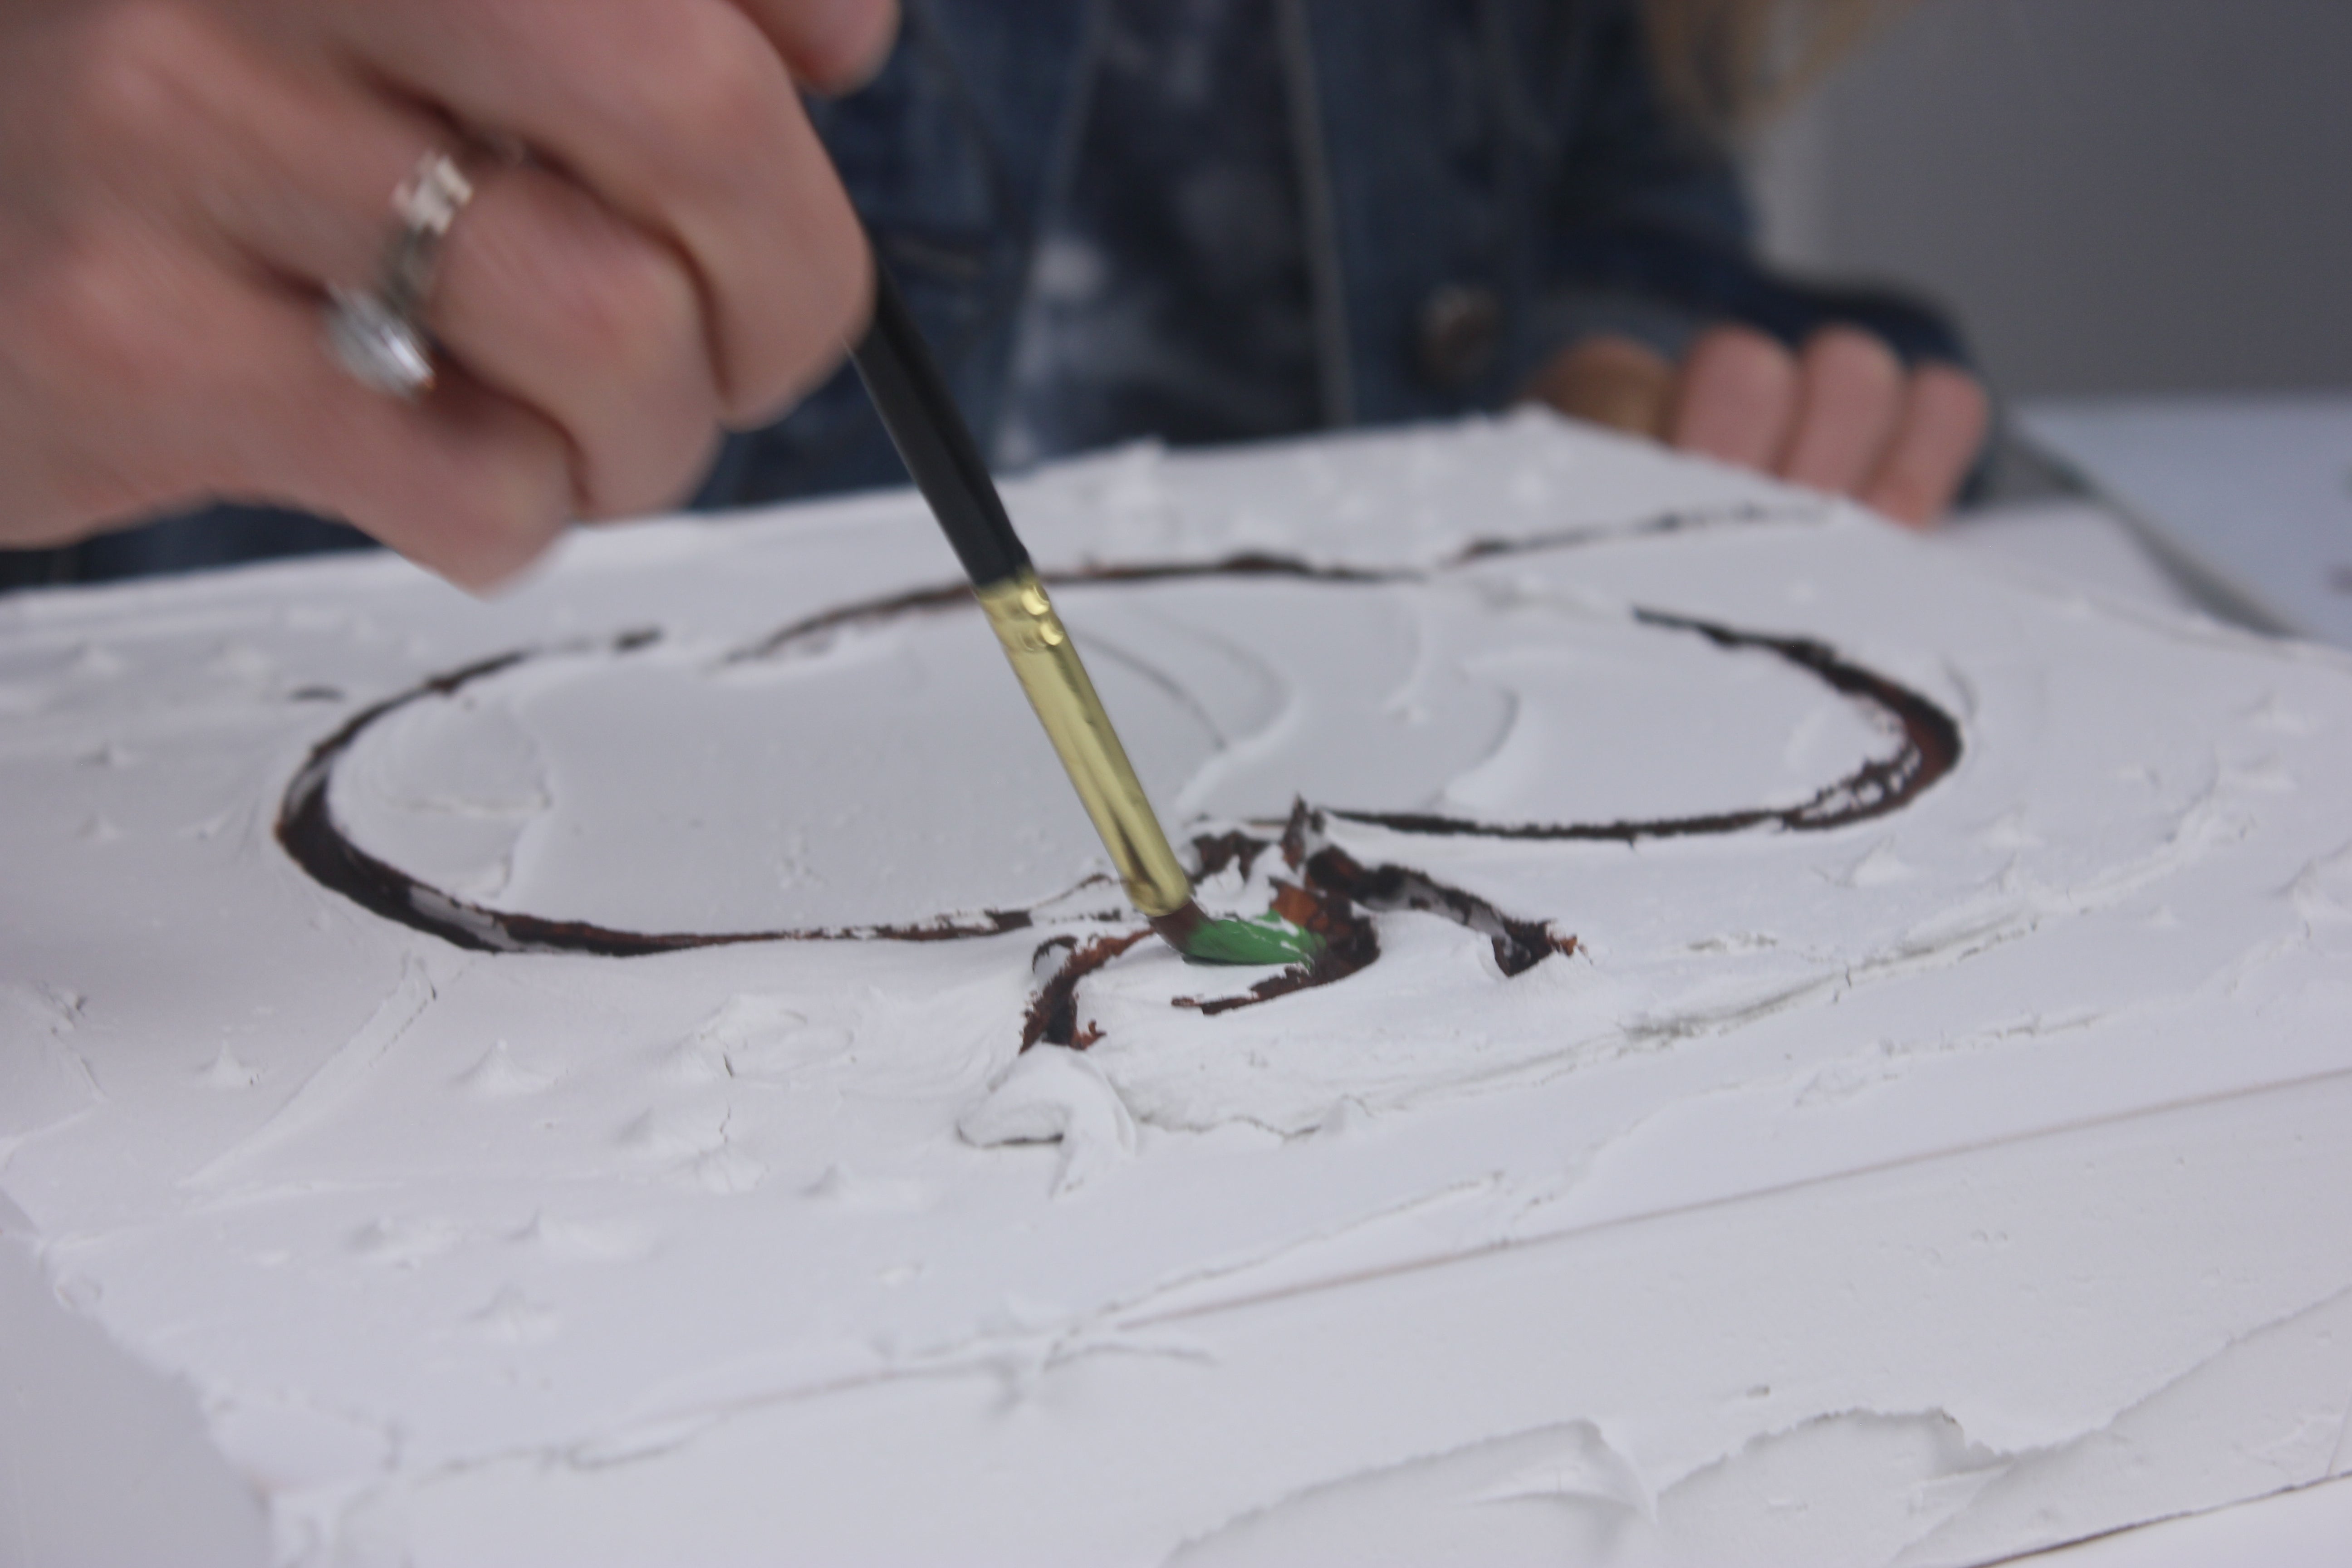
4. Divide resin into small plastic cups
Portion out the resin into small plastic cups, one per color. Add a few drops of ResinTint to each cup, mixing well to achieve the color you desire. Start with less than you need, adding more as necessary. Check the transparency by pulling some of the tinted resin up the side of the cup with the stir stick: if the tint is too translucent, add a little more colorant.
💡TIP: No matter which colorant you use, don't add more than 6% of the total combined volume of resin and hardener. Adding more than this will throw off the delicate balance required for the resin and hardener to cure, and you may end up with resin that doesn't harden.

💡TIP: No matter which colorant you use, don't add more than 6% of the total combined volume of resin and hardener. Adding more than this will throw off the delicate balance required for the resin and hardener to cure, and you may end up with resin that doesn't harden.
5. Apply The Tinted Resin
Apply the tinted resin to fill in the design as you wish. You could, for example:
- Fill in the outline with an eyedropper
- Use a paintbrush for any detail work
- Fill in larger areas with a foam brush
- Pour the tinted resin onto your piece, using a gloved hand to blend it.
6. Pass a butane torch over the top of the resined surface
Pass a butane torch over the top of the resined surface quickly to remove any bubbles. Looking under a light source, remove any dust or pop any stray bubbles with a toothpick. Cover your resin art with a clean dust cover and allow to dry for 24 hours.
Making these textured resin art pieces really is as simple as it looks: one will give you a vibrant, opaque look and the other has a less saturated, transparent look. Whichever technique you choose to try is really up to your personal preference. Either way, you're going to see just how fun they are to make, we promise.
Which one do you prefer? Let us know in the comments below!
Do you want to learn more about using resin on different surfaces? See below our how-to tutorials:
- Introduction to Resin Art
- How to Resin an Acrylic Painting
- How to Resin Watercolor
- How to Resin on Canvas for Beginners
- How to Resin Flowers
- How to Resin Over Gold Leaf
- How to Resin Metal Print
- How to Resin Wood
- How to Resin Mosaic
- How to Resin Rocks
- How to Resin Modelling Clay
- How to Resin Chalk Pastel
- How to Resin A Paper Collage
- How to Resin Charcoal
- How To Resin Mosaic
ArtResin: Made For Artists, By Artists