Turn Broken Glass Into Unique Resin Art
Broken bottle resin art has become a popular way to turn empty bottles into a unique piece of wall art! Perfect for preserving a special memory, creating a conversation piece for your home bar, or making a meaningful gift for someone special, this beginner-friendly project combines recycled glass with glossy resin for a one-of-a-kind result.
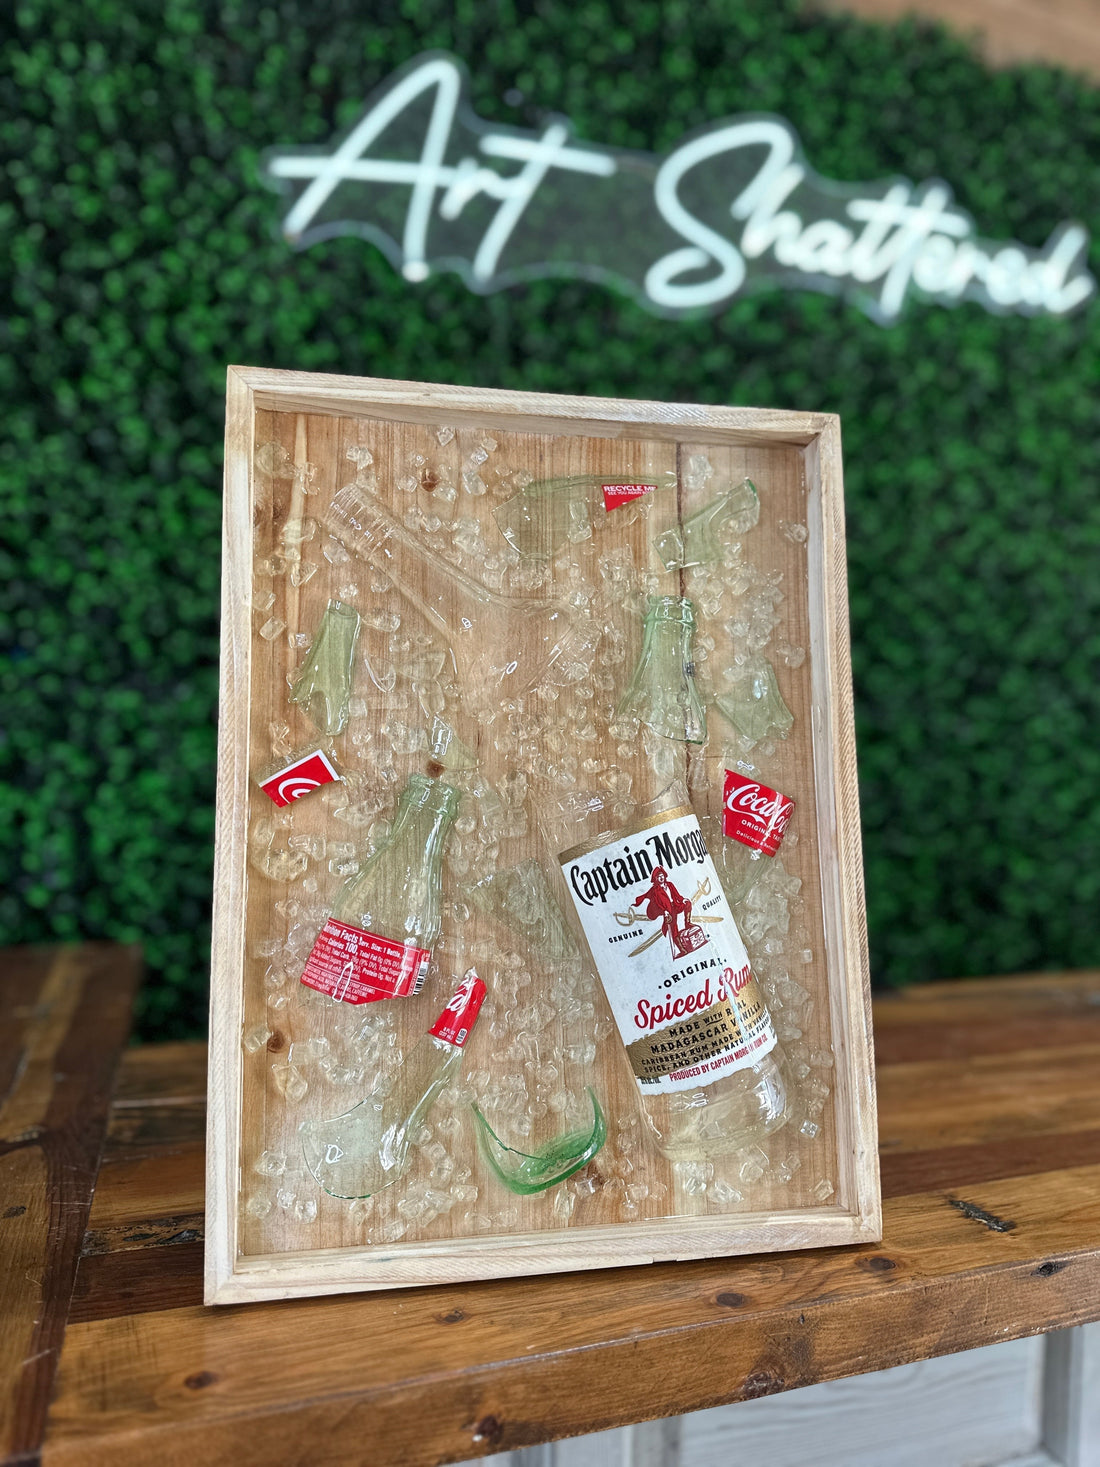
Artist Cindy Manly, founder of Art Shattered and The Shattered Circle, has over 20 years of experience teaching glass and resin techniques. In this tutorial, Cindy shows how to use resin, crushed glass, and broken Captain Morgan and Coca-Cola bottles to create a Rum and Coke inspired resin art piece.
Here's how to make your own broken bottle resin art from start to finish. Let's get started!
Watch the full video tutorial here:
Materials
• Wood tray: Cindy's is from Hobby Lobby
• Painter's Tape: optional, to protect the tray sides and back from drips
• Broken bottles: Captain Morgan & mini Coca-Cola for a rum and Coke theme
• Crushed Tempered Glass: Cindy uses crushed tempered glass in Starfire
• Plastic-lined work surface
• Nitrile gloves
• ArtResin
• Mixing Cup: with graduated lines
• Stir stick: Cindy used a jumbo craft stick
• Spreader: Cindy used a silicone spreader
• Heat gun or Butane Torch: to pop bubbles
• Dust Cover: to protect the curing resin
• Isopropyl Alcohol & Paper Towel: to wipe off wet tools or clean resin drips or spills
Step 1 - Prepare the Base
Lay your materials out on a plastic-lined work surface.
💡 TIP: Work on plastic lined table top. Resin drips can be wiped away with baby wipes or isopropyl alcohol, or simply peel from the plastic once cured.
Cindy's wood tray is not sealed, but you can apply a clear-drying sealant to help prevent air bubbles. You can also paint the tray if you wish, but Cindy chose to leave hers natural for a rustic look.

Step 2 - Mix the ArtResin
Next, Cindy mixes up 3 oz of ArtResin - enough for the base coat, to apply the broken glass pieces and as a top coat to fix them in place.
If you're unsure how much resin you'll need, enter the dimensions of your piece into ArtResin's Resin Calculator, and double the result to cover the base and top coat.
💡 TIP: Cindy decants her resin and hardener into labelled squeeze bottles for easy pouring.

Stir the resin and hardener together for 3 minutes, scraping the sides and bottom of the mixing cup to ensure a thorough mix. Stir gently to avoid creating excess bubbles.

Step 3 - Pour the Base Layer
Once mixed, Cindy pours a thin, even layer of resin onto the base of the tray. She guides it to the edges and corners with a silicone spreader. The base layer gives the glass pieces something to adhere to.


Step 4 - Place the Glass Pieces
⚠️ IMPORTANT: Before handling the glass, it's important to hone the sharp edges with a honing stone. This will dull the edges, protecting you while you're creating your piece, as well as those who may handle it afterwards.
Cindy starts by positioning the Captain Morgan bottle, which luckily broke into 2 really nice, clean pieces.
To make sure the glass adheres well, Cindy drizzles a little resin, smoothing it out with her gloved hand along the inside of the glass as well as the edges. This will help the glass pieces, particularly curved pieces, stick better.


Cindy positions the rum bottle pieces on the tray.

Next, Cindy moves onto the Coke bottle, which shattered into multiple small pieces. Cindy repeats the steps, carefully coating the inside and edges of each piece, before placing them on the tray around the Captain Morgan pieces. She adjusts the placement as she goes, varying the direction so that the pieces don’t all sit facing the same way.
💡 TIP: Whether the pieces are large or small, it's ok either way! The smaller pieces help add interest and texture.


Step 5 - Add Crushed Glass
Once all the pieces are placed, Cindy removes her gloves to add the crushed tempered glass, scattering them around the empty spaces. This will add some depth and help create the illusion of freshly shattered glass or crushed ice.


Step 6 - Seal with a Top Coat
Next, Cindy puts her gloves back on and, using a craft stick, drizzles a generous amount of resin over the glass, focusing on the edges to seal them in. She uses her craft stick to help spread it evenly, partcularly over the curved pieces. This step helps solidify the art, making it less fragile or prone to breakage.
Cindy prefers drizzling the resin over top rather than flooding the surface. As you drizzle, check for bare spots on the base to make sure the coverage is even however, you can also leave some shards without a top layer of resin for a more “raw” broken-glass look.
💡 TIP: Don't worry if the resin pools in spots - ArtResin will even out as it cures.


Step 7 - Pop the Bubbles & Finish
Now that the top coat of resin is applied, it's time to pop the bubbles. Cindy is using a heat gun, but you can use a butane torch if you wish.
💡 TIP: Make sure you keep the heat gun or torch moving at all times to avoid scorching the resin or the wood.

Finally, Cindy sprinkles in a few more pieces of fireglass to any areas that look a bit sparse, then covers her artwork to protect it from dust while curing.

Once cured, your Rum & Coke broken bottle resin art is ready to hang - a glossy, upcycled piece of wall art that you made yourself!

Thanks so much to Cindy for sharing her techniques with us! We hope you enjoyed this fun project and feel inspired to make a broken bottle resin art piece of your own!
For more information on resin and glass, please visit our blogs:
How To Create a Resin & Glass Mosaic Seahorse
Can Resin Art Be Done On Glass?
Les Braze is our ArtResin Winner!
ArtResin: Celebrating 10 years as the Original Epoxy for Resin Art.
