Create with Walmart
OCEAN RESIN ART

The secret to creating beautiful, realistic beach resin art is tinted epoxy resin and a hairdryer: it's an easy technique that involves pouring layers of resin in various shades of blue, then finishing with a layer of white that gets pushed around with a hairdryer to create a lacing effect reminiscent of sea foam. Resin is essential to creating realistic ocean art: it's clarity, consistency and gloss replicate the look of water in a way you simply can't get with any other medium.
Layering various shades of tinted ArtResin creates a feeling of motion and depth: beautiful, deep ocean blues contrast with white wave crests against a sandy shore and ArtResin's irresistibly shiny finish makes you want to dive right in.
Whether you call it ocean art, beach art or a seascape, chances are you've seen this gorgeous look before and wondered how it was done: artist Rebecca Brianceau dropped by the ArtResin studio to demonstrate how easy it is to create your own stunning ocean art, even for a beginner!
Let's get started...
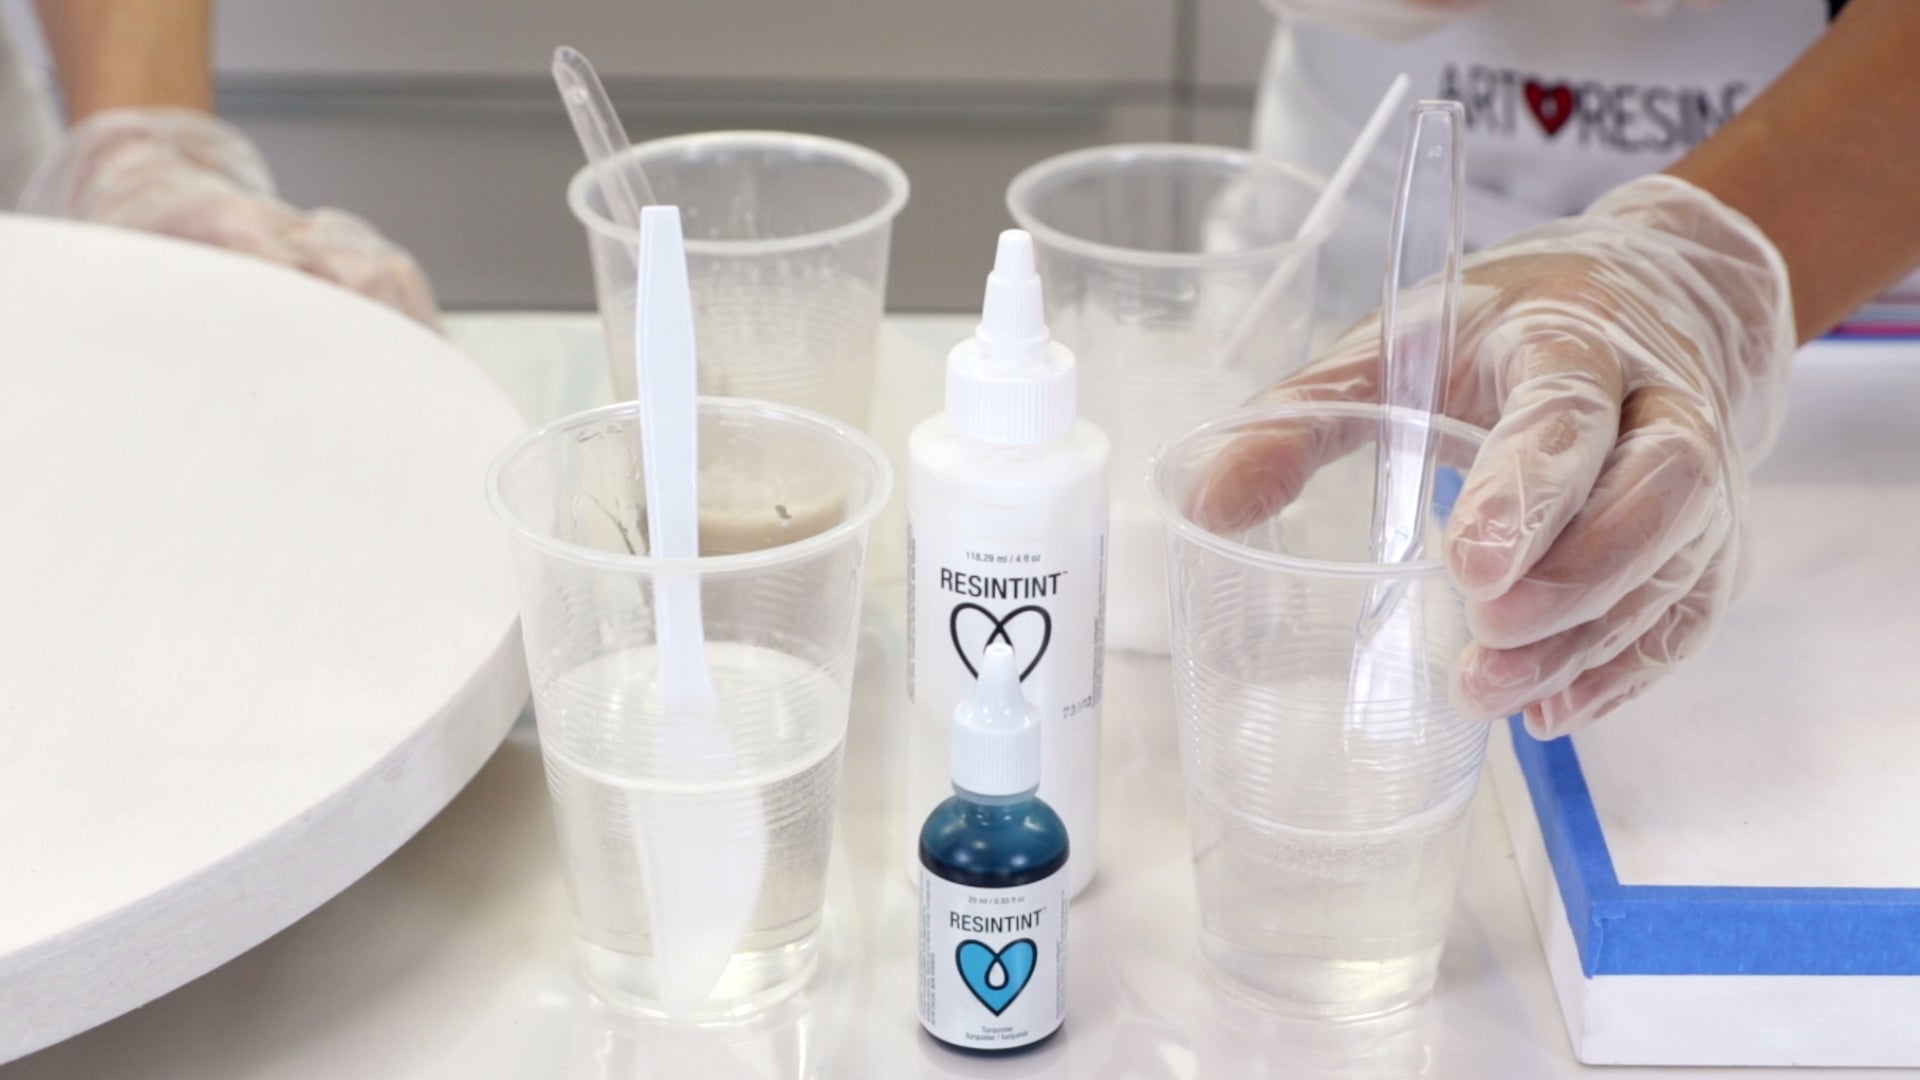
What You'll Need:
- ArtResin epoxy resin
- ResinTint liquid colorants
- a wooden panel, round or square
- a hairdryer
- nitrile gloves
- plastic mixing cup
- small plastic cups and stir sticks, enough for each colour of tint used
- toothpick
- a piece of plastic to work on ( a cut piece of vinyl shower curtain works great )
- plastic stands to prop your work up on ( painter's pyramids or plastic cups )
- an Artist's Torch
- dust cover large enough to cover your piece
Browse our resin art accessories & tools.
1. Assemble Your Materials Before You Start:
Gather your tools so that everything is on hand before you start, including your dust cover. 
If you want to keep the panel edges clean, tape them off with painter's tape to protect them from getting splashed with resin.
If you want to allow your resin to run over the sides of your panel, prop it off of your work surface: we like using painter's pyramids, plastic cups or lego blocks.


2. Prepare Your ArtResin And Tints:
Measure equal amounts, by volume, of resin and hardener and mix thoroughly for at least 3 minutes, scraping the bottom and sides of the mixing container as you go. Divide the resin equally among small plastic cups, allowing one per color.
Shake the ResinTint bottles well and use a few drops to tint each cup of resin, mixing well after each addition. Don't be afraid to mix and match to achieve the colours you wish to use. After you mix in the tint, ensure the resin sits and thickens for 15 minutes before you start to create your design. If you try to pour right after mixing, the resin will be too fluid: you'll end up with muddy colours and could lose your design.
We prepared 4 colors for this project:
- light turquoise ( using only a few drops of turquoise and a bit of white )
- dark turquoise ( using several drop of turquoise for a deeper color )
- white
- sand ( neon green, neon pink, neon yellow & white mixed together )
ResinTint is a highly saturated pigment based colorant, so it's always best to start with less than you need, adding more as necessary. Never add more than 6% of the total volume of resin and hardener combined, or your resin won't cure.
Check the transparency by using the mixing stick to pull some of the tinted resin up the side of your cup: if the tint is too translucent, add a little more until you're happy with what you see.

3. Create Your Beach:
After your tinted resin has had a chance to sit and thicken, you're ready to pour.
First, start with the sand color to create the beach. If you're using a round panel, apply the sand to the edge closest to you, spreading the resin out and over the sides with a popsicle stick or a plastic knife.
4. Create Your Ocean:
Next, we're going to start building our ocean, starting with the dark turquoise to represent the deepest, darkest part of the water.
Apply the dark turquoise to about half of your panel, starting on the far end ( the side opposite to the sand. ) Use your plastic knife to spread it out and over the sides.

Feel free to adjust the color as you wish:
- If you want the color a bit darker, add more turquoise.
- If you want to increase the opacity, add a little bit of white.
In this case, Rebecca wanted a more saturated color so added more turquoise for a deeper, richer look. Experiment and have fun!
Next, pour the light turquoise: this will represent the shallow water closer to shore. Once again, Rebecca adjusted her color, adding a little white to increase the opacity and richness. Remember, there's no wrong or right - add and adjust until you see the color you're happiest with.
Apply the lighter turquoise to the remainder of the canvas. Blend well where the light turquoise meets the dark turquoise to get a nice, even transition between the two colors. Leave a little separation between the sand and turquoise along the shoreline: you don't want the two colors to meet or you'll end up with a muddy look.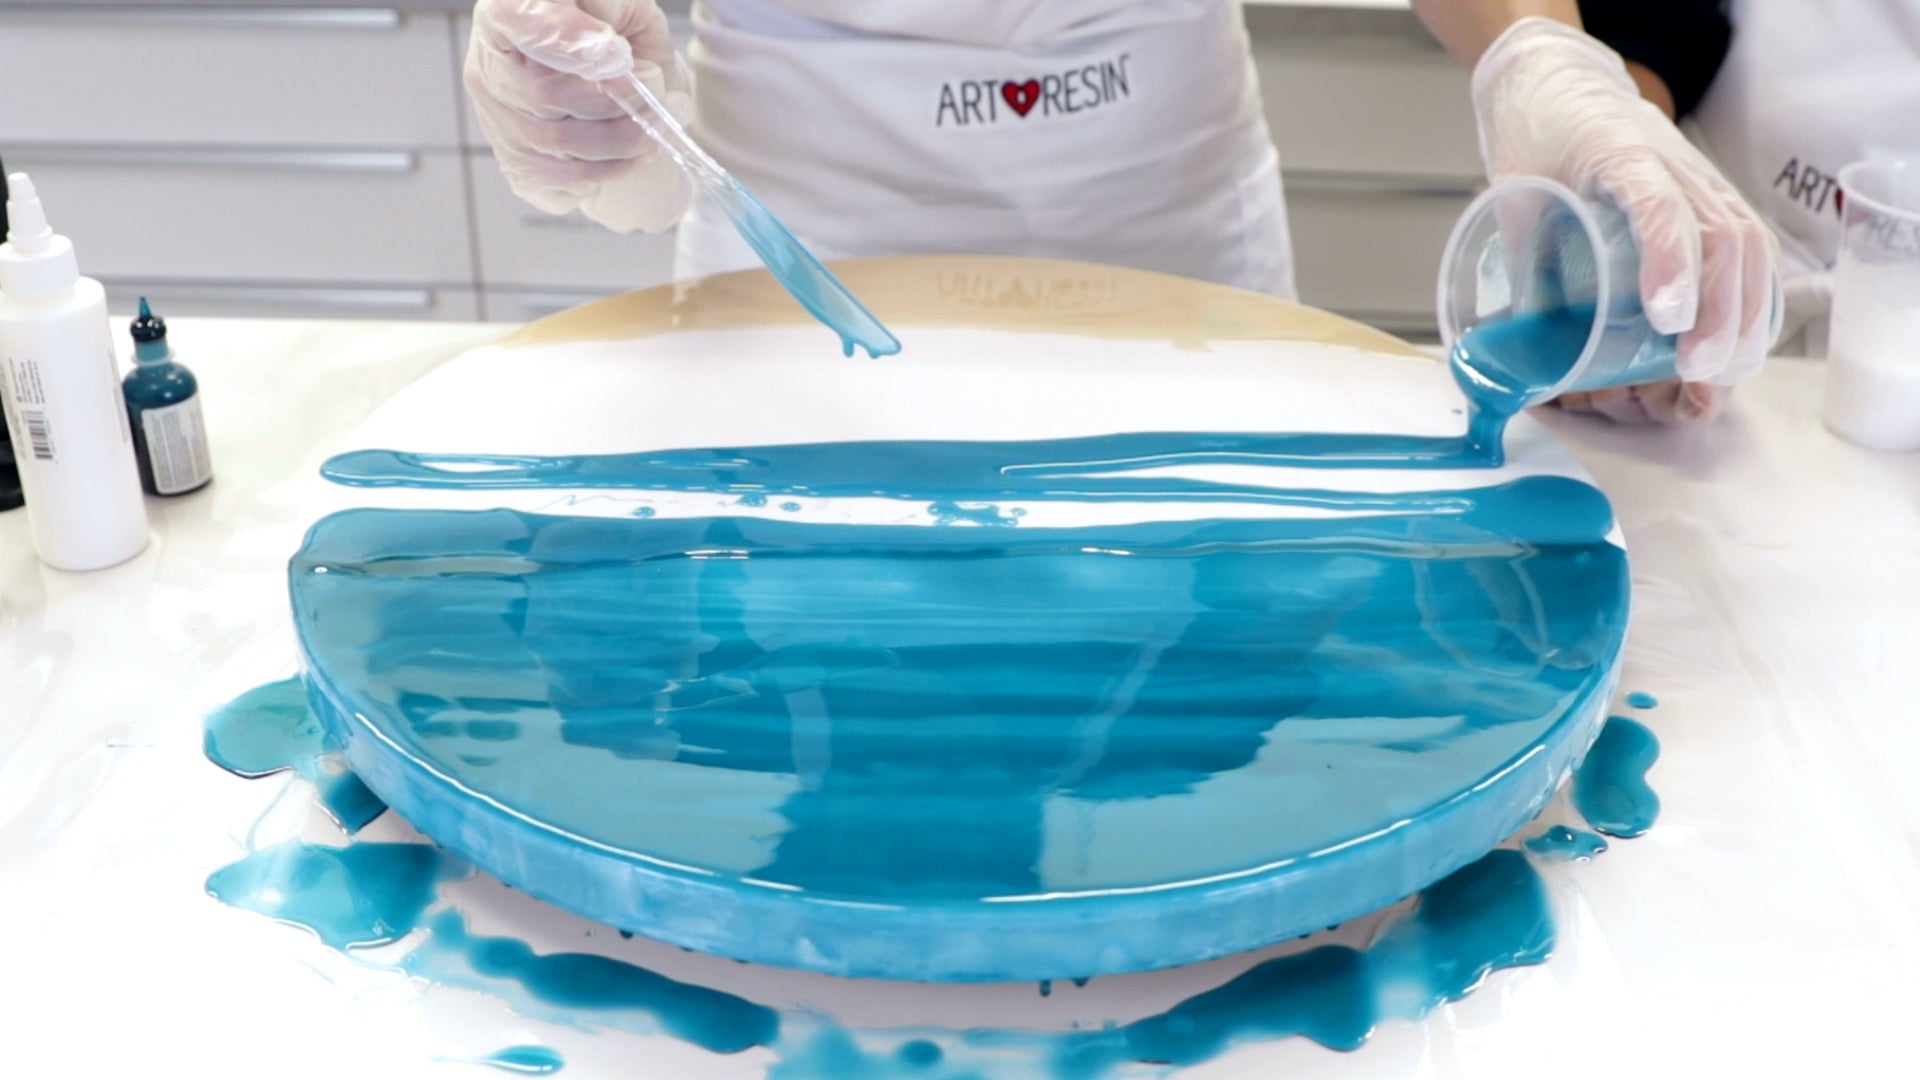
Blend in lines of dark turquoise into the light turquoise to create fluidity, depth and a natural, color gradient. 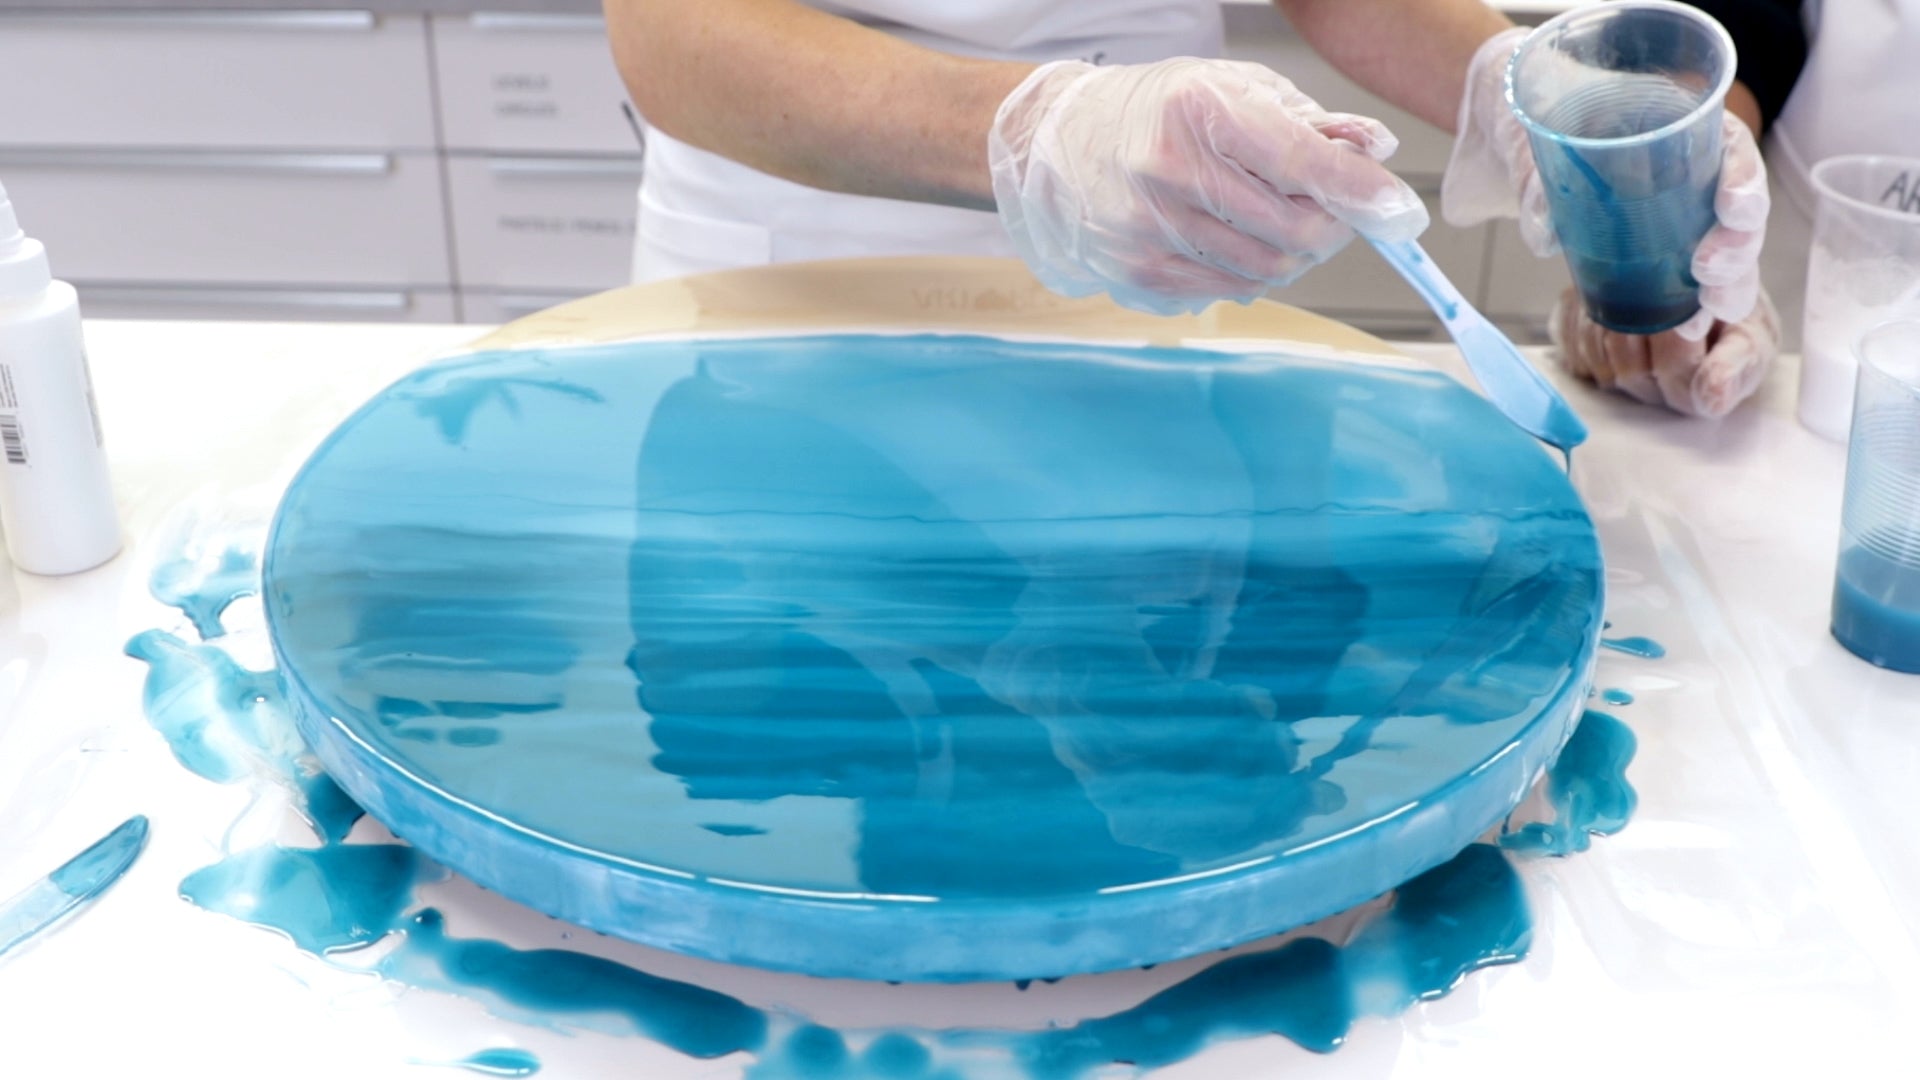
5. Create Your Waves:
This is where the magic happens!
Lightly drop a thin line of white resin into the gap between the beach and ocean: this will eventually become waves crashing against the shoreline. Start with a thin strip - you can always add more. 
Add a second ( or third ) line of white anywhere else you see fit in your ocean.
6. Make Your Waves Crash:
Now we're ready for the fun part ... using a hair dryer to push the white resin, creating lacing and cells that look just like the crests of waves crashing against the shoreline.
Start on the hairdryer's low setting for complete control over the motion and spread of your wave. Aim the hairdryer where you want to start, in the white strip between the ocean and the sand. Move the hairdryer back and forth, staying close to the white and pushing it in and out to spread it over the blue resin.
💡TIP: Allowing the resin to sit and thicken a bit before pouring means it can better hold its shape and it won't disappear into the blue resin.
Move on to the second wave: start at the lowest setting, but since you have a lot of blue space around it, you can adjust the hairdryer to a higher setting for a little more spread. If your wave spreads too thin and disappears, you can add a little more white and try again.
Use a toothpick to drag through the white seafoam, exaggerating and elongating the wave.
7. Torch, Cover And Wait:
Torch the resin to remove any remaining bubbles. Cover it with a dust cover, like a plastic tote or a cardboard box, and allow it to cure.


And voilà ... your own beautiful, one of a kind, lifelike aerial beach scene! 
On A Square Panel:
If you're using a square panel to create your beach scene, the technique is very much the same. Remember to tape off the edges of your piece with painter's tape if your panel has a lipped edge - the tape will prevent resin splashes on the edges.
Apply the sand tinted resin in a small arc shape in a corner of your square panel: this will become your beach and you'll follow this curved line when creating your ocean and waves.

Apply the dark turquoise in the opposite corner of the square panel, echoing the same arc shape as the sand.

Pour the light turquoise to fill in the remaining white space, leaving a gap along the shoreline.
Blend in lines of dark turquoise or pull some of the dark turquoise into the light turquoise using your spreading tool. Blend well, on the same arc line as the beach, for a seamless and natural looking color gradient.
To create your waves, drop a thin line of white resin in the gap between the beach and ocean: this will eventually become waves crashing against the shoreline. Start with a thin strip - you can always add more.

Add a second ( or third ) line of white as you wish.
Using the hairdryer, push the white resin layer back and forth creating a lacing effect to mimic sea foam. Because a square panel presents a more confined space, ensure the hairdryer is kept at the lowest setting to prevent the resin from splashing.

Torch the bubbles from your piece, cover and wait. The next day, once the resin has dried to the touch, remove the tape.

Once you've mastered this technique, you can even expand on this method by adding embellishments such as shells, rocks, and sand: whether you're a brand new resin artist or a seasoned professional, creating your own one of a kind, realistic ocean art is a fun and easy project, with gorgeous results.
Have you created your own ocean beach resin art?
We'd love to hear - let us know in the comments below!
Artist Rebecca Brianceau art was inspired by a journey she took to Brazil where she joined local marine biologists in picking up garbage samples along the shoreline. Rebecca was so impacted by this damaging effect of human behaviour, she felt compelled to spread the message of loving and preserving our earth's precious water resources through her Ocean Soul Series.
To see more of Rebecca's artwork and learn about her :
follow her on Instagram: @rebeccabrianceauart
visit her website: www.oceansoulseries.com
ArtResin: Made For Artists, By Artists