
Have you ever wondered how to paint with alcohol ink? With the right tools and techniques, painting with alcohol ink is fun and easy with stunning results, even for beginners. Alcohol ink's deep, saturated color can be diluted with isopropyl alcohol to increase the transparency. This flexibility means you can create alcohol ink paintings that are soft and ethereal or bright and intensely colorful. Artist Jessica McGaw dropped by ArtResin to demonstrate two different painting techniques using alcohol ink and yupo paper, a smooth, non-porous paper:
1) using a blow tool to create a soft, blended, fluid art painting
2) using various techniques to apply alcohol ink on yupo to create a colorful, abstract collage
Jessica goes over all of the tools you'll need to create a painting and a collage and shares valuable tips from her many years' experience working with alcohol ink and yupo.
Let's get started!
Alcohol Ink Fluid Art Painting

What You Need:
• ArtResin® Alcohol Ink in blue, purple, green and yellow
• yupo paper
• 5 x needle dropper bottles
• 99% isopropyl alcohol
• alcohol ink blending solution (also known as extender)
• handheld alcohol ink air blower
• cotton pads, to soak up extra ink or alcohol
• paint palette, for blending colors or to clean off a paintbrush
• gold leaf & gilding paste
• small, fine tipped paint brush
• soft brush for applying gold leaf
• wide brush for sweeping off excess gold leaf
• microfiber cloth cleaning up gold leaf remnants
• utility knife
• wood panel smaller than your yupo paper
• ArtResin epoxy resin
• a pair of nitrile gloves, a stir stick and spreader
• a measuring cup with easy to read measurement lines
• a handheld torch like our Artist's Torch
• toothpicks
• a clean, empty plastic tote to protect your piece while it dries
Discover our resin art tools & accessories!


1. Fill Your Needle Dropper Bottles

You'll need 3 main colors and 1 accent color for this piece: Jessica chose alcohol ink in blue, purple, and green, and accented her piece with yellow that she had dulled down with a little black. The fine tip on these needle bottles drop only a small amount of ink at a time, giving you far more control over your painting and allowing you to react a little quicker. You'll need one bottle per color, one bottle for the isopropyl alcohol and one for the blending solution.
💡TIP: Choose 3-4 main colors that you know work well together to help achieve soft blends. Some colors can get muddy once combined so do a little experimenting first.
What's the difference between isopropyl alcohol and blending solution?
Both isopropyl alcohol and blending solution will blend colors, increase transparency and revive dried ink, but there are a couple of key differences:
Isopropyl alcohol increases the fluidity and pushes the alcohol ink so it spreads. It has a short dry time so you need to work quickly and use your blow tool to control the flow of the ink.
Blending solution is stickier than isopropyl alcohol so will blend the colors without causing them to spread. It doesn't dry as quickly so won't create hard lines between colors which can sometimes happen with isopropyl alcohol.
2. Start Your Design
Work on a piece of yupo paper that’s bigger than your panel so you have a choice as to what part of the composition you mount. Start with a dot of blue on the page, keeping the dot small and controlled to prevent the ink from spreading.
💡TIP: Alcohol ink dries fast so it's best to work quickly.

Next, add a few small drops of isopropyl alcohol in and around the dot to push the ink and guide the colors.
💡TIP: If the ink or alcohol is flowing too fast from the needle point bottle, fill it up. This will reduce the amount of air in the bottle and slow down the flow.

Add another drop of green next to the first, keeping the colors separate at first so they don't blend together too much. Dot more isopropyl alcohol around the drop of green. As you add isopropyl alcohol, the ink gets more diluted which encourages the two colors to blend. 
Use your hand blower to blend the colors out. If you feel there is too much ink pooling, use a cotton pad to pull out some of the excess ink.
Next, add a drop of purple, followed by several small dots of isopropyl alcohol and the hand blower to build your design. The isopropyl alcohol will help the blow tool do its job. If the ink is wet when you add the isopropyl alcohol, it will blend softly. If it's dry, it won't blend as well and this is when you can end up with jagged edges.
💡TIP: Some jagged lines can look interesting but too many can be visually distracting. For a wispy, ethereal look, soften jagged lines with isopropyl alcohol to blend them out at any time.


Build your design, working your way up the center of the page. Control the movement by using tiny amounts of alcohol ink and isopropyl alcohol. Be patient and allow the design to develop.
Look for areas that are heavy with ink and dilute them out by adding isopropyl alcohol. When the isopropyl alcohol hits the page, use the blow tool to spread out heavy areas of ink, blending while the ink is wet to prevent heavy lines.

Why use a hand blower instead of a hair dryer?
• Hair dryers are often used with alcohol ink, but they can dry out the ink very quickly, creating hard lines. A blow tool pushes the color without drying the ink out to achieve a soft, blended look between colors. If you don’t dry your ink as fast, it has more time to settle into the page and blend out nicely for a flowy effect.
• The point on the blow tool also allows for fine detail work: blowing little gusts of air around the circle of ink prevents it from spreading too far, whereas blowing in the middle of the dot pushes the color out.

3. Build Out Your Design
Once your core design is established, begin building the pattern out to the rest of the page. Add more color, using isopropyl alcohol and the blow tool to blend it out while the ink is still wet, repeating this process to create new and different colors on the page.
Keep the colors balanced: if you have too much of one color in an area, add some of the other colors to help balance it out. Turn the page and look at it from a different perspective to help you decide where you need to build the pattern, soften concentrated areas, fade out color etc.

Tips for working with alcohol ink:
• Alcohol ink dries fast so work quickly
• Keep color drops separate and blend using isopropyl alcohol and the blow tool.
• Blend while the inks are wet to achieve a soft look and avoid hard lines between colors. If hard lines do occur, add a few drops of isopropyl alcohol or blending solution to soften them out.
• The isopropyl alcohol dictates what the ink is going to do: dropping it in the center of the drop will push the ink away. Dropping it around the edges will dilute the ink and create a faded, blended look.
• Focus on small areas at a time, trying not to place too much isopropyl alcohol down at once. If you have excess alcohol or ink, use a cotton pad to pick it up.
"Alcohol inks dry quickly so in some senses you have to make quick decisions. They may not always feel like the right decision at the time but if you keep going with a piece, you can get it to a place where you’ll be happy with it in the end. Some of the pieces that I’ve made where I've thought they weren’t going to turn out, [I found that] if I just stick with them and keep blending and trying my techniques, it helps them turn out.” - Jessica McGaw

4. Add details
Once you're happy with the composition, add fine detail work to create areas of interest. This gives you an opportunity to change areas you're not 100% happy with. Stay away from areas that you really like so you don’t accidentally change anything.
Create faded edges to soften harsh lines and fan the colors out. Dot plain isopropyl alcohol onto the page, connecting it up to the edges of the ink color and using the blow tool to gently push it outward. The more isopropyl alcohol you dot around the page, the more it will blend. You can also use a gloved finger to help spread it out to ensure it’s nice and faded. A cotton pad soaks up excess alcohol, helps to soften up the edges and helps it dry.
Create a wash by diluting blue ink with isopropyl alcohol so the color is barely there. Wipe it onto a cotton pad, adding the slightest bit of color onto the page to break up the white and give your piece a softer, organic look. Add more dots of isopropyl alcohol around the wash to create a light veining effect, using a cotton pad to blend out any areas that are too harsh.

Drop isopropyl alcohol in areas where there isn't much color: the alcohol will pick up the ink to create a bubbly texture and a wispy fade. 
Dot isopropyl alcohol throughout the piece to create visual interest and texture within the ink, keeping the dots small and fairly close together.

Fixing Mistakes
• The great thing about alcohol ink is that it’s not permanent, so it's fairly easy to fix mistakes.
• If you don't like a certain area, you can correct it by adding a bit of isopropyl alcohol onto a cotton pad and rub at a line to soften or blend it.
• Remember that learning comes from practice and failure. Each time you create a piece you’re not 100% happy with, you learn something. Practice helps you know what to do next. It’s not hard to learn, you just need to stick with it.
“There are no rules about how you make these pieces. You kind of have to surrender to the inks a little bit. Sometimes they won’t do exactly what you want, but that’s the beauty of it. Follow the ink and use your blow tool to guide you, but part of this whole process is that you’re giving up a bit of control when you’re using alcohol inks. That’s part of the reason I like them so much.” - Jessica McGaw

5. Add Accent Color
An accent color provides a subtle, unexpected pop and creates visual interest. Choose an accent color that's brighter but still complements your main colors. For our piece, we mixed yellow with a slight amount of black to dull it down so it would flow with the blue, green and purple color palette.
Drop the accent color into the palette using a fine brush, dotting it randomly onto the page wherever it feels like it will work. You can also lightly splatter it onto the page, taking care not to load the brush up too much - you want the splatters to be subtle.
For a softer look, drop isopropyl alcohol in the center of the yellow dots to push the color out, following with the blow tool to fade it out. 
6. Seal Your Painting
Wearing a mask, spray Kamar varnish over the entire piece in a light sweeping motion. Allow it to dry according to label instructions.

7. Apply Gold Leaf
A raised gold accent adds texture and visual interest. Slowly squeeze gilding paste in an organic fashion to create thin, raised lines. Less is more - you don’t want to overwhelm your piece with gold.
Allow the paste to dry to a point where it’s clear and tacky - approximately 1-2 hours depending on how thick you’ve applied the paste. You'll know the paste is ready for the gold leaf when it's transparent but feels tacky to the touch: if it’s too soft, the relief paste will squish under the gold leaf. If it's too dry, the gold leaf will not adhere.

Apply the gold leaf sheets over the paste. Be aware, gold leaf is somewhat finicky and will fly everywhere as you apply it.

Use a soft brush to lift off the excess gold leaf. 
Use a microfibre cloth to clean up any remaining bits of gold leaf, then a wide, flat brush to sweep up any remaining bits.

8. Mount Your Painting
The next step is to determine what portion of the artwork you’ll mount onto the wood panel. Lay a piece of bristol board over your painting with a window cut to the same dimension as your wood panel: this will help you visualize a composition you like best. Use a pencil to mark the corner points. Line up the canvas with the pencil marks and cut the composition with a utility knife, cutting slightly wider than the panel.

Apply a layer of gel medium or adhesive evenly to the board. Line up the paper to the panel as best you can. Press to adhere it, ensuring there are no air pockets and the paper is evenly bonded to the panel.
Once adhered, flip it over and trim the excess paper off with a utility knife so that it matches the size of the panel perfectly.

9. Resin Your Art
Wearing gloves, mix up a batch of ArtResin into your mixing cup: measure equal parts of resin and hardener, by volume. Stir for at least 3 minutes, scraping the sides and bottom as you go.


Apply ArtResin evenly to the front of your panel using a plastic spreader, nudging the resin right up to the sides without going over. If you wish, you can apply it to the edges using a foam brush or gloved hands. You'll have about 45 minutes of working time before the resin gets too thick to work with.

Pass a butane torch over the top of the resined surface quickly to remove any bubbles. Looking under a light source, use a toothpick to remove dust or pop stray bubbles. Cover your resin art with a clean dust cover and allow to dry for 24 hours. The next day, admire your work! 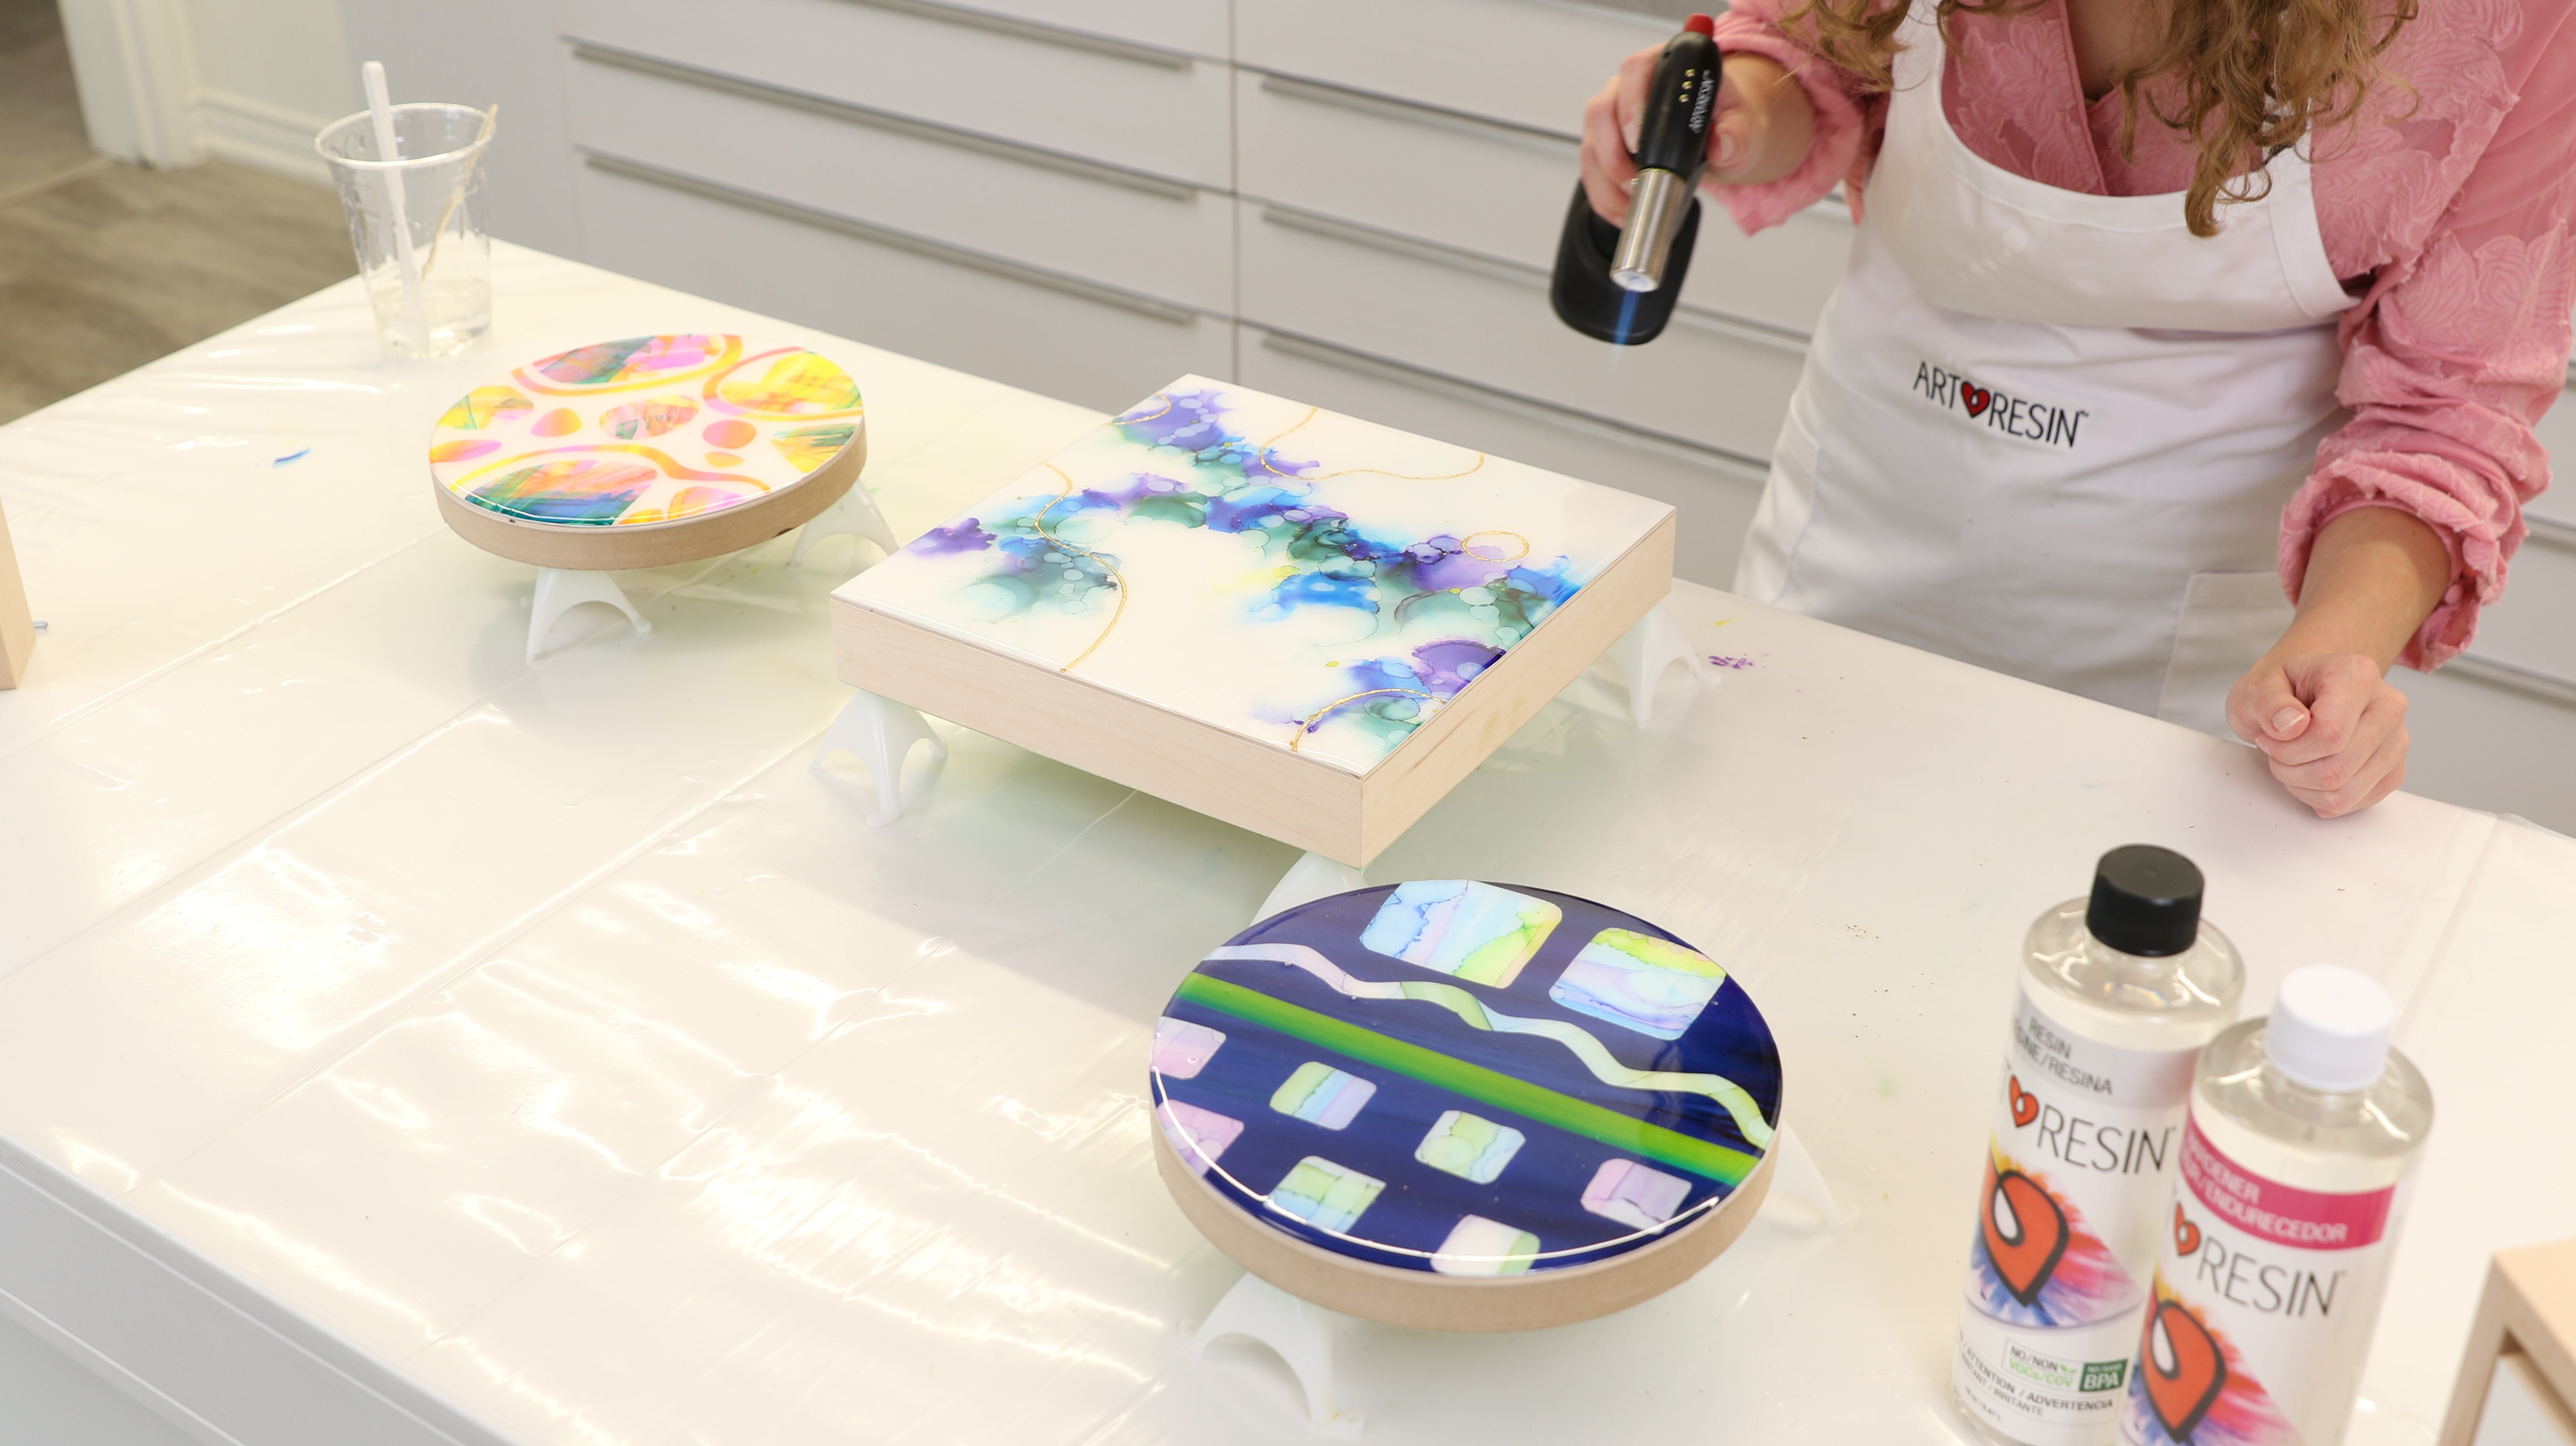

Alcohol Ink Collage
For this project, Jessica builds an abstract collage using cut outs from 4 different techniques for applying alcohol ink to yupo paper:
1) using a palette knife to push the ink around the page
2) using a brush to create some texture
3) using a foam brush to create a gradient
4) using plastic wrap to create a mosaic texture
What You Need:
• ArtResin® Alcohol Ink
• yupo paper
• needle dropper bottles
• 99% isopropyl alcohol
• handheld alcohol ink air blower
• cotton pads, to soak up extra ink or alcohol
• paint palette, for blending colors or to clean off a paintbrush
• palette knife
• small flat paint brush
• foam brush
• plastic kitchen wrap
• scissors
• utility knife
• wood panel smaller than your yupo paper
• ArtResin epoxy resin
• a pair of nitrile gloves, a stir stick and spreader
• a measuring cup with easy to read measurement lines
• a handheld torch like our Artist's Torch
• toothpicks
• a clean, empty plastic tote to protect your piece while it dries
1. Palette Knife Technique

Choose 3 colors that work well together: a good guideline is to choose 2 colors that blend well together, with the third being a contrasting color. For example, use pink, yellow and blue: if the pink and yellow blend, they'll create an orange color. Apply the contrasting color last, just in case it turns any of the colors muddy.
Start with a base of one color, applying a generous amount of ink to the paper. Use a palette knife to drag the ink across the page. This should be a quick, forceful push to disperse the ink and create texture. Don't leave any pools of ink that may spread. Leave some blocks of white for the remaining two colors.
Repeat the same process with the second and third colors, using less ink each time - the contrasting color should be minimal in case it creates any muddiness. It may look really busy but that's ok - you'll be cutting it up and focusing on small areas so don't worry too much if you don't love the color or composition.
2. Paintbrush Technique

Choose 3 colors maximum to keep it simple, keeping in mind that 2 complimentary colors and 1 contrasting color works best. Add a few drops to a palette, diluting them with some isopropyl alcohol to make them easier to spread.
Load the first color of alcohol ink onto a flat brush and paint in lines across the yupo. Add some isopropyl alcohol to blend it and create some texture.
Clean your brush and repeat with the second color. Adding a line of isopropyl alcohol will push the ink upward into the color above to create blended lines.
Clean your brush again and apply thin lines and dots of the third color throughout as an accent.
Add isopropyl alcohol to soften out harsh lines and to create visual interest. Add lines or dots of isopropyl alcohol - be generous with it because your goal is to cover the page with texture.
3. Foam Brush Gradient


Choose colors that blend well together to avoid any muddiness: we used 2 colors but you can use more if you wish.
Load the ink colors directly onto a foam brush, saturating it. Drop a small amount of isopropyl alcohol into the sponge brush to help the ink move smoothly across the page. The more isopropyl alcohol you add, the more diluted the ink color will be.
Glide the brush across the page in stripes, applying a little bit of pressure. If you end up with concentrated ink on the side of the page, lift it up to prevent it from pooling.
4. Plastic Wrap Technique


Choose two colors that blend well together: we used blue and yellow and blue and purple.
Apply them in random lines on the page using a foam brush loaded up with ink and isopropyl alcohol or with a flat paintbrush to keep the colors separate. The ink should be fairly saturated so that the page is slightly wet.
Lay a piece of plastic wrap on top of the ink, crinkling it slightly. The wrap will cling to the ink. You can pick the wrap up and reposition it, but make sure it is contact with the entire page.
Once fully dry, remove the plastic wrap and reveal the cool mosaic effect!
Creating The Collage
Create your collage on a piece of yupo paper: use white or one that you’ve already washed with color. Trace the wood panel out onto the yupo (slightly larger than the panel itself) and cut it out.
Cut out shapes to create a design that you like: organic shapes or geometric shapes, repeat a pattern of similar sized shapes or vary the sizes. As you cut, look for visually interesting parts of your alcohol ink work and start to plan out your design. Remember, if something isn't working out, it's easy to swap it out.


Use gel medium to affix your design onto the yupo once you're happy with how it looks. Gel medium is like school glue but doesn't yellow. Try not to get gel medium on the ink side of your yupo paper or the ink may run.
Apply a thin, even coat of gel medium over the entire panel. Mount your collage, applying some pressure to ensure a good bond and to remove any air pockets.
Once mounted, flip it over and use a utility knife to trim off the excess paper.
Seal with a light, even coat of Kamar varnish and allow to dry according to the label directions.

Wearing gloves, mix up a batch of ArtResin into your mixing cup: measure equal parts of resin and hardener, by volume. Stir for at least 3 minutes, scraping the sides and bottom as you go.
Apply ArtResin evenly to the front of your panel using a plastic spreader, nudging the resin right up to the sides without going over. If you wish, you can apply it to the edges using a foam brush or gloved hands. You'll have about 45 minutes of working time before the resin gets too thick to work with.

Pass a butane torch over the top of the resined surface quickly to remove any bubbles. Looking under a light source, use a toothpick to remove dust or pop stray bubbles. Cover your resin art with a clean dust cover and allow to dry for 24 hours.
The next day, admire your work! The resin coat not only makes the color pop, but it brings out some of the finer details in the alcohol ink work. ArtResin also provides a level of UV protection which helps as alcohol ink is prone to susceptible to fading in bright conditions.

We hope you enjoyed learning all the tips and techniques for applying alcohol ink to yupo paper, and that you're inspired to create a painting or a collage of your own!
For more information on creating resin art, please see our friend Jane Monteith's book The Ultimate Fluid Pouring & Painting Project Book, available on Amazon.com and Amazon.ca.
Please leave any questions in the comments below. Let us know which technique you liked best!
Check out our blog on How to Resin An Aluminum Print.
ArtResin: Made For Artists, By Artists.
