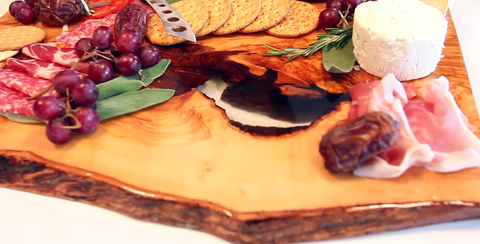
Wood, and in particular, live edge wood, looks absolutely spectacular covered in gorgeous, glossy epoxy resin. From trays to tables to clocks, ArtResin and wood are a match made in heaven!
Live edge wood - the name pretty much says it all, right?
A slab of wood in its natural state, with the raw line of the tree trunk left intact along its edge.
But ... live edge wood is so much more!
It represents a much more holistic approach: an approach in which those parts of the tree's history once viewed as flaws (such as holes, knots, burls, curves) are instead honoured for their unique beauty.

Live edge wood has captured the attention of ArtResin artists for good reason:
- epoxy resin makes wood positively glow, highlighting the colour and natural beauty of the grain
- resin gives wood a slick, smooth, shiny finish, all while protecting and preserving it like nothing else can. It's the perfect bridge between rustic and modern!
- a piece of live edge wood is like a piece of organic artwork, proving yet again that Mother Nature is the best artist :) And ArtResin's super glossy, crystal clear formula transforms wood into functional one-of-a-kind works of art and great conversation pieces!
As always, Rebecca shares a ton of helpful tips and insight along the way :)
And in our new series, How To Resin A Live Edge Wood Board, Joanne takes us step by step on how to resin a live edge wood charcuterie board!
1. First Joanne explains how and why sealing is best practice to achieve a beautiful ArtResin finish!
But before we seal, Joanne tapes off the bottom edges of the tray to help deal with potential drips, rubs in another very thin coat of ArtResin and then is ready to start layering inside the hole.
2. Next, Joanne has to mask off the hole on the bottom so that the resin has a base to stick to. Since ArtResin doesn't adhere permanently to plastic, a piece of acetate cut to the shape of the hole and taped to the bottom is the perfect solution!
The resin will stick to the acetate, but it can easily be peeled off once the resin has dried.
3. Now, the fun begins ... our first layer of ArtResin! You may be wondering ...
"Why do you need to pour layers instead of filling the hole in one pour?"
Good question!
It's because ArtResin was formulated to be poured in thin applications - this allows space for bubbles to escape to the top so they can be torched out.
And especially when working with an organic object like wood that releases a lot of trapped air, it's a good idea to err on the side of caution and work in multiple, thin layers, torching after each one - as many layers as you like until you get to the height you desire.
It's much safer to go slow and steady. After all, we don't want a stray bubble ruining all our hard work.
4. We've almost finished transforming our piece of live edge wood into a gorgeous, charcuterie board! We've sealed, we've sanded, we've built up layers to fill and cover the natural hole in the wood and today we are ready for the final sand and final coat of ArtResin!
5. Dave pulls off all the tape and the sheet of acetate that was serving as the base of the hole - you'll see how cleanly and beautifully it pulls away from the ArtResin and why it was the perfect choice.
6. Next, he wants to make sure the both the top and bottom surfaces of our wood tray are perfectly smooth and perfectly level, so he pulls out our new belt sander one more time.
7. Once it's sanded, Joanne wipes it down ... this step is super important. The last thing you want are bits of dust and debris stuck in your final cure. She tapes off the bottom to catch drips and pours on the final top coat, making sure to wipe down the sides with gloved fingers as she goes.
8. The next day once the resin is dry to the touch, she pulls the tape off, along with all the drips!
💡 TIP: Keep a utility knife close by in case there are any stubborn bits of tape that need a little help to remove.
9. Our next step is to flip the tray over and rub in a thin coat of ArtResin with gloved hands on the underside of our tray. The bottom of the tray doesn't need a full coat and rubbing it in with a gloved hand allows you to apply a very small amount ...
Which means no drips ...
Which means no taping required! :)
And there you have it!
Many steps, many sands, many layers of ArtResin but it's all worth it in the end as our finished tray is absolutely gorgeous!! Not only is it beautiful but it's functional as well, making a stunning one-of-a-kind tray that will take pride of place in your kitchen!
All we need now is a party!!
Thanks for watching!
Let us know if you have plans to ArtResin a wood tray of your own - we would love to see your process!!
If you're a beginner and inspired by our Live Edge Wood Project, get started with our blog How to ArtResin.
