We're so glad you asked! The answer is YES you can, and artist Josie Lewis is here to show us how!
We totally understand that sometimes you might need a thicker layer if for instance, you're pouring into a mold, or if you're embedding objects into your resin, or maybe you just like the look of a thick coat!
You can do all of that with ArtResin, but for the best results you're going to need to follow a couple of steps.
It's important to note that because ArtResin was formulated to be a surface coating, it naturally self-levels to about 1/8". This thickness also allows bubbles to rise to the top so you can easily torch them out.
To get really thick coverage, you'll need to layer ArtResin in multiple coats.
You can layer multiple coats as high as you'd like, just as long as you pour in 1/8" increments.
Remember: don't pour ArtResin any thicker than 1/8" at a time, or the bubbles won't all be able to escape.
Meet our good friend, artist Josie Lewis:

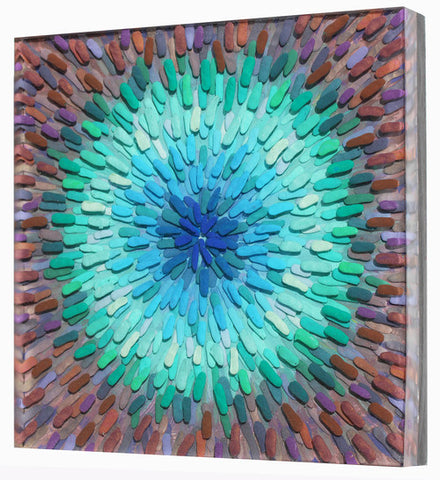
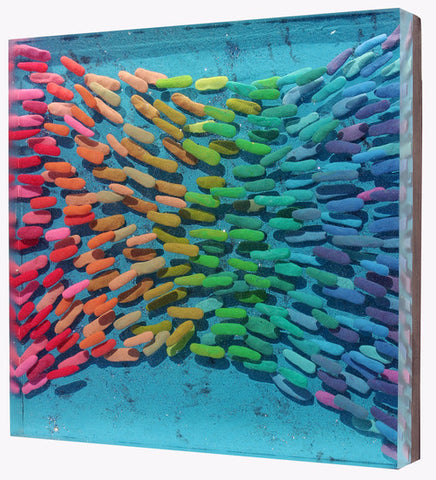
Josie has mastered this layering technique to create what she calls the resin slab:
thick, multi-layered resin coats. Taking it one step further, she embeds paper clippings or Plasticine in between the layers to make collages with a super cool 3D effect!
Check out some of Josie's gorgeous work!

Take a look at this video for an up-close look at one of her pieces .... check out the incredible detail in her collage work and just how thick she got that ArtResin coat!!
So impressive!!
I'll bet you wanna know how she did it?!
Well, guess what?
Josie was kind enough to create a video to show step-by-step just how she makes her thick, multilayered resin slabs!
Take a peek.
As you see in Josie's video, you have to create a barrier or dam along the edges of your piece, creating a reservoir in which to pour your resin layers. Tape works beautifully for this, especially a thick, wide, strong tape like the aluminum tape Josie uses in her video.
TIP: You can find aluminum tape in the ventilation section of any big hardware store.
Once you've applied the tape to each side of your artwork, you're ready to resin!
Remember: use an equal, one-to-one, carefully measured amount of resin and hardener and mix for at least 3 minutes, ensuring you scrape the bottom and sides of your mixing vessel :)
Pour the resin into your dammed in area, no thicker than 1/8" at a time to allow bubbles to escape. Torch out bubbles with a heat torch - Josie uses a propane torch very similar to this one here.
Now, cover and wait.
Okay. So you have a couple of choices at this point.
1)
- let this layer of resin set up to the jelly like stage (usually after about 3-5 hours)
- then go ahead and pour another 1/8" layer on top ( adding more artwork if you like before you pour. )
- torch out bubbles
- cover and wait 3-5 hrs
- repeat as many times as you like until you reach the height you desire
OR
2)
- wait 24 to 48 hrs until the layer has dried
- lightly sand the surface down ( to create a bit of tooth for your next layer to adhere to )
- wipe up all sanding debris, add more artwork, and then pour on your next 1/8" layer.
- torch out bubbles
- cover and let this layer dry
- repeat these steps as many times as you'd like
TIP: Keep in mind that ArtResin's recommendation of a full 72hr cure time is based on a 1/8" layer. The thicker your layers are, the longer the cure time will be. It could take up to a week for a full cure, depending on how thick the final coat is.
When the resin has fully cured, use a table saw to tidy the edges (cutting through the tape, thick resin, artwork and wooden panel). If you like, you can bevel down any sharp edges with sandpaper .... and for a pro looking finish, you can even polyurethane the raw resin edge and paint the raw wood, just like Josie does!
Thanks so much, Josie!!
Hope Josie's video inspires you to create a resin slab of your own!
Be sure to share your results with us - we'd love to see your work!
Check out more of Josie's art at:
www.josielewis.com
Follow Josie on social media:
Instagram: @josielewisart
Facebook: @JosieLewisArt
Do you want to learn more about the mixing & pouring process of epoxy resin? Read our guides below:
How To Measure Epoxy Resin & Hardener?
How Do I Know When Resin If Fully Mixed?
How Thick Can I Pour ArtResin?
How Much Epoxy Resin Do I Need?
Should I Warm Epoxy Resin Before Mixing It?
