Inspired by rock formations found in nature, geode resin art is popular for good reason. Using tinted resin, glitter, crushed glass and real crystals, the possibilities are endless and the results are beautiful.
You can buy crystals and gemstones to create geode art but they're expensive and since each one is unique, you might not always find exactly what you want. Now, thanks to Mold Making Material, when you find a crystal you love, you can duplicate it (and even customize the color) as many times as you wish.
We’re going to show you 2 ways to make your own crystals for geode art:
- how to copy a quartz cluster.
- how to copy several small gemstones or pieces of glass.
Let's get started.
Quartz Crystal Cluster

What You'll Need:
- A quartz crystal cluster
- A plastic container slightly bigger than the crystal
- Mold Making Material
- Hot glue gun (optional)
- ArtResin epoxy resin
- Disposable gloves
- Stir Sticks
- Mixing cup with easy to read measurement lines
- ResinTint Colorants (optional)
Discover our resin art tools & accessories.

1. Prepare The Mold Making Material:
Measure out equal amounts of Mold Making Material and stir it up. Conveniently, Mold Making Material comes in a Part A and Part B that are 2 different colors: white and dark blue. You'll know when the mixture is ready once the color becomes a consistent medium blue hue. 


Mold Making Material is a 2 part silicone product that makes durable, flexible molds that stretch without tearing and can be used over and over again. It's non-toxic, odorless and safe for home use. There are no VOCs, no BPAs, and no fumes.
2. Prepare Crystal & Container
Find a plastic container just slightly bigger than the crystal. The box should provide a snug fit while still leaving about 1/2" of space on each side to create a strong, durable mold that can be used again and again. You can use plastic or plastic lined items such as reusable food containers, yogurt cups or milk containers cut to size. Place the crystal into the container.
💡TIP: Depending on the weight of your crystal, you may or may not need to glue it down to the bottom of your plastic container.

3. Pour Into The Container:
Pour the Mold Making Material into one corner and let it flow over the crystal. Let it sit for 3-4 hours at room temperature. You’ll know it’s ready when it’s no longer tacky to the touch.

To remove the mold, gently pry it from the container until it releases.
Once the mold is released, the crystal needs to be removed. Using a utility knife, carefully cut the mold across the top of the crystal and pry it out.


When you look inside, you can see that all of the details of your crystal have been captured perfectly. Congratulations - your mold is complete and you're ready to make replicas!
Making A Replica
You can use many different substances to fill the mold, such as cement, plaster, polyurethane, soap, clay, polymer clay, play dough and wax, but we recommend ArtResin epoxy resin in combination with our line of ResinTints. Whether you tint it or use it straight out of the bottle, ArtResin gives your crystal replica a glass like finish that’s as shiny as the real thing.
💡 TIP: You can also use Mold Making Material for food safe molds to create personalized shapes out of chocolate, candy, ice, butter and more! Just remember, molds made for use with food should ONLY be used for food. For more information, see our blog Make Your Own Food Safe Silicone Molds.

Just like Mold Making Material, ArtResin is a simple 1:1 ratio of resin and hardener. Measure out equal parts of both solutions and mix thoroughly for 3 minutes. You’ll have approximately 45 minutes of working time with the resin mixture before it will begin to set.


_______________________________________________________________________
One of the great benefits of making your own crystals is that you can customize them to suit your own colour palette using ResinTint, our line of premium liquid colorants. Add a few drops of ResinTint into the ArtResin and mix together until you have one consistent hue. ResinTint is a highly saturated colorant so always start with less than you think you'll need - you can always add more if necessary.
💡TIP: No matter which colorant you use, don't exceed 6% of the total combined volume of resin and hardener, otherwise your resin may not cure properly. For example, if you have 50 ml resin + 50 ml hardener for a total of 100 ml, don't exceed 6 ml of colorant.
_______________________________________________________________________
Pour your clear or tinted resin into the mold and let it sit for at least 24 hours. ArtResin is hard to the touch after 24 hours, but a full, hardened cure will take 72.
Once 24 hours has passed, the resin will be hard to the touch and the crystal casting can be removed from the mold. You can repeat this process many times over - the mold is strong enough to make multiple copies.


We were so happy with the incredible detail we were able to capture with our molds that we decided to create a piece of geode art of our own.

Crushed Glass

What You'll Need:
- Crushed glass pieces or gemstones
- A shallow plastic container
- Mold Making Material
- Hot glue gun
- ArtResin epoxy resin
- Disposable gloves
- Stir Sticks
- Mixing cup with easy to read measurement lines
- ResinTint (optional)
1. Prepare Glass Pieces & The Container
Find a shallow plastic container to fit several glass pieces. The container should be big enough to fit your pieces while still leaving about 1/2" of space on each side to create a strong, durable mold that can be used again and again. You can use plastic or plastic lined items such as reusable food containers, yogurt cups or milk containers cut to size.
Glue down the glass pieces with a hot glue gun: because they are lightweight, they will shift under the weight of the Mold Making Material. 


2. Prepare The Mold Making Material:
Measure out equal amounts of Mold Making Material and stir it up. Conveniently, Mold Making Material comes in a Part A and Part B that are 2 different colors: white and dark blue. You'll know when the mixture is ready once the color becomes a consistent medium blue hue.
Mold Making Material is a 2 part silicone product that makes durable, flexible molds that stretch without tearing and can be used over and over again. It's non-toxic, odorless and safe for home use. There are no VOCs, no BPAs, and no fumes.
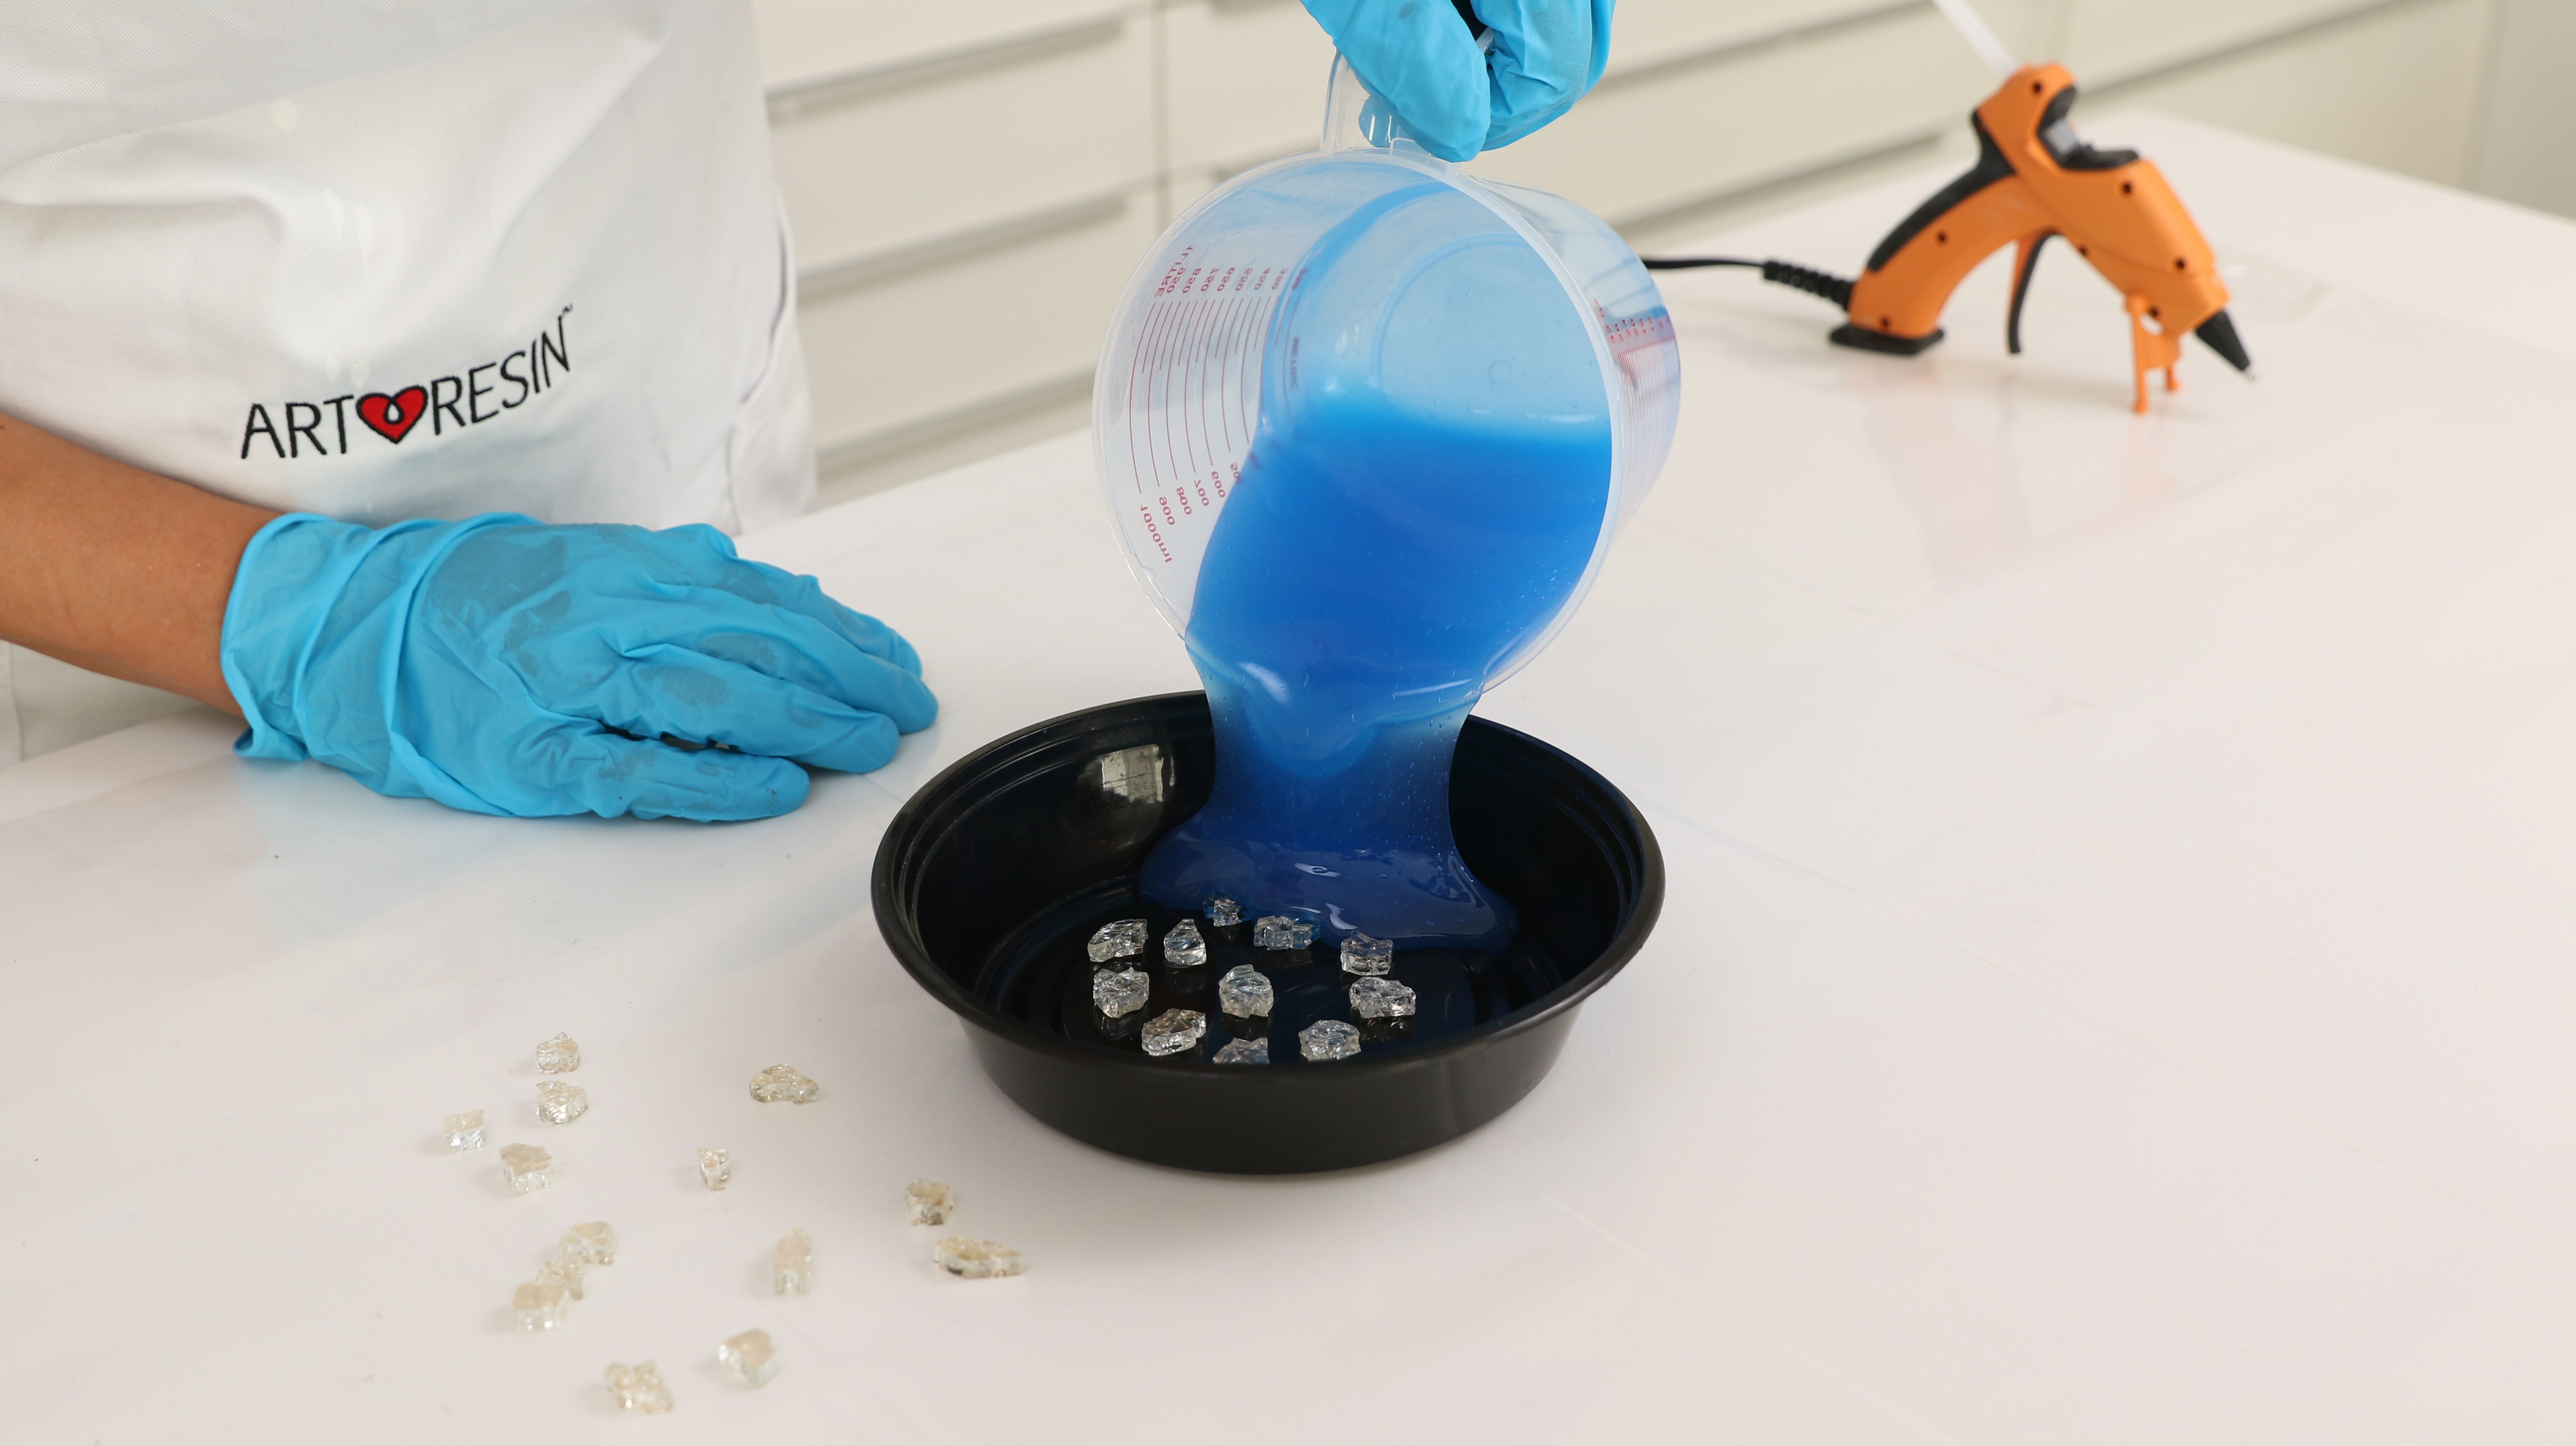
3. Pour Into The Container:
Pour the Mold Making Material into one corner and let it flow over the crushed glass pieces. Let it sit for 3-4 hours at room temperature. You’ll know it’s ready when it’s no longer tacky to the touch.

To remove the mold, gently pry it from the container until it releases.
Once the mold is released, the glass pieces need to be removed. Because the individual glass pieces have flat bottoms, they simply pop right out of the mold. Congratulations - your mold is complete and you're ready to make replicas!

Making A Replica
You can use many different substances to fill the mold, such as cement, plaster, soap, clay, polymer clay, play dough and wax, but we recommend ArtResin epoxy resin in combination with our line of ResinTints.. Whether you tint it or use it straight out of the bottle, ArtResin gives your crystal replica a glass like finish that’s as shiny as the real thing.
💡 TIP: You can also use Mold Making Material to create molds that are food safe for making personalized shapes out of chocolate, candy, ice, butter and more! Just remember, molds made for use with food should ONLY be used for food. For more information, see our blog Make Your Own Food Safe Silicone Molds.
Just like Mold Making Material, ArtResin is a simple 1:1 ratio of resin and hardener. Measure out equal parts of both solutions and mix thoroughly for 3 minutes. You’ll have approximately 45 minutes of working time with the resin mixture before it will begin to set.
Pour your tinted resin into the mold and let it sit for at least 24 hours. ArtResin is hard to the touch after 24 hours, but a full, hardened cure will take 72.
Once 24 hours has passed, the resin will be hard to the touch and the crystal casting can be removed from the mold. You can repeat this process many times over - the mold is strong enough to make multiple copies.


One of the great benefits of making your own crystals is that you can customize them to suit your own colour palette using ResinTint, our line of premium liquid colorants. Add a few drops of ResinTint into the ArtResin and mix together until you have one consistent hue. ResinTint is a highly saturated colorant so always start with less than you think you'll need - you can always add more if necessary.
💡TIP: No matter which colorant you use, don't exceed 6% of the total combined volume of resin and hardener, otherwise your resin may not cure properly. For example, if you have 50 ml resin + 50 ml hardener for a total of 100 ml, don't exceed 6 ml of colorant.


We were so happy with the incredible detail we were able to capture with our molds that we decided to create a piece of geode art of our own.


Who knew cloning could be such fun?!
Well, we did. And that’s why there’s Mold Making Material.
So go ahead. Make a copy.
And then make another, and another, and another, and another…
Do you want to learn more about resin art techniques. See below our how-to tutorials:
- Introduction to Resin Art
- How to Make Ocean Resin Art
- How To Create A Black Resin Ocean With A Gold Crackle Shoreline
- Selective Embellishment
- How to Make Resin Flow Art
- Create Lacing and Cells in Resin
- How to Make Epoxy Resin Matte
- How to Make Mandala Resin Art
- How to Make Resin Art with Dried Flowers
- How to Resin Mixed Media Paintings (Step-by-Step Tutorial)
- How to Resin Collage Art
- How to Resin Marker Pointillism
- How to Resin Spray Paint
- How to Resin A Glossy Photo
